
I’ve had a brake pedal go soft under my foot exactly once, and I still think about it on long downhill drives. It wasn’t a blown line or a bad caliper. It was brake fluid that nobody had bothered to change in years.
That’s the thing about brake fluid. It’s the one part of your braking system you can’t see, can’t hear, and can’t feel — until the day it lets you down. So let’s get into what it actually does, what those DOT numbers mean, and how to bleed your brakes the right way without turning it into a two-hour mess.
Why Brake Fluid Does All the Heavy Lifting
Your brakes run on hydraulics, plain and simple. Press the pedal, and you push a piston inside the master cylinder. That piston shoves fluid through the brake lines to the calipers (or wheel cylinders if you’ve got drum brakes in the back). The fluid can’t be compressed, so that force travels almost instantly and clamps the pads against the rotors.
That’s the whole trick. No compressible fluid, no delay, no surprises.
But brake fluid has two jobs, not one. It has to transfer force without squishing down on itself, and it has to survive serious heat without turning into vapor. I’ve pulled wheels off cars where the rotors were too hot to touch with a bare hand. That heat soaks straight into the fluid sitting in the caliper.
If the fluid can’t handle it, you get a soft pedal right when you need a firm one.
DOT Ratings, Explained Without the Headache
DOT stands for Department of Transportation, and these ratings exist because not all brake fluid handles heat the same way. I keep a chart taped inside my garage cabinet because I still mix these numbers up if I haven’t bled brakes in a while.
Quick Reference Table
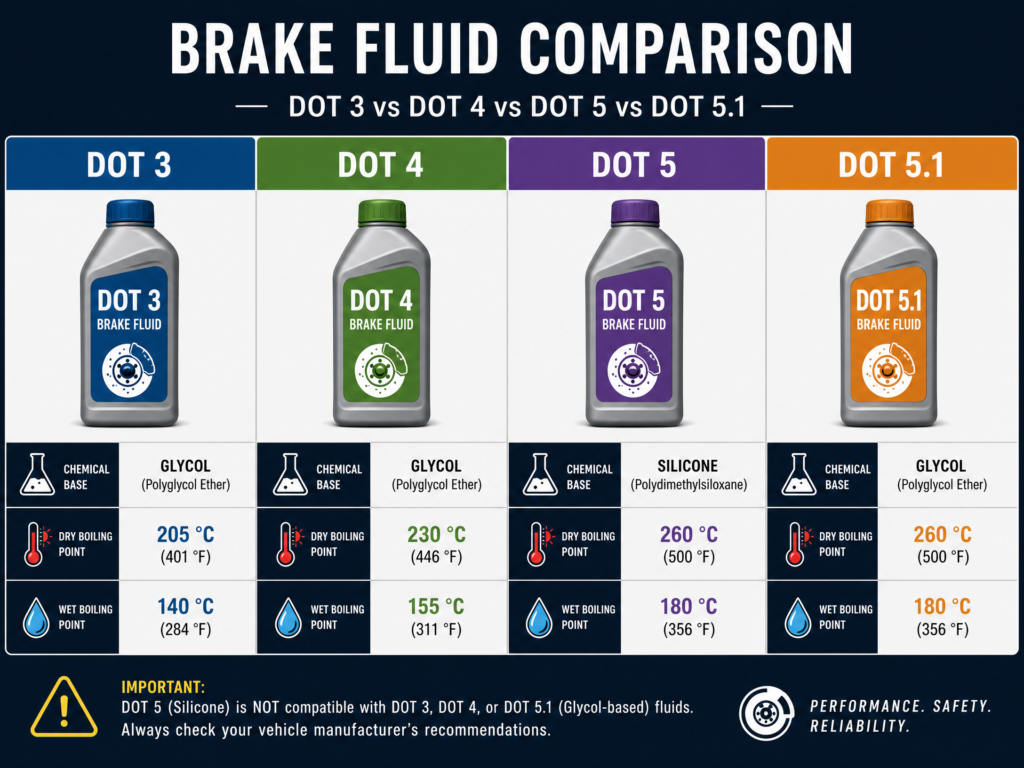
Here’s the breakdown, mechanic to mechanic.
DOT 3: The Old Reliable
DOT 3 is glycol-based and it’s been around forever. You’ll find it in older economy cars and plenty of budget daily drivers.
- Dry boiling point: 401°F (205°C)
- Wet boiling point: 284°F (140°C)
- Best for: Older vehicles, light daily driving, no aggressive braking
That “wet” number matters more than people think. It assumes the fluid already has about 3.7% water in it, which is realistic after a year or two on the road. DOT 3 is fine for grandma’s grocery runs. It’s not fine for towing a trailer down a mountain pass.
DOT 4: What’s Actually In Most Cars Today
DOT 4 is also glycol-based, but it’s got added borate esters that push the boiling point higher. This is the fluid I reach for on most modern cars with ABS, traction control, or stability systems, because those systems generate more heat in the lines.
- Dry boiling point: 446°F (230°C)
- Wet boiling point: 311°F (155°C)
- Best for: Modern daily drivers, European cars, anything with ABS
DOT 4 is backward compatible with DOT 3 in most vehicles. I’ve topped off DOT 3 systems with DOT 4 in a pinch plenty of times. Just check your owner’s manual first — some manufacturers are picky about it.
DOT 5: The One That Doesn’t Play Nice With Others
This is where I see people get into trouble. DOT 5 is silicone-based, not glycol-based, and that’s a completely different chemistry.
- Dry boiling point: 500°F (260°C)
- Wet boiling point: 356°F (180°C)
- Best for: Classic cars, military vehicles, specific restoration builds
DOT 5 is hydrophobic, meaning it doesn’t absorb water like the others do. That sounds like an upgrade, but it’s actually a trade-off. Any moisture that sneaks into the system has nowhere to go, so it pools at low points in the lines and causes localized rust or, in cold weather, ice.
Never mix DOT 5 with DOT 3, DOT 4, or DOT 5.1. The chemistries don’t blend. I’ve seen what happens when someone tops off a glycol system with silicone fluid by mistake — it separates, seals swell or shrink unevenly, and you end up chasing a mushy pedal you can’t explain until you drain the system and see the two fluids sitting in layers like oil and vinegar.
DOT 5.1: The High-Performance Glycol Fluid
DOT 5.1 is the one that confuses people because of the name. It’s NOT related to DOT 5 chemically. It’s glycol-based, just like DOT 3 and DOT 4, so it’s fully compatible with both.
- Dry boiling point: 500°F (260°C)
- Wet boiling point: 356°F (180°C)
- Best for: Performance cars, modern ABS systems, track use
DOT 5.1 also runs a lower viscosity, which helps it move fast through tight ABS lines during hard braking events. If your manufacturer allows it, you can usually upgrade from DOT 3 or DOT 4 to DOT 5.1 without any compatibility issues.
Interactive Tool: DOT Fluid Compatibility Checker
Use this tool to verify if you can safely mix or upgrade your current brake fluid.
⚙️ DOT Fluid Compatibility Checker
Find out which brake fluids can be mixed or upgraded
Step 1: Select Your Current Brake Fluid
Step 2: Select Fluid You Want to Use
Compatibility Result
Select both fluids to see compatibility.
Quick Reference: DOT Fluid Specifications
| DOT Rating | Type | Dry Boiling Point | Wet Boiling Point | Best For |
|---|---|---|---|---|
| DOT 3 | Glycol-ether | 205°C (401°F) | 140°C (284°F) | Older vehicles, economy cars |
| DOT 4 | Glycol-ether | 230°C (446°F) | 155°C (311°F) | Modern vehicles, ABS systems |
| DOT 5 | Silicone-based | 260°C (500°F) | 180°C (356°F) | Classic cars, military vehicles |
| DOT 5.1 | Glycol-ether | 260°C (500°F) | 180°C (356°F) | High-performance, modern ABS |
Why Water Is Brake Fluid’s Worst Enemy
Here’s the part that surprises most people: brake fluid actually pulls moisture out of the air. It’s called being hygroscopic, and it happens slowly through tiny pores in rubber brake lines, through worn seals, and every time you crack open that reservoir cap.
That moisture is bad news because water boils at a much lower temperature than brake fluid. Once you’ve got just 3-4% water content in the system, your fluid’s effective boiling point can drop by 50 degrees or more. I’ve tested fluid with a $20 boiling point tester that read fine on paper but failed miserably once I factored in the water content the test strip showed.
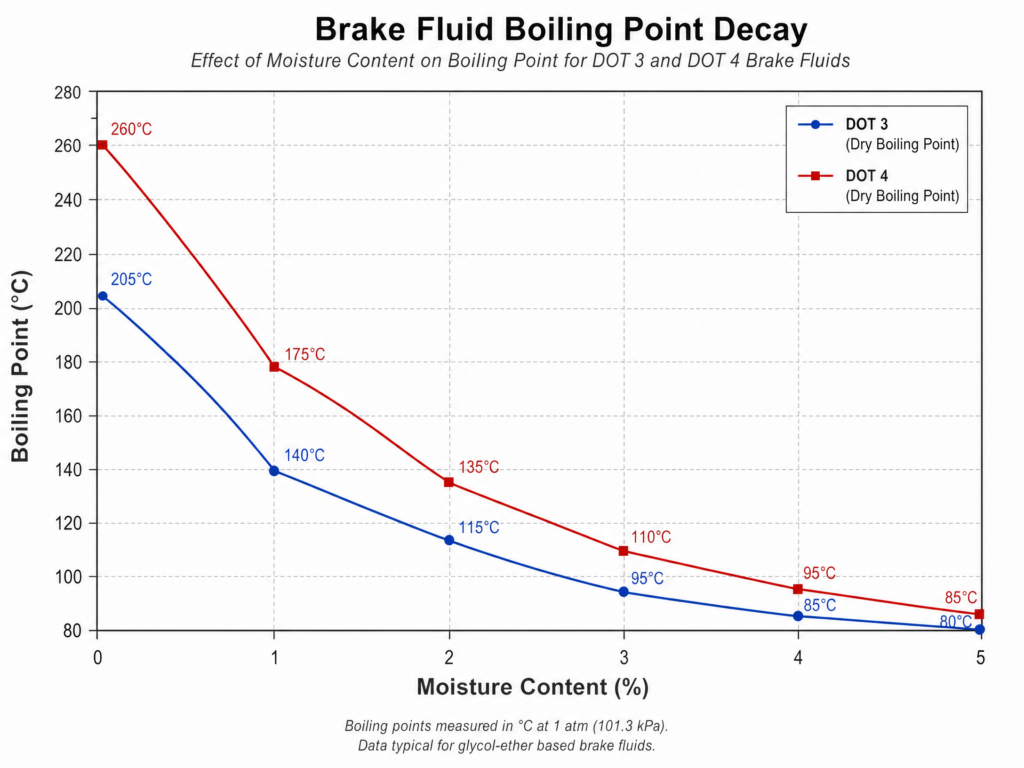
When fluid boils inside the line, it creates vapor bubbles. Vapor compresses easily — unlike fluid, which doesn’t compress at all. Press the pedal, and instead of clamping the pads, you’re just squeezing air. That’s brake fade, and it’s terrifying the first time it happens to you on a real grade.
This is exactly why your owner’s manual tells you to change brake fluid on a schedule, not “whenever it looks dirty.”
Warning Signs Your Brake Fluid Needs Attention
Most cars don’t scream at you when brake fluid goes bad. They whisper. Here’s what to watch for.
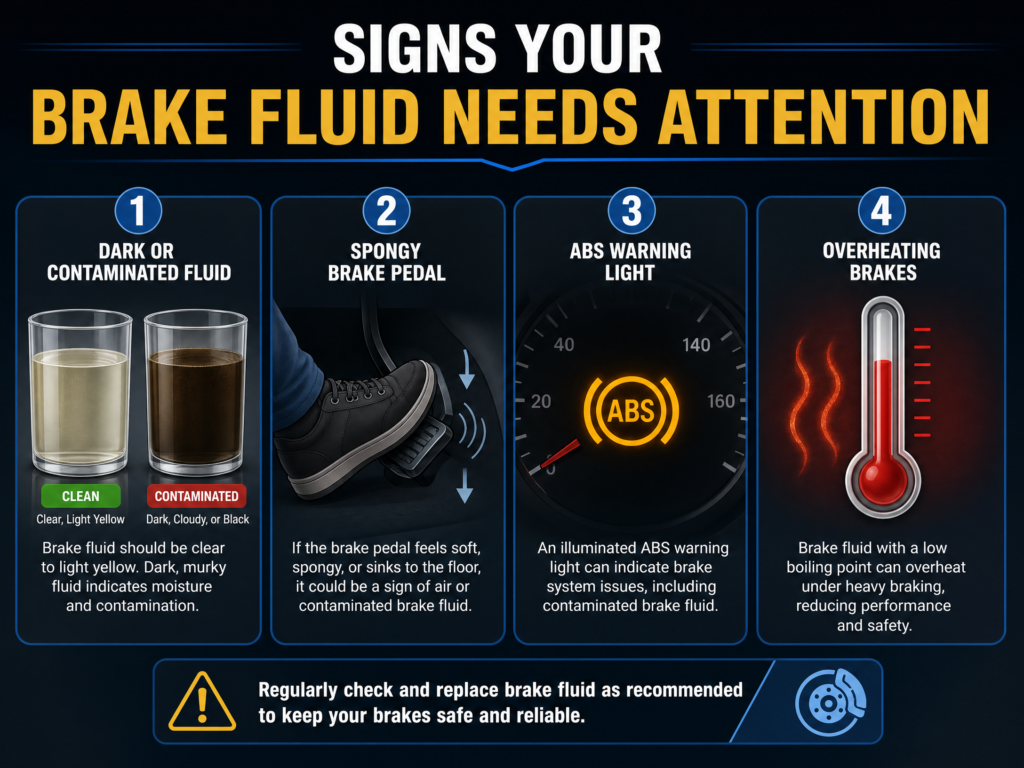
Spongy or soft pedal. If the pedal sinks farther than usual before the car responds, you’ve likely got air or vapor bubbles in the lines. I always tell people: a healthy brake pedal should feel firm about an inch or two down, every single time.
Longer stopping distances. If you’re pressing harder or longer to get the same stop you used to get, contaminated fluid is a real suspect.
Dark or cloudy fluid. Pop the reservoir cap and look. Fresh fluid is clear to light amber. If it’s gone brown or black, that’s moisture and grime doing their work. I check this every oil change — it takes ten seconds.
ABS warning light. Low or contaminated fluid can trip ABS sensors. It’s not always the fluid, but it’s worth ruling out first since it’s the cheapest fix on the list.
Burning smell or grinding noise. Overheated fluid has a distinct burnt smell, sharper than burning oil. Combine that with grinding, and you need to pull a wheel and look immediately.
The Hill That Taught Me to Respect Brake Fluid
I want to tell you about a job early in my career, because it’s the reason I never skip a fluid check anymore.
A customer brought in an older sedan for a routine suspension look-over. Brakes felt completely normal in the parking lot and on slow streets around the shop. I took it out for a proper road test down a long, steep grade nearby, the kind with switchbacks and a 25 mph advisory sign.
Halfway down, the pedal started sinking. Every pump took it lower toward the floor mat. White smoke curled up from both front wheel wells, and the cabin filled with that acrid, burnt smell that doesn’t smell like anything else in a garage. I dropped it into a lower gear and let engine compression do the work to get us down safely.
Back at the shop, we drained the fluid. It was nearly black and tested at over 4% water. All that heat from the descent had boiled the trapped moisture right there in the calipers, and the vapor pockets killed our pedal feel in minutes. A full flush with fresh DOT 4 brought the pedal back rock solid.
That car drove fine for daily errands. It nearly couldn’t stop on one hill. That gap between “feels fine” and “actually fine” is exactly why fluid age matters more than fluid feel.
How Often Should You Flush Your Brake Fluid?
Most manufacturers recommend a brake fluid flush every two years or every 20,000 to 30,000 miles, whichever comes first. I follow that schedule on my own vehicles regardless of how the pedal feels, because moisture absorption doesn’t wait for symptoms.
It’s a cheap job compared to what happens if you skip it. A full flush runs $80-150 at most shops, or under $30 in parts if you do it yourself. Compare that to a caliper rebuild after years of internal corrosion, and the math isn’t close.
How to Bleed Your Brakes Yourself
Bleeding brakes means pushing fresh fluid through the system to push out the old fluid along with any trapped air. It’s one of those jobs that looks intimidating until you’ve done it once, and then it becomes routine.
Tools You’ll Need
- Flare nut wrench in 10mm or 11mm (don’t grab a standard open-end wrench — it’ll round off the soft brass bleeder valve in about two turns)
- Clear vinyl tubing, 1/4-inch diameter, about two feet long
- Catch bottle — any clean plastic bottle works
- Fresh brake fluid — two cans of the exact DOT rating stamped on your reservoir cap
- Shop rags and a can of brake cleaner, just in case
- A helper to sit in the driver’s seat
Paint warning: Brake fluid acts almost exactly like paint stripper. One drop on your fender and left untreated, it’ll eat down to bare metal within minutes. Keep rags handy and rinse any spill immediately with water or brake cleaner.
Step-by-Step Process
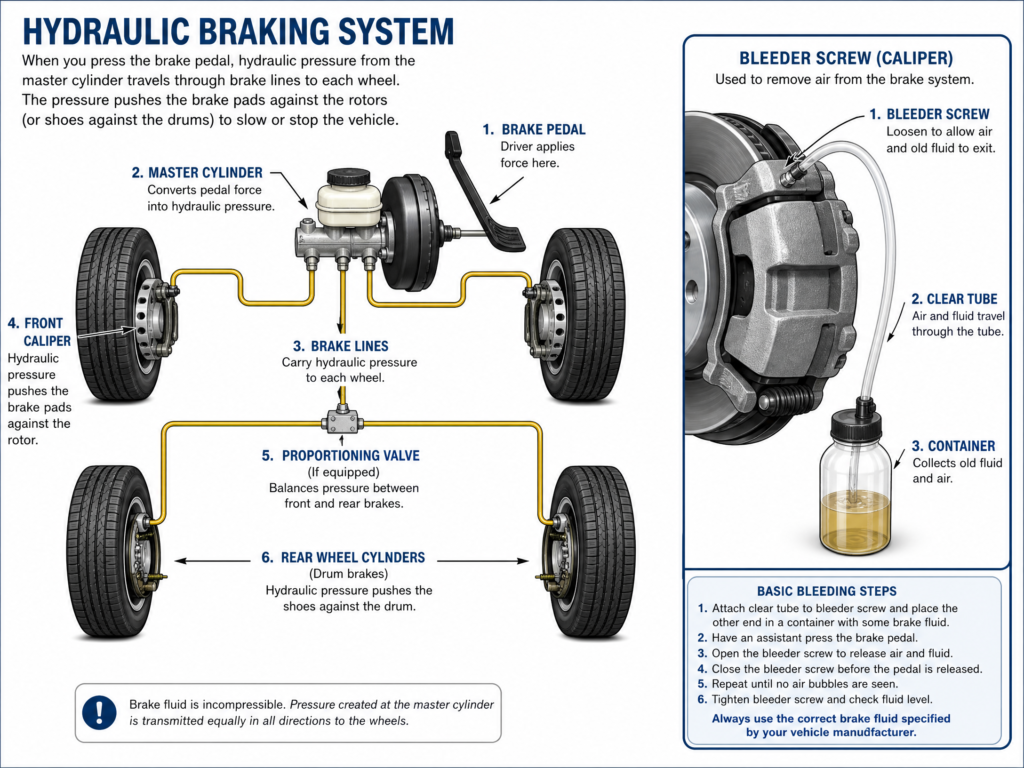
- Clean the reservoir cap before opening it. Wipe off all dirt and grime first. A single speck that falls into the reservoir can travel through the system and chew up your ABS valves, which are not a cheap repair.
- Pull out the old fluid. Use a turkey baster (a dedicated one, not your Thanksgiving one) to suck most of the old fluid from the reservoir, then top it off with fresh fluid to the “Max” line.
- Work the wheels in the correct order. Start with the wheel farthest from the master cylinder and work your way closer. On most vehicles, that’s: passenger rear, driver rear, passenger front, driver front. Check your service manual, since some cars vary.
- Have your helper pump the pedal. Three slow pumps, then hold the pedal down firmly and call out “holding.”
- Crack the bleeder valve. Slip the clear tubing over the bleeder valve, drop the other end into your catch bottle, and open the valve about a quarter turn. You’ll see old fluid and air bubbles shoot through the tube as the pedal sinks toward the floor.
- Close the valve before your helper lifts their foot. This order matters. If the valve is open when the pedal comes back up, it’ll suck air backward into the line and undo your work.
- Repeat 5-6 times per wheel. Keep going until the fluid running through the clear tube looks clean and shows no bubbles. Check the reservoir level after every wheel — if it runs dry, you’ll pull air into the system and have to start that wheel over.
Interactive Tool: Brake Fluid Health Quiz
Not sure if your brakes need attention? Take my quick quiz to find out.
🔧 Brake Fluid Health Quiz
Discover if your braking system is in top condition
Question 1
Common Mistakes I See Most Often
- Skipping the bleed order. Starting at the closest wheel instead of the farthest leaves air trapped further down the line.
- Letting the reservoir run empty. This is the single most common mistake that turns a 30-minute job into an hour-long redo.
- Leaving the bleeder valve loose. Snug it down firmly with the flare wrench, or you’ll draw air back in over the next few days of driving.
If your pedal still feels soft after a full bleed cycle on all four corners, there may be a leak somewhere in the system, or you’ve got a stickier bleeding job that calls for a vacuum bleeder or pressure bleeder. At that point, it’s worth a second opinion from a shop.
Common Brake Fluid Myths, Cleared Up
“Brake fluid lasts forever.” Not even close. Glycol-based fluids pull in moisture continuously, and that moisture lowers the boiling point year after year. Even DOT 5, which resists moisture absorption, can still end up with pooled water causing localized corrosion.
“I’ll just top it off when it’s low.” Topping off covers the symptom, not the cause. A dropping fluid level usually means your pads are wearing down (calipers extend further and use more fluid) or you’ve got an actual leak. Top it off, sure, but figure out why it dropped in the first place.
“All brake fluids mix fine.” DOT 3, DOT 4, and DOT 5.1 are compatible with each other since they share the same glycol base. DOT 5 is the outlier. Mix it with the others and you risk seal damage, fluid separation, and a pedal that fails when you least expect it.
“Bleeding brakes is a pro-only job.” It’s absolutely doable in your own garage with the right tools, a helper, and some patience. That said, if you’re not confident, there’s no shame in having a shop handle it. Air left in the system is not something to gamble on.
“My brakes feel fine, so the fluid must be fine.” This is the myth that got me on that mountain road years ago. Degradation is gradual and invisible until you load the system with real heat — towing, mountain driving, hard repeated stops. By the time you feel a problem, the fluid’s already well past where it should be.
The Bottom Line
Brake fluid doesn’t ask for much. Check it during oil changes, flush it on schedule, and use the exact DOT rating your manufacturer specifies. That’s really it.
I think about that mountain road every time I top off a reservoir now. The car ran perfectly fine for groceries and school runs right up until it didn’t. Don’t wait for your brakes to teach you the same lesson mine taught me.
References
- Lube-Squad. (n.d.). DOT 3 vs DOT 4 vs DOT 5.1 — Mixing, Upgrading, Choosing. https://lube-squad.com/dot-3-vs-dot-4-vs-dot-5-1-mixing-upgrading-and-choosing-the-right-brake-fluid
- Valvoline Global. (n.d.). Vehicle Maintenance: Brake Fluid. https://www.valvolineglobal.com/en-ksa/vehicle-maintenance-brake-fluid/
- AMSOIL Blog. (2019, March 20). DOT 3 and DOT 4 Brake Fluid: What’s the Difference?. https://blog.amsoil.com/dot-3-and-dot-4-brake-fluid-whats-the-difference/
- Brake Parts Inc. (n.d.). Types of Brake Fluid. https://www.brakepartsinc.com/dam/jcr:be5cef80-95e6-496a-8527-726d067dd0f2/Types%20of%20Brake%20Fluid.pdf
- Motive Products. (2023, January 9). Your Guide on When to Bleed Brake Lines. https://www.motiveproducts.com/blogs/news/your-guide-on-when-to-bleed-brake-lines
- CarParts.com. (n.d.). Avoid These Common Mistakes When Bleeding Your Brakes. https://www.carparts.com/blog/avoid-these-common-mistakes-when-bleeding-your-brakes/
Related posts:
 The Science of Car Audio Tuning: Why Your Speakers Sound Off (And How to Fix It)
  Top 10 Performance Upgrades for Your Car: Boost Horsepower and Handling
  The Beginner’s Guide to Checking and Topping Off Brake Fluid Safely
  Why Your Car Cranks But Won’t Start (How to Safely Check Fuel and Spark at Home)
Leave a Reply