
You know that feeling. You’re already running late for work. It’s 6:45 AM, dark as a coal mine, and the thermometer on your porch says 12°F. You bundle into the driver’s seat, turn the key, and hear it: click-click-click-click. That slow, agonizing death rattle from under the hood.
I’ve been there more times than I want to admit. And I fix cars for a living.
Here’s what’s happening inside your engine while you’re shivering. Freezing weather drops a car battery’s cranking power by up to 50%. At the same time, your engine oil thickens up like cold maple syrup. That means your starter is trying to turn over an engine that’s twice as hard to spin, with half the electrical power it had in July.
Over my years wrenching in cold garages, winter preparation is where I see drivers make the most avoidable—and expensive—mistakes. Winter doesn’t just make driving unpleasant. It actively attacks your vehicle’s mechanical weak spots until something gives.
Let’s walk through the real checklist. The one I use on my own cars every October.
Simple Tool to Check Your Winter Preparedness
Think your vehicle is prepared for the snow? Take our 30-Second Winter Readiness Quiz to find your hidden weak spots and get a custom action plan before the temperature drops!
Winter Readiness Scorecard
Assess your vehicle’s preparedness for the cold season
🔋1: Testing Battery Cranking Power (Not Just Looking at It)
Stop looking at your battery terminals for blue fuzz and calling it a day. That’s like checking your pulse by looking in a mirror. It tells you almost nothing about whether the battery will actually start your car on a 5°F morning.
The Science (Quick Version)
A car battery creates electricity through a chemical reaction between lead plates and sulfuric acid. Freezing temperatures slow that reaction down to a crawl. At 0°F, a battery that tested perfectly fine at 80°F loses about half of its cranking amps.
The Mechanic’s Tool Trick
You need a real digital battery load tester. Not a cheap multimeter from the hardware store. I use an entry-level Topdon or Ancel unit—about $40 to $60. Worth every penny compared to a tow truck.
Here’s the test sequence I run on every car that rolls into my garage before December:
- Connect the tester to the terminals. Red to positive, black to negative. (Double-check. Reverse polarity kills testers.)
- Read the static voltage with the car completely off. Engine cold, doors closed, lights off.
- Crank the engine while watching the voltage drop.
The Magic Numbers
- 12.6 volts or higher when the car is off = healthy resting battery
- 12.4 volts = about 75% charged. Borderline. Start watching it.
- Below 9.6 volts while actively cranking = failing battery. Replace it now.
I had a customer last December swear her battery was “basically new.” It was reading 11.8 volts static and dropped to 7.2 during crank. She’d been driving on borrowed time for three months.
Actionable Step
Clean your terminals anyway. Even if the numbers look good.
Grab a metal wire battery brush (about $5 at any auto parts store). Mix one tablespoon of baking soda into a cup of warm water. Dip the brush. Scrub the terminals and cable clamps until you see bare, shiny lead.
The baking soda neutralizes crusty acid buildup. That white or blue crust acts like an insulator, blocking current flow. Clean terminals won’t fix a dying battery, but they’ll let a healthy battery do its job.
🧪 2: Antifreeze vs. Coolant (The Hydrometer Test)
Let me clear up a stupid piece of misinformation that keeps floating around the internet.
Engine coolant is a 50/50 mix of distilled water and ethylene glycol (antifreeze). They’re not two different things. Antifreeze is the concentrated chemical. Coolant is the mixed, ready-to-use liquid. You cannot run pure antifreeze—it actually freezes at a higher temperature than the 50/50 mix. I’ve seen people do this and crack their blocks anyway.
The Threat
Here’s where people get wrecked. You had a small leak in August. It was 95°F outside. You topped off the radiator with plain tap water from the garden hose because you were in a hurry.
Now it’s January. That tap water has diluted your 50/50 mix down to something like 30% antifreeze. At 10°F, that watery mix freezes solid inside your engine block. Water expands when it freezes. Cast iron and aluminum do not. The ice cracks the block wide open.
I’m not talking about a little leak. I’m talking about a crack big enough to pour coolant straight onto the ground. That’s a $4,000 to $6,000 repair. You don’t fix a cracked block. You replace the whole engine or scrap the car.
The Expert Tool
Go buy a $5 coolant hydrometer from any auto parts or online store. It’s a small plastic dropper with colored floating discs inside. Takes ten seconds to use.
Actionable Step
Pop your hood while the engine is stone cold. Open the overflow reservoir tank—the plastic bottle connected to your radiator by a hose. Never open the radiator cap itself on a warm engine. Hot coolant under pressure will spray out and send you to the burn unit.
Squeeze the hydrometer bulb. Suck up a small sample of coolant from the reservoir. Count how many discs float.
- 3 or 4 discs floating = good down to -34°F or lower. You’re safe.
- 2 discs = good to about +10°F. Risky if you live anywhere that sees real winter.
- 1 disc or none = pure water. Your engine is a ticking time bomb.
If you’re low, buy a jug of pre-mixed 50/50 coolant that matches your vehicle’s spec (green, orange, pink, or yellow—check your owner’s manual). Pour it directly into the reservoir. Don’t mess with concentrate unless you have distilled water and a measuring cup.
🛞3: Tires, Cold Physics, and the PSI Drop
Here’s a trick question I ask every customer who comes in for winter prep: “When was the last time you checked your tire pressure when the tires were cold?”
Most people stare at me.
The Physics Principle
For every 10°F drop in outside temperature, your tires automatically lose about 1 PSI of air pressure. This isn’t a leak. Cold air physically compresses and shrinks. A tire that read 35 PSI on a 70°F day in September will read around 29 PSI on a 20°F January morning.
Six pounds low on all four corners means your tires wear unevenly, your gas mileage drops, and your braking distance on cold pavement gets dangerously long.
Check pressures monthly with a digital tire gauge (the pencil-style stick gauges are garbage—throw them away). Always check when the car has been sitting for at least three hours. And add air at the gas station before you drive, not after. Driving warms the tires and gives you a false high reading.
The Tread Depth Test
The Penny Test isn’t just a old wives’ tale. It works.
Take a penny. Insert it upside down into the deepest groove of your tire tread, with Lincoln’s head going in first. Look at the top of his head.
- Can’t see the top of his head? Your tread is above 2/32 of an inch. You’re legal, but not great for snow.
- Can see the full top of Lincoln’s head? Your tread depth is under 2/32 of an inch. You have zero traction on slush, snow, or black ice. Zero.
I’ve driven on bald tires in a light dusting of snow. It’s like trying to walk across an ice rink in dress shoes. You’re not in control. You’re just a passenger until you hit something.
All-Season vs. Winter Tires
Stop believing the marketing. All-season tires are not for all seasons if you live somewhere with actual winter.
All-season rubber starts getting hard and slippery like a hockey puck when the temperature drops below 45°F (7°C) . The compound hardens, and your stopping distance increases by 30 to 40 feet from 60 mph.
True winter tires use a soft silica rubber compound that stays flexible in sub-zero weather. They also have thousands of tiny sipes (little slits in the tread blocks) that bite into ice.
I run dedicated winter tires on my personal truck from Thanksgiving to March. They’re not magic—you still need to drive carefully—but they’re the single biggest safety upgrade you can make for winter.
PSI Calculator + Winter Tire Comparison Table
Cold Weather Tire Pressure Calculator
See how much pressure your tires lose as it gets colder
All-Season vs. Winter Tires: Performance Comparison
| Feature | All-Season Tires | Winter (Snow) Tires |
|---|---|---|
| Rubber Compound | Hardens below 45°F (7°C) | Stays flexible in sub-zero temps |
| Tread Design | Smooth for fuel efficiency | Deep grooves & sipes for ice grip |
| Braking (on Ice) | Longer sliding distance | Up to 30% shorter stops |
| Best Used For | Mild climates (Rain/Light snow) | Severe winter (Ice/Heavy snow) |
Source: Automotive Safety Research & Tire Manufacturers’ Data
🐍 4: Checking Serpentine Belts and Hoses for Cracks
Cold weather makes rubber brittle. That’s just physics. A serpentine belt that was “probably fine” in August can snap on a 10°F morning startup, leaving you stranded without power steering, alternator charging, or water pump circulation.
Actionable Step
Grab a good LED flashlight. Pop the hood. Find the main drive belt on the front of your engine—it snakes around several pulleys including the alternator and power steering pump.
Look at the ribbed underside of the belt. Not the smooth back side. The ribs are where cracks start.
The Three-Crack Rule: If you spot more than three cracks within any single inch of the belt, replace it immediately. Don’t wait. Don’t “keep an eye on it.” A belt with that much wear will strand you.
Hoses
Squeeze the upper radiator hose—the big thick rubber hose running from the top of your radiator to the engine. It should feel firm but springy, like a ripe banana. Never mushy or soft. And definitely not crunchy.
A crunchy or rock-hard hose is dried out internally. It’ll split the first time your cooling system builds pressure. A soft, mushy hose is oil-soaked and about to burst.
While you’re there, squeeze the lower radiator hose too. And the two smaller heater hoses going into the firewall.
One more thing: While your head is under the hood, look for green, orange, or pink crusty residue around any hose clamp or connection. That’s dried coolant. Means you have a slow leak that’ll get faster when everything freezes and contracts.
🪵5: Assembling a True Winter Emergency Roadside Kit
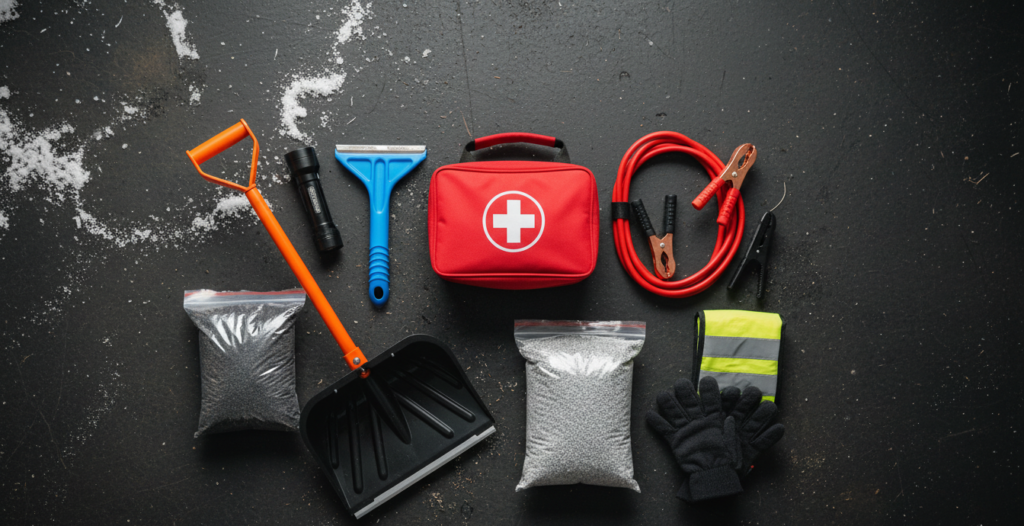
Most winter “emergency kits” you see at the auto parts store are junk. A tiny first aid kit, a cheap flashlight with dead batteries, and a plastic ice scraper. That’s not going to help you when you slide off a rural road at 11 PM with no cell service.
The Real Essentials
Build your own kit. Throw these items in a plastic tote or an old duffel bag and leave it in your trunk from December through March:
- Heavy-duty 8-gauge jumper cables. Not the thin 12-gauge garbage. Eight gauge or thicker. Cold engines need serious amperage to jump. Cheap cables won’t deliver it.
- Small folding metal entrenching shovel. The kind campers use. If you bury your front wheels in a snowdrift, your hands won’t dig you out.
- Bag of cheap clay kitty litter. Not the scented stuff. Clay litter. Pour it under your drive wheels on ice patches for instant traction. Works better than sand because the clay crystals grip.
- Space blanket (Mylar emergency blanket). Costs $4. Folds to the size of your wallet. If you run out of gas and have to wait two hours for a tow, that blanket keeps you from going hypothermic.
- Portable lithium jump-starter pack. NOCO, Clore, or Weego brands. Keep it charged and in your passenger cabin, not the trunk. A dead battery in freezing temps won’t even unlock your doors. The jump pack lives under your seat.
- Headlamp. Not a flashlight. You need both hands free to work. A $20 headlamp from Energizer or Black Diamond is fine. Keep extra AAA batteries in the kit.
- Two chemical hand warmers. The kind hunters use. If you have to change a tire in single-digit weather, your fingers will stop working after three minutes without these.
Run through this list. Check off what you already have. The goal is 100% before the first heavy snowfall hits your area. Don’t be the guy digging through a useless store-bought kit while freezing his fingers off.
Conclusion
Here’s my rule: Do these checks in late October or the first week of November. Before the first hard freeze. Before the salt trucks roll.
Winter prep isn’t complicated. Test your battery with a real load tester, not your eyes. Check your coolant with a $5 hydrometer. Add air to your tires every time the temperature drops twenty degrees. Inspect your belt and hoses for cracks. Throw a real emergency kit in the trunk.
Do all that, and you’ll be the guy who turns the key on a 5°F morning and hears a healthy vroooom while your neighbor is calling a tow truck.
I’ve been wrenching in cold garages for longer than I want to admit. Take care of your car before winter, and it’ll take care of you when you need it most.
Stay safe out there.




Leave a Reply