
Last July, my 2012 Mazda 3 decided to quit on me at the worst possible moment. It was 97°F outside, I was stuck in traffic on I-85 just outside Atlanta, and the AC that had been ice-cold that morning suddenly started blowing what felt like a hair dryer on my face. I cranked the knob to max, heard the blower fan screaming, but it was just hot, humid air. My first thought was “great, compressor’s dead, there goes $900.” I learned that day that hot air doesn’t always mean a dead compressor, and you can figure out 80% of it in your driveway with a $35 gauge set and your eyes.
If you’re here because your vents are blowing hot, you’re probably stuck between two Googled answers: low refrigerant vs. bad compressor clutch. I’ll walk you through exactly how I test both, in order, without throwing parts at it. You’ll need to know what to listen for, what your gauges should actually read, and when to stop and call a pro.

The 2-Minute Rule: Is Your Compressor Even Trying?
Before you hook up anything, do this. It saves you an hour. Pop the hood, have a friend sit in the car with it running, AC set to MAX, recirc on, fan on high.
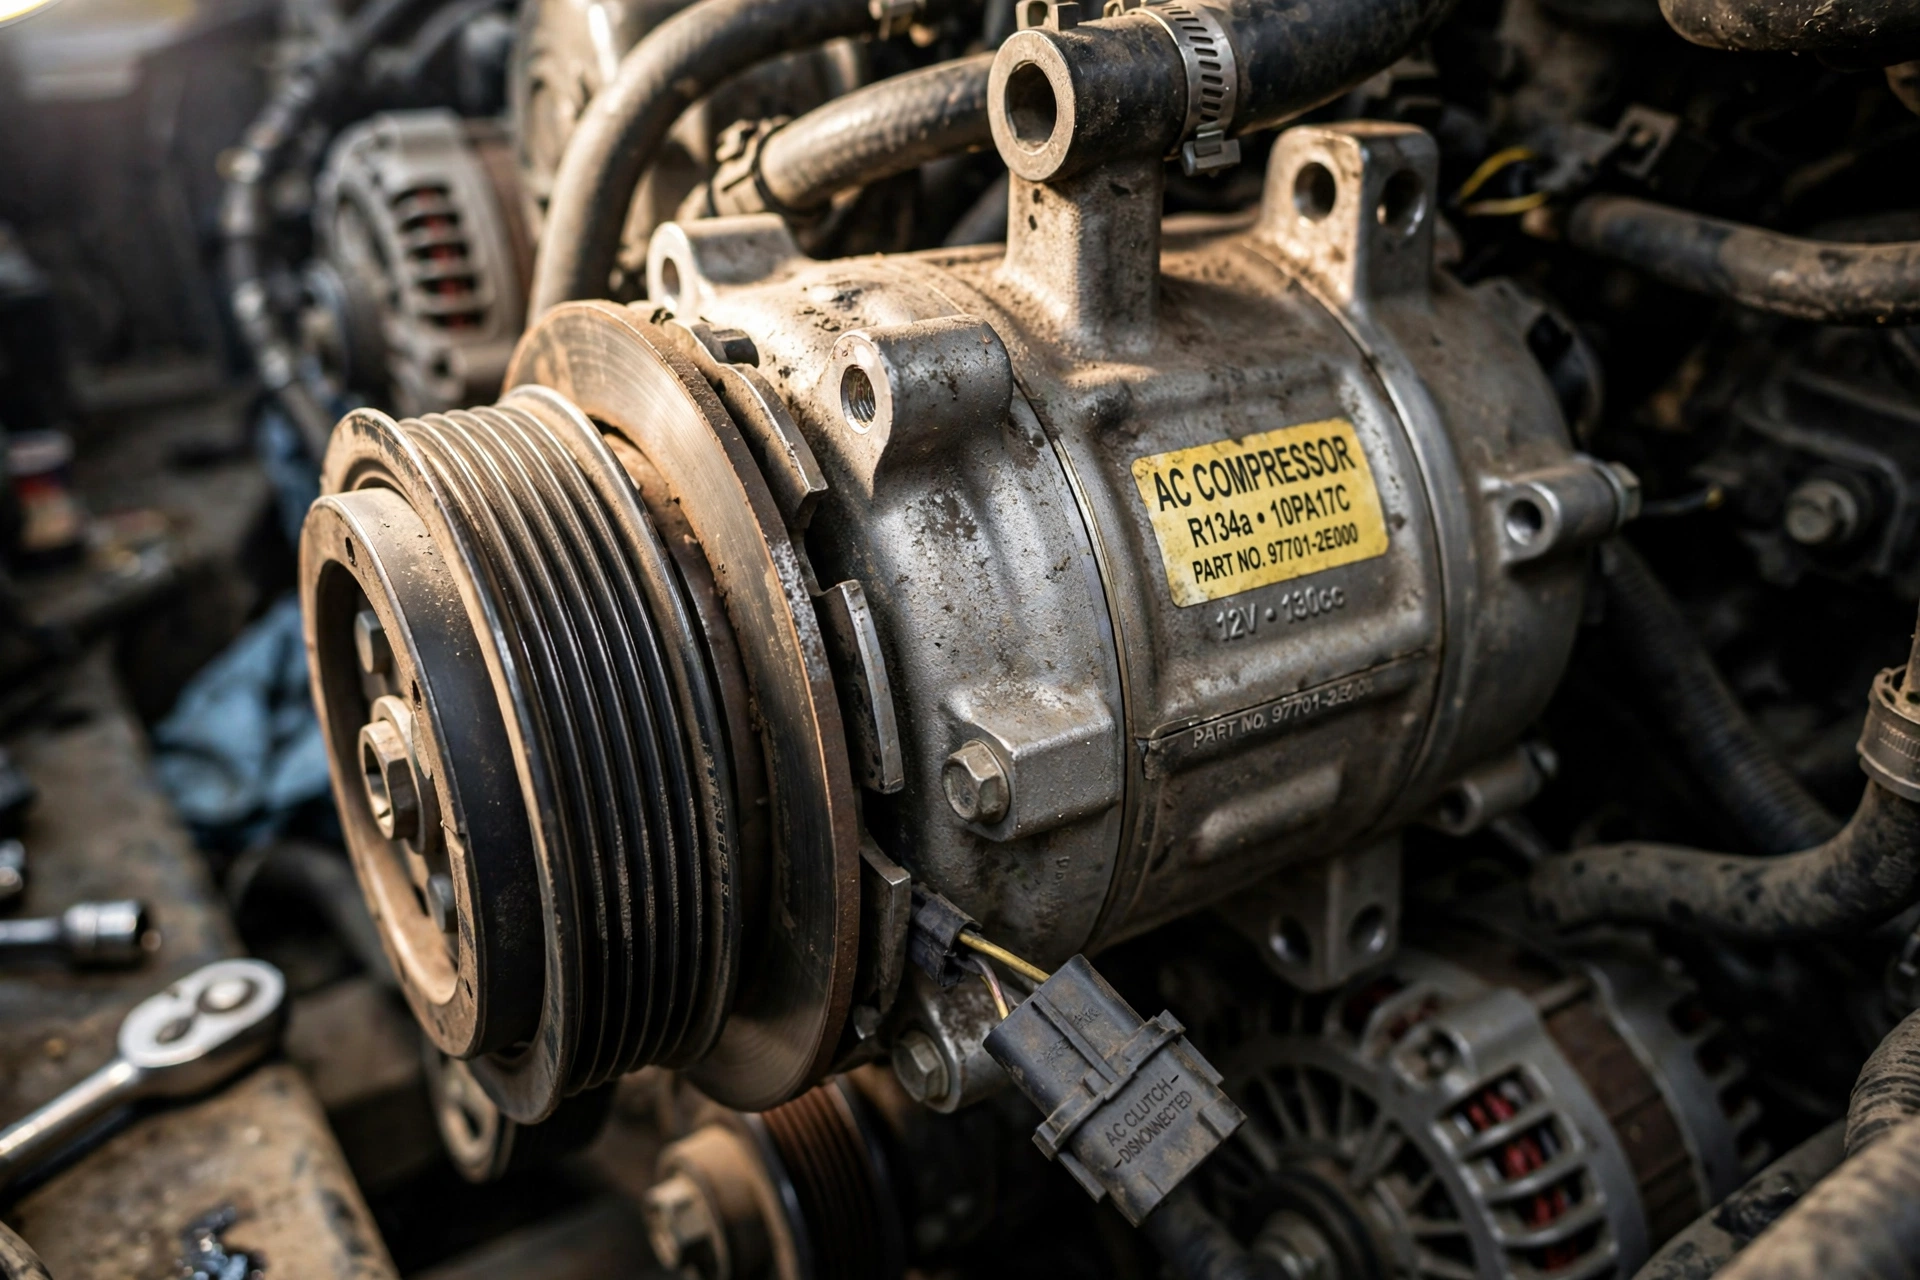
Stand where you can see the AC compressor. It’s the thing on the front of the engine with the serpentine belt around it. Now have your friend turn the AC button off, then on. You should hear and see two things within 1-2 seconds:
- A distinct audible CLICK from the front of the compressor
- The inner hub (the clutch plate) snaps in and starts spinning with the outer pulley
When the AC is off, only the outer pulley spins with the belt. When it clicks on, the center plate locks in. If you hear the click and see it engage, your clutch circuit is at least trying to work. If you hear nothing and that center stays still while the outer pulley spins, your problem is likely electrical or the clutch itself — not just low refrigerant.
On my Mazda, I saw the gap. The clutch had a visible 0.020” air gap that had grown to about 0.040” after 140k miles. It would click, try to grab, slip, then give up. That’s classic clutch failure.
Understanding Low Refrigerant vs. Bad Clutch — How They Feel Different
These two failures feel similar at the vent, but they act completely differently under the hood. Here’s how I differentiate them now after getting burned once:
1. Low Refrigerant (The Slow Fade)
This is 70% of hot-air complaints I see. Your system lost R-134a or R-1234yf through a tiny O-ring, a pinhole in the condenser, or just age. Refrigerant carries the oil that lubricates the compressor, so when it’s low, cooling capacity tanks.
What you’ll notice:
- AC was gradually getting less cold over weeks/months, not instant death
- Compressor clutch DOES click and engage, but cycles on/off rapidly — like 5 seconds on, 10 seconds off
- Low-side pressure reads low (under 25 PSI at 80°F ambient)
- Vents blow slightly cool but not cold, maybe 60-70°F when it should be 38-45°F
- You might see oily residue on AC lines or condenser
2. Bad Compressor Clutch (The Sudden No)
The clutch is an electromagnetic switch. Coil gets 12V, creates magnet, locks the plate, compressor pumps. Coil burns out, air gap gets too wide, or clutch bearing seizes.
What you’ll notice:
- AC was fine yesterday, dead hot today — very sudden
- NO click at all, or a weak click that doesn’t hold
- Low-side pressure reads static — same pressure engine on or off (around 80-100 PSI depending on heat)
- Vent temp = ambient temp or even hotter from heater core
- 12V at the connector but no engagement, or no 12V because low-pressure switch is blocking it (that’s the tricky part)
The Comparison Table: Symptoms Side-by-Side
I built this table for my own notes after I misdiagnosed my Mazda the first time and almost bought a $450 compressor I didn’t need.
| Symptom / Test | Low Refrigerant | Bad Compressor Clutch / Coil |
|---|---|---|
| Onset | Gradual weeks/months | Sudden, same day |
| Clutch Click Heard? | Yes, rapid cycling | No click, or single weak click |
| Center Hub Spinning? | Yes, but intermittently | No, stationary |
| Low Side @ 85°F ambient | 15-25 PSI (too low) | 80-110 PSI static (not pumping) |
| High Side Pressure | Low ~120-150 PSI (should be 200-275) | Basically equal to low side |
| Vent Temp | 55-70°F (coolish) | 80-110°F (full hot) |
| Common Fix Cost (DIY/Shop) | $45 recharge / $150-250 leak repair | $85 clutch kit DIY / $350-550 shop |
| Risk if ignored | Compressor burns up from lack of oil | None mechanical, just no AC |
Tools You Actually Need (No Expensive Snap-On Truck)
You don’t need a $400 Robinair machine for this test. Here’s what I use in my garage:
- Manifold gauge set for your refrigerant type: R-134a (pre-2021 most cars) or R-1234yf (newer). Get one with quick-connect low side. ~$35-60 on Amazon. Make SURE you get the right fittings. My 2012 uses R-134a.
- Digital multimeter – $20
- Feeler gauge (0.010” to 0.040”) – for clutch air gap. Spec is usually 0.014” – 0.026”
- 10mm, 12mm, 14mm sockets + ratchet – clutch bolt is often 8mm, 10mm, or 14mm hex depending on car. Mazda is 10mm center bolt.
- Torque wrench (inch-pounds): Clutch plate bolt is light — typically 12-15 ft-lbs (144-180 in-lbs). Over-tightening kills the clutch bearing. Compressor mount bolts are 18-22 ft-lbs if you ever remove it.
- IR thermometer or meat thermometer in vent: For vent temp reading.

Step-by-Step: Low Refrigerant Pressure Test
Step 1: Ambient Temperature Matters
Pressure depends heavily on outside temp. You cannot diagnose at 68°F and compare to a 95°F chart. Park in shade, engine running 1500 RPM, windows down, AC on MAX. Let it stabilize for 3 minutes. Note ambient temp from your dashboard or weather app.
Step 2: Hook Up Low Side Only (For Quick Check)
Find the low-side service port — it’s always the larger diameter aluminum tube, between evaporator and compressor, with a plastic cap marked “L”. Clean cap and area. Snap on low-side coupler. Read pressure with compressor ENGAGED if possible.
Here’s a rule of thumb I use, but remember this is low-side ONLY — not a full diagnosis:
Chart Explanation: If you plotted ambient temperature (X axis, 70°F to 100°F) against correct low-side pressure with a properly charged system and compressor engaged at 1500 RPM, you’d see a rising line from about 35 PSI at 70°F to 55 PSI at 100°F. Most DIYers see 20 PSI at 90°F and think “a little low.” That’s actually almost EMPTY. The chart would also show a static pressure line (compressor NOT running) that climbs steeply from ~70 PSI to ~110 PSI. So if your engine is on, AC is commanded on, but the low side sits at 95 PSI steady, your compressor isn’t pumping at all — that’s a clutch circuit, not refrigerant. That visual crossover is what separates the two failures instantly.
Step 3: Interpret Your Reading
- Under 25 PSI at 80°F+ with clutch engaged and cycling fast: System is low. Stop. You have a leak. Adding a can will get you cold for a week but the leak remains. Look for oil dye traces with UV light.
- 35-50 PSI steady, vent 38-50°F: Charge is probably fine. Look at blend door or cabin filter.
- 80-110 PSI steady, clutch not engaged: See clutch test below.
Step-by-Step: Compressor Clutch Test
This is where most YouTube videos skip details. Here’s the method I learned from a Toyota master tech that actually works.
Test A: The 12V Jump
Unplug the single wire connector at the compressor clutch coil. Set meter to DC volts. Have helper turn AC on MAX. You should see battery voltage — 12.0-14.4V at that connector. If you see 0V, the car is telling the compressor NOT to run. That could be low-pressure switch (because refrigerant is low), high-pressure switch, blown 10A AC fuse, bad relay, or bad pressure sensor.
If you DO see 12V and clutch still doesn’t click and engage, your clutch coil or air gap is bad.
Test B: Resistance Check
Engine OFF, clutch unplugged. Meter on ohms (200Ω range). Measure across the two pins on the clutch coil itself (not the car harness). Good coil is typically 2.5-4.5Ω. My Mazda measured 3.1Ω when good. If you see infinite/OL = burned open coil. If under 1Ω, coil shorted. Both mean replace clutch/coil.
Test C: Air Gap Check
Engine OFF. Try to slide feeler gauges between clutch plate and pulley. Factory spec on most Denso compressors (Toyota, Mazda, Honda) is 0.014”-0.026” (0.35-0.65mm). If yours is 0.035”+, the magnet can’t pull it in, especially when hot. Mine was 0.038”. You can remove a shim washer behind the plate to tighten it — 15-minute fix on many cars.
Clutch removal: Center bolt is usually 10mm, left-hand? No, it’s normal right-hand thread. Hold clutch plate with a clutch holder tool ($12) or wrap old serpentine belt around it. Remove bolt, gently pull plate off with two flat screwdrivers wiggling side to side. Don’t pry on pulley face. There may be 1-2 thin shims inside — don’t lose them. Removing one shim reduces gap by ~0.015”.
Torque specs to write down: Clutch plate center bolt: 12-15 ft-lbs (check Alldata for your exact car — some GM are 11 ft-lbs, some Nissan 13 ft-lbs). Don’t use impact. Compressor through-bolts to engine: 18-22 ft-lbs.
So Which Is It? My Diagnostic Flow
Here’s exactly what I do now in order:
- Hood open, engine running, AC MAX — do I hear click + see hub spin? If YES → low refrigerant likely. Hook up gauges.
- If NO click: Check fuse (under-hood 10A AC COMP) and relay swap. If still no click, measure 12V at clutch connector.
- No 12V = car inhibiting compressor. Check low-side pressure — if under 20 PSI, pressure switch is saving compressor. That’s a refrigerant leak path, not clutch.
- 12V present but no engagement → measure coil ohms + air gap. Replace clutch or adjust gap.
For me, step 4 was the winner. $65 clutch kit from RockAuto, 45 minutes with a 10mm socket, feeler gauge to 0.020”, torqued to 13 ft-lbs, and I’ve had ice cold 42°F vent temps ever since, even at 98°F in traffic.
When Recharge Is Okay and When It’s Not
If your gauges show low and clutch is cycling, you can add refrigerant as a temporary confirmation. Use only pure R-134a or R-1234yf — no stop-leak or “AC Pro with sealant.” That sealant clogs shops’ recovery machines and they will charge you extra.
- Add with engine running, AC MAX, 1500 RPM, can upright, shake occasionally.
- Add in 2-3 second bursts, let pressure stabilize 15 seconds.
- Target low side 40-45 PSI at 85-90°F ambient with steady engagement. Don’t go over 55 PSI.
- If vent goes to 42°F, stop. You confirmed low charge. Now find leak with UV dye. Common leak points: condenser lower corners (stone hits), Schrader valves, compressor shaft seal (oily).
If you need more than one can per season, you have a real leak that needs fixing. Refrigerant loss rate should be near zero per year.
Cost Reality Check
Here’s what I’ve paid or quoted in Georgia in 2024-2025: R-134a 12oz can: $12. Manifold set: $45. Shops charge $150-$250 for evac + recharge with dye + leak check. Compressor clutch kit DIY: $65-$120 + 1 hour. Full compressor with clutch (Denso): $280-$400 + 3 hours labor ($500-$900 total at shop, plus $150 for refrigerant recovery/evac).
Don’t let a shop sell you a full compressor when only clutch failed, BUT — if your system was low and ran dry, the compressor internals may be damaged from lack of oil. That’s when full replacement + receiver/dryer is smart. If you see metal debris or black oil, it’s done.
What I Learned the Hard Way on My Mazda
When my clutch gap grew, it only failed when heat-soaked. Mornings it was fine. After a 30-minute drive and a quick grocery stop, no AC for 15 minutes then it magically came back when it cooled. If your AC is intermittent hot/cold, especially after heat soak, measure gap when HOT. That’s when coil magnetism is weakest.
I fixed it by pulling one 0.020” shim. Gap went from 0.038” to 0.019”. I cleaned the clutch faces with brake cleaner (no oil!), torqued center bolt to 13 ft-lbs with blue Loctite 242, and it’s been two summers. If I had ignored the low refrigerant side, that slipping clutch would’ve overheated and taken the rubber isolators with it, and then you ARE buying a compressor.
When You Should Stop and Take It to a Shop
- You see black death — black oily gunk on service port or gauges. That’s compressor internals disintegrated. Needs full flush, dryer, expansion valve, compressor.
- High side over 350 PSI and condenser fan is running. Don’t keep running it — you’ll blow a hose.
- System was open to air for more than a day (accident, line removed). Receiver/dryer is saturated and must be replaced, then deep vacuum 30 minutes at 500 microns.
- You have R-1234yf — cans are $80+ and require different couplers. Many shops won’t let you DIY because gas is mildly flammable. Be careful.
Bottom line: If clutch doesn’t click, chase electrical first. If it clicks but cycles fast and pressure is low, you’re low. Get a real gauge set, measure vent temp, and don’t guess. I spent $45 on gauges that saved me $500. You can too.
If your AC is still blowing hot after this? Check the simplest thing — cabin air filter. I once pulled one that was a mouse nest. No airflow = feels hot. And make sure your coolant isn’t low; some cars disable AC if engine overheats. But 8 times out of 10, it’s exactly these two: low refrigerant or clutch gap.
Stay cold out there.




Leave a Reply