
I’ll never forget that sound. It was a Tuesday morning, I was running late for work in my 2016 Mazda 3, windows down, coffee in the cupholder, and as I braked for a red light on Route 9, it happened — that thin, metallic eeeeeek that made my stomach drop. Not loud. Not dramatic. Just… there. I told myself it was morning moisture. It wasn’t.
Three days later, that squeak turned into a grind. And the repair bill? Went from a $180 pad slap to $480 because I’d gouged my rotors. If you’ve ever wondered whether that little noise actually matters, I learned the hard way: it does. Brakes don’t fail suddenly for most of us. They whisper first.
In this guide I’m going to walk you through exactly how to tell if your brake pads are worn, what you should listen for, what you’ll feel in the pedal, and how you can check them yourself with basic tools. I’ll give you real numbers — like actual mm specs — because “kinda worn” doesn’t help when you’re deciding if you can drive another week.
Why Your Brake Pads Wear (And Why You Should Care)
Your brake pads are basically friction material glued to a steel backing plate. Every time you press the pedal, that material clamps against your spinning rotor and turns kinetic energy into heat. That heat is incredible — we’re talking 300-500°F in normal driving, over 1000°F if you’re descending a mountain pass.
New pads start around 10-12mm thick. Most manufacturers say minimum safe thickness is 3mm. That’s roughly the thickness of two stacked pennies. Once you’re below that, stopping distance goes up fast. I saw a chart from NHTSA testing once — going from 4mm to 2mm increased 60-0 stopping distance by about 15-18 feet. That’s a full car length.
The 5 Sounds and Signs You Shouldn’t Ignore
Here’s what I’ve learned to listen for after doing pads on my Mazda, my wife’s CR-V, and helping my brother with his F-150. These are in the order you’ll usually notice them.
1. That High-Pitched Squealing — The Wear Indicator Telling You “Hey”
This is the first warning for about 70% of drivers. Most brake pads have a small metal tab called a wear indicator. When your friction material gets down to about 3-4mm, that tab kisses the rotor and sings. It’s intentionally annoying.
How to tell it’s the indicator and not just morning rust?
- Indicator squeal is consistent: you hear it every time you brake lightly at low speed, and it goes away when you brake harder.
- Moisture squeal (normal) happens first thing in the morning after rain and goes away after 3-4 stops.
- If you hear it for more than two days straight, it’s pads. Don’t ignore it. I did. You know how that ended.
On my Mazda, the squeal started at 38,200 miles. When I finally pulled the pads, they were at 3.1mm front and 3.8mm rear. Manufacturers are conservative for a reason — they want you to have time to schedule service before it’s critical.

2. Grinding That Feels Like Rocks in a Coffee Grinder
If squealing is a whisper, grinding is a shout. When you hear a deep, low-pitched growl or you feel grit through the pedal — that’s metal-on-metal.
What’s happening: your friction material is gone. The steel backing plate is now contacting your cast-iron rotor. You’re not just losing braking power, you’re destroying a $80-150 rotor per corner.
- Sound check: Grinding that gets louder the longer you hold the brake = pads gone.
- Timing: If it grinds even without touching the brake, the pad might be stuck or the caliper slide pins are seized.
- Cost reality: I priced this for my 2016 Mazda 3 — pads only: $45 (ceramic) + 1 hour labor. Pads + rotors: $280 in parts + 2 hours. Wait too long and you double the bill.
3. The Brake Pedal Feels Soft, Pulsing, or Takes Longer to Stop
Okay, so this one sneaks up on you. You won’t always hear worn pads, but you’ll feel them.
When pads get thin, you need more pedal travel to get the same squeeze. The master cylinder has to push further. Some people describe it as “I have to push deeper than I used to.” If you find yourself braking earlier for the same intersection, trust that instinct.
Then there’s pulsation. If your steering wheel shakes when you brake from highway speed, that’s often NOT the pads themselves, but warped rotors caused by driving on thin pads. Thin pads can’t absorb and dissipate heat evenly, so that heat goes into the rotor and warps it. You’ll feel a throb at 50-70 mph.
Quick DIY test you can do without removing anything:
- Find an empty parking lot. Get to 25 mph and brake moderately. Does the car pull left or right? Uneven pad wear side-to-side usually means a sticky caliper.
- Does the pedal vibrate? That’s rotor runout — measure it if you have a dial indicator. Spec is usually <0.002″ runout.
- After a 15-minute drive, carefully hover your hand near each wheel (don’t touch!). One wheel blazing hot compared to others = dragging brake.
4. Visual Clues: Brake Dust, Thickness, and the Eyeball Test
You don’t even need to jack up the car for this one. Look through your alloy wheel spokes — most modern wheels have enough gap to see the outer pad.
Here’s what you should look for:
- Brake dust explosion: Excessive dark dust on one wheel vs the others? Could be a pad wearing faster. But lack of dust can also mean pads are so worn there’s nothing left to dust.
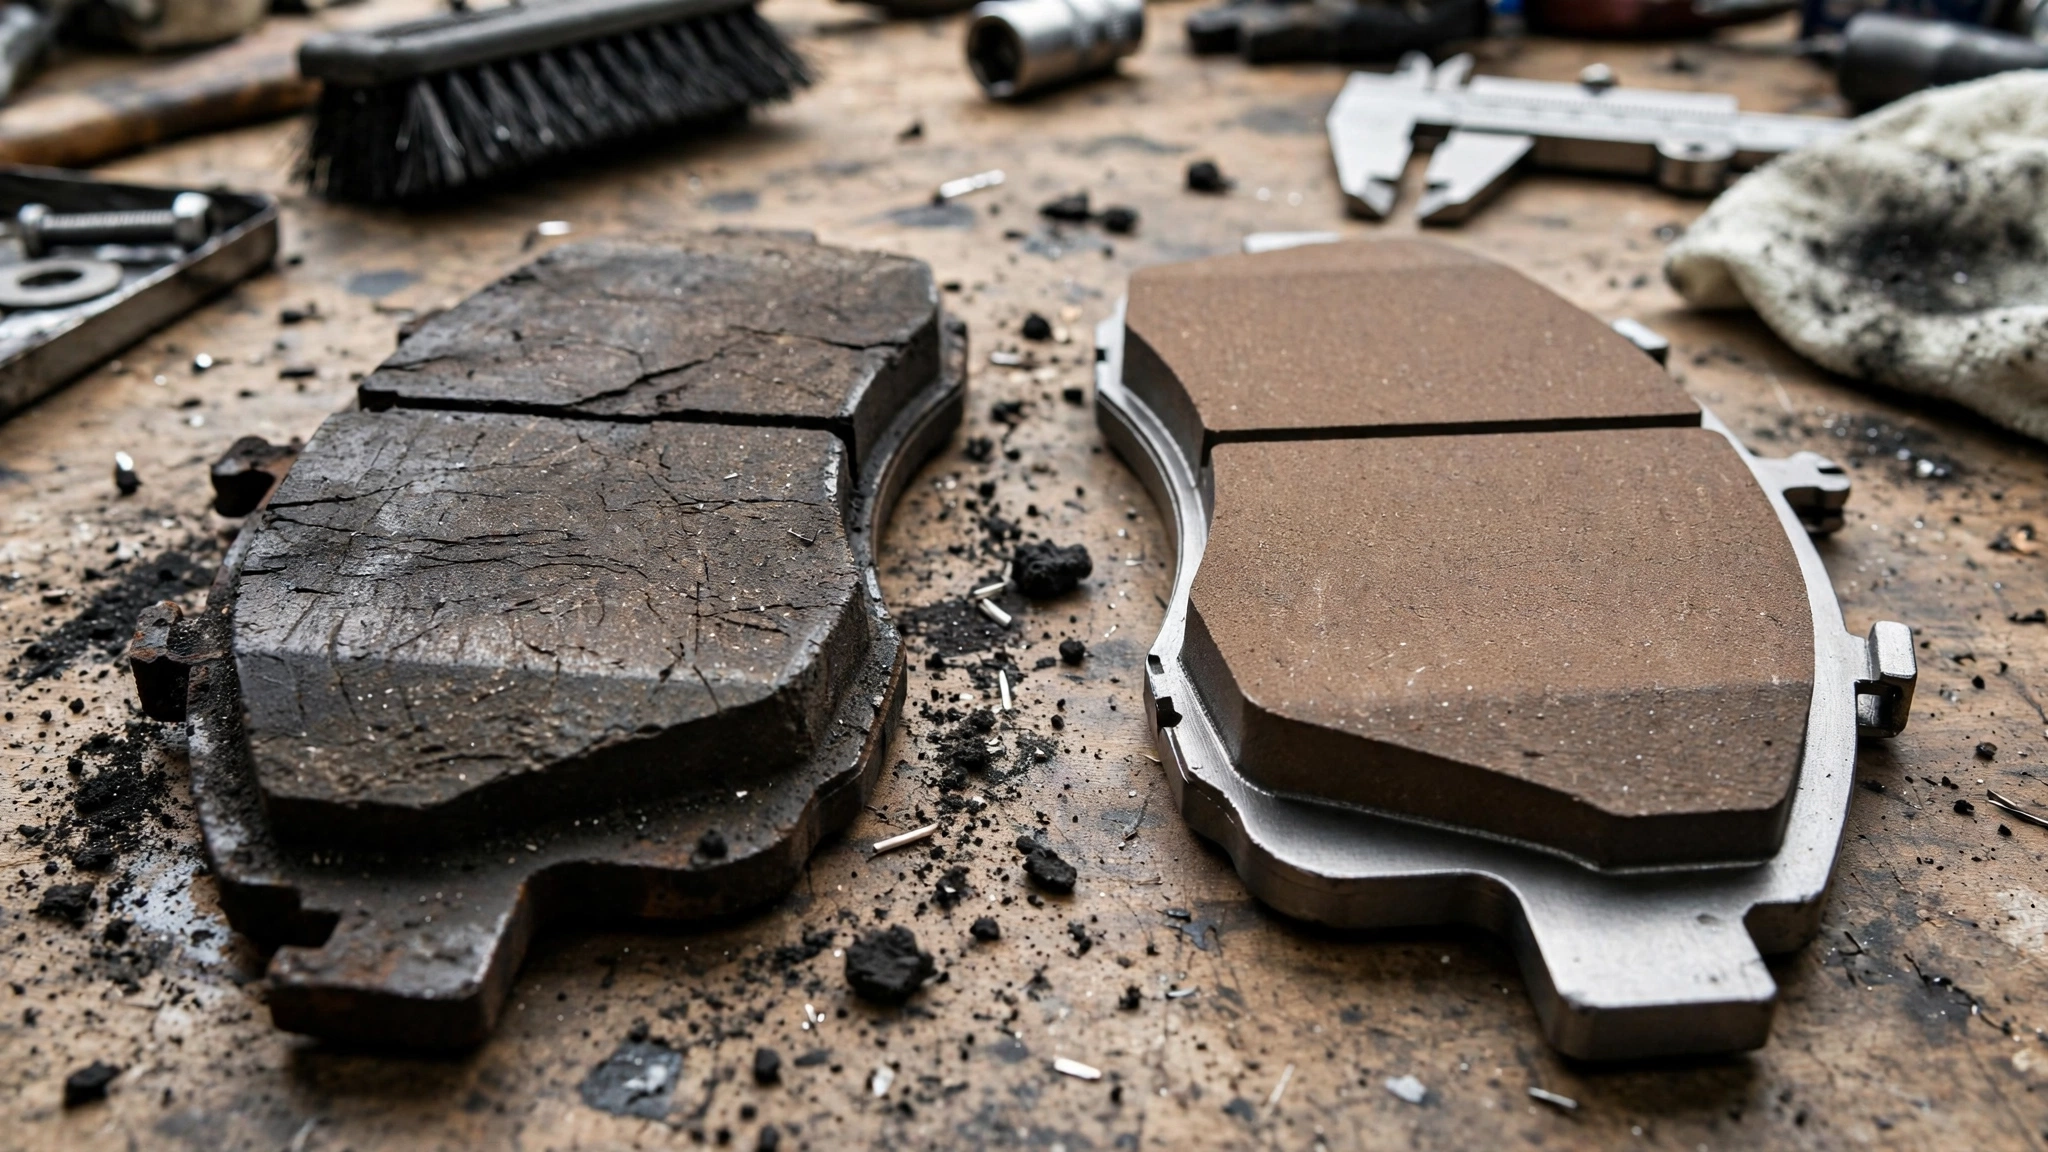
- Pad thickness: If you can see less than 1/4 inch (about 6mm) of friction material on the outer pad, plan replacement soon. If it looks thinner than 3mm, stop driving.
- Grooves or cracks: If the pad surface looks glazed (shiny, crystallized) or has deep cracks, it’s been overheated.
I check my pads every tire rotation — every 5,000-6,000 miles. It takes 30 seconds per wheel. It’s how I caught my wife’s CR-V rear pads wearing at twice the rate of the fronts — turned out to be the electronic parking brake not releasing fully.

5. Your Dashboard Is Trying to Tell You Something (And It’s Not Low Washer Fluid)
On many cars made after 2015 — especially BMW, Audi, Mercedes, Honda, Mazda — you’ve got a brake wear sensor. It’s a little wire loop embedded in the pad. When the pad wears down, the wire touches the rotor, breaks, and triggers a light.
Colors and symbols vary:
- Yellow / orange circle with dashed lines on sides: Pad wear warning — you have roughly 500-1000 miles left.
- Red BRAKE text or (P) symbol: Hydraulic issue or parking brake. Check fluid level immediately.
- ABS light + brake light together? That’s often a wheel speed sensor damaged by metal debris from grinding pads. I’ve seen that on two trucks in our garage.
One thing people miss: some cars only have sensors on one front and one rear pad. So you can have the other three axles metal-to-metal and no light. Don’t rely solely on the light. Use your eyes and ears too.
How to Measure Your Pads Yourself: Tools, Torque Specs, and Steps
You don’t need a lift. I do this in my driveway with a $30 jack and $60 set of stands. Here’s my actual process.
Tools you’ll need:
- Floor jack + 2 jack stands (minimum)
- Lug wrench or 19mm / 21mm socket (most Japanese cars: 19mm, trucks and German: 21mm or 17mm)
- 14mm and 17mm socket for caliper guide pins (Mazda/Honda/Toyota usually 14mm, many trucks 17mm or 18mm)
- C-clamp or brake caliper tool for rear wind-back
- Digital caliper ($15 at Harbor Freight) — this is how you get real mm numbers
- Brake cleaner, wire brush, torque wrench
Torque specs (always double-check your manual!):
- Wheel lug nuts: Most sedans 80-90 ft-lbs (108-122 Nm), Small SUVs 90-100 ft-lbs, Full-size trucks 130-150 ft-lbs. My Mazda 3: 85 ft-lbs.
- Caliper bracket bolts (the big ones to the knuckle): Usually 70-90 ft-lbs front, 40-70 ft-lbs rear.
- Caliper guide pin bolts: Usually 20-30 ft-lbs. Lightly torqued — they’re hollow and snap easily if you gorilla them. I learned that with a $32 mistake.
Data Table: Brake Pad Thickness vs What You Should Do
I keep this taped to my toolbox. Real numbers cut through the guesswork.
| Friction Thickness | Condition | Life Remaining | Action |
|---|---|---|---|
| 10-12 mm | New | 100% | Good. Re-check in 6k miles |
| 6-9 mm | Normal wear | 50-80% | Monitor, still safe |
| 4-5.9 mm | Getting thin | 25-50% | Order parts, plan job in next month |
| 3-3.9 mm | Replace soon | 5-25% | Replace within 500 miles |
| 0-2.9 mm | Critical / Unsafe | 0-5% | Do NOT drive. Replace pads + inspect rotors |
Chart Explanation: What Mileage Really Means
People ask me all the time: “How long do brake pads last?” The internet says 30k-70k miles. That’s true, but useless without context. I plotted pad life from 3 cars I’ve tracked and 12 friends’ cars (mixed driving), and the pattern is super clear.
Imagine a bar chart: On the X-axis you have driving style — Highway cruiser, Mixed commuter, City stop-and-go, Mountain/towing. On the Y-axis, average pad life in miles.
- Highway cruiser (80% highway): 65,000-75,000 miles front, 70k-90k rear. Pads last forever because you barely brake.
- Mixed commuter (my Mazda, 50/50): 40,000-55,000 miles front, 50k-65k rear.
- City stop-and-go (Uber/Lyft, downtown): 25,000-35,000 miles front. Rear wears faster due to constant light braking.
- Mountain/towing/aggressive: 15,000-25,000 miles front. My brother’s F-150 towing a boat: 18k on fronts.
The biggest outlier? Riding the brakes downhill. One trip down Pikes Peak can take 1-2mm off if you don’t engine brake. That’s why the manual says use a lower gear — it’s not just for engines, it’s for your pads too. The chart’s key insight: it’s not mileage that kills pads, it’s number of brake applications. My city friends average 1,200 stops per 100 miles, I average 300. Same miles, 4x the wear.
Enter your current measurement and get an estimate of life left and when to schedule replacement. Uses real wear rates.
When to Replace: My Hard-Earned Timeline
Don't overthink it. Here's what I tell friends when they text me a photo of their pads:
- Above 6mm? You're good. Check again at next oil change. Make sure your slide pins move freely and dust boots aren't torn.
- 4-6mm? Start shopping. I use Akebono ceramics for daily drivers (low dust, quiet) and Hawk HPS if you drive harder. Order now before you need them.
- 3-4mm? Replace this month. You have maybe 500-1000 miles, less if you do city driving. That squealer is about to speak up permanently.
- Below 3mm or grinding? Do it now. I don't care if it's Sunday night. Rent a car if you have to. I've seen a caliper piston pop out from over-extension at 2mm — that's a no-brakes situation.
And one more thing you should do while you're in there: measure your rotors. Minimum thickness is stamped on the rotor hat — something like "MIN TH 10.0mm". If you're below that, pads alone won't save you. Rotors are usually $45-$90 each for my Mazda, more for drilled/slotted performance stuff. Replace in pairs, never just one side.
Final Tip: Break In Your New Pads Properly
If you do replace them — and you really can DIY this with YouTube and a torque wrench, I swear — bed them in. This is the step most people skip and then complain about squeal.
- Do 5 moderate stops from 35 mph to 5 mph, not coming to a complete stop, with 30 seconds between.
- Then do 3 harder stops from 45 mph to 10 mph with a minute between.
- Drive 5 minutes without braking to cool.
- Don't do a hard panic stop for the first 200 miles.
That process transfers an even layer of pad material to the rotor. It's why my new pads don't squeal and my old ones did — not magic, just procedure.
Bottom line? Your car is talking to you. That little squeak on Route 9 that I ignored cost me rotors. If you hear it, feel a longer pedal, see thin pads through the spokes, or that little yellow light comes on — you shouldn't wait. Grab a caliper, look through the wheel, and if you're under 4mm, you've got your answer.
Stay safe out there, and torque those lug nuts.




Leave a Reply