The morning click
You know the sound. You’re already running late, you slide into the seat, turn the key, and instead of a roar you get a weak click-click-click. Maybe a “rur-rur-rur” if you’re lucky. Then nothing.
Here’s the thing nobody tells you: your battery didn’t die overnight. It’s been whispering warnings for weeks. Slower starts on cold mornings. Dash lights that look a little duller than they used to. You just weren’t listening, because honestly, who has time to listen to a battery.
I’ve pulled more “surprise” dead batteries out of driveways than I can count, and almost every single time, the signs were there a month earlier. A car battery typically lasts 3 to 5 years before it starts losing its ability to hold a charge. Testing one at home takes less than ten minutes with a fifteen dollar tool from the auto parts store. Compare that to a tow truck bill on a Tuesday morning when you’ve got somewhere to be, and the ten minutes starts looking pretty cheap.
I want to walk you through exactly how I check a battery in my own garage, the same way I’d check one for a friend who calls me panicking about a slow crank. No guesswork, no “just buy a new one to be safe.” Just real numbers and what they actually mean.
3 warning signs your battery is on its last legs
Before a battery fully gives up, it usually tries to tell you. Here’s what to listen and look for.
The slow crank. This is the big one. A healthy battery spins the engine over fast and confident. A weak one drags, sounding like “rur-rur-rur” instead of a quick, sharp turnover. If you’ve noticed your car taking an extra half-second to fire up, especially on cold mornings, that’s not your imagination.
Dimming dashboard lights. Sit in your car with the engine off and flip on the headlights or check your dash display. If everything looks a little washed out and dim, then suddenly brightens the moment you rev the engine, your battery is leaning hard on the alternator just to keep the lights on. That’s a battery running on fumes.
The rotten egg smell. Pop the hood and take a sniff near the battery. A battery that’s overcharging or simply wearing out can vent sulfuric acid gas, and it smells exactly like rotten eggs. If you catch this smell, don’t ignore it. I’ve seen a leaking battery eat through a wiring harness bracket in a matter of weeks. Acid corrosion doesn’t wait around.
If any of these sound familiar, don’t panic. Just grab ten minutes and run the tests below before you call anyone or spend a dime.
The headlight trick: testing without tools
This is the test I tell people to try the same night they notice something’s off, before they even own a multimeter. It costs nothing and takes two minutes.

- Park facing a closed garage door or a flat wall, after dark.
- Turn on your headlights without starting the engine.
- Look at the beams on the wall. If they look noticeably dim or yellowish instead of crisp and white, your battery is holding a weak charge.
- Now start the engine and watch the wall again. If the beams suddenly jump brighter the second the engine catches, that’s your alternator stepping in to prop up a battery that can’t carry the load on its own.
This isn’t a precise test, and I won’t pretend it is. But it’s a great gut check you can run tonight in your driveway, and it’s caught plenty of batteries on their way out before they stranded anyone.
For the real numbers, you’ll want a multimeter.
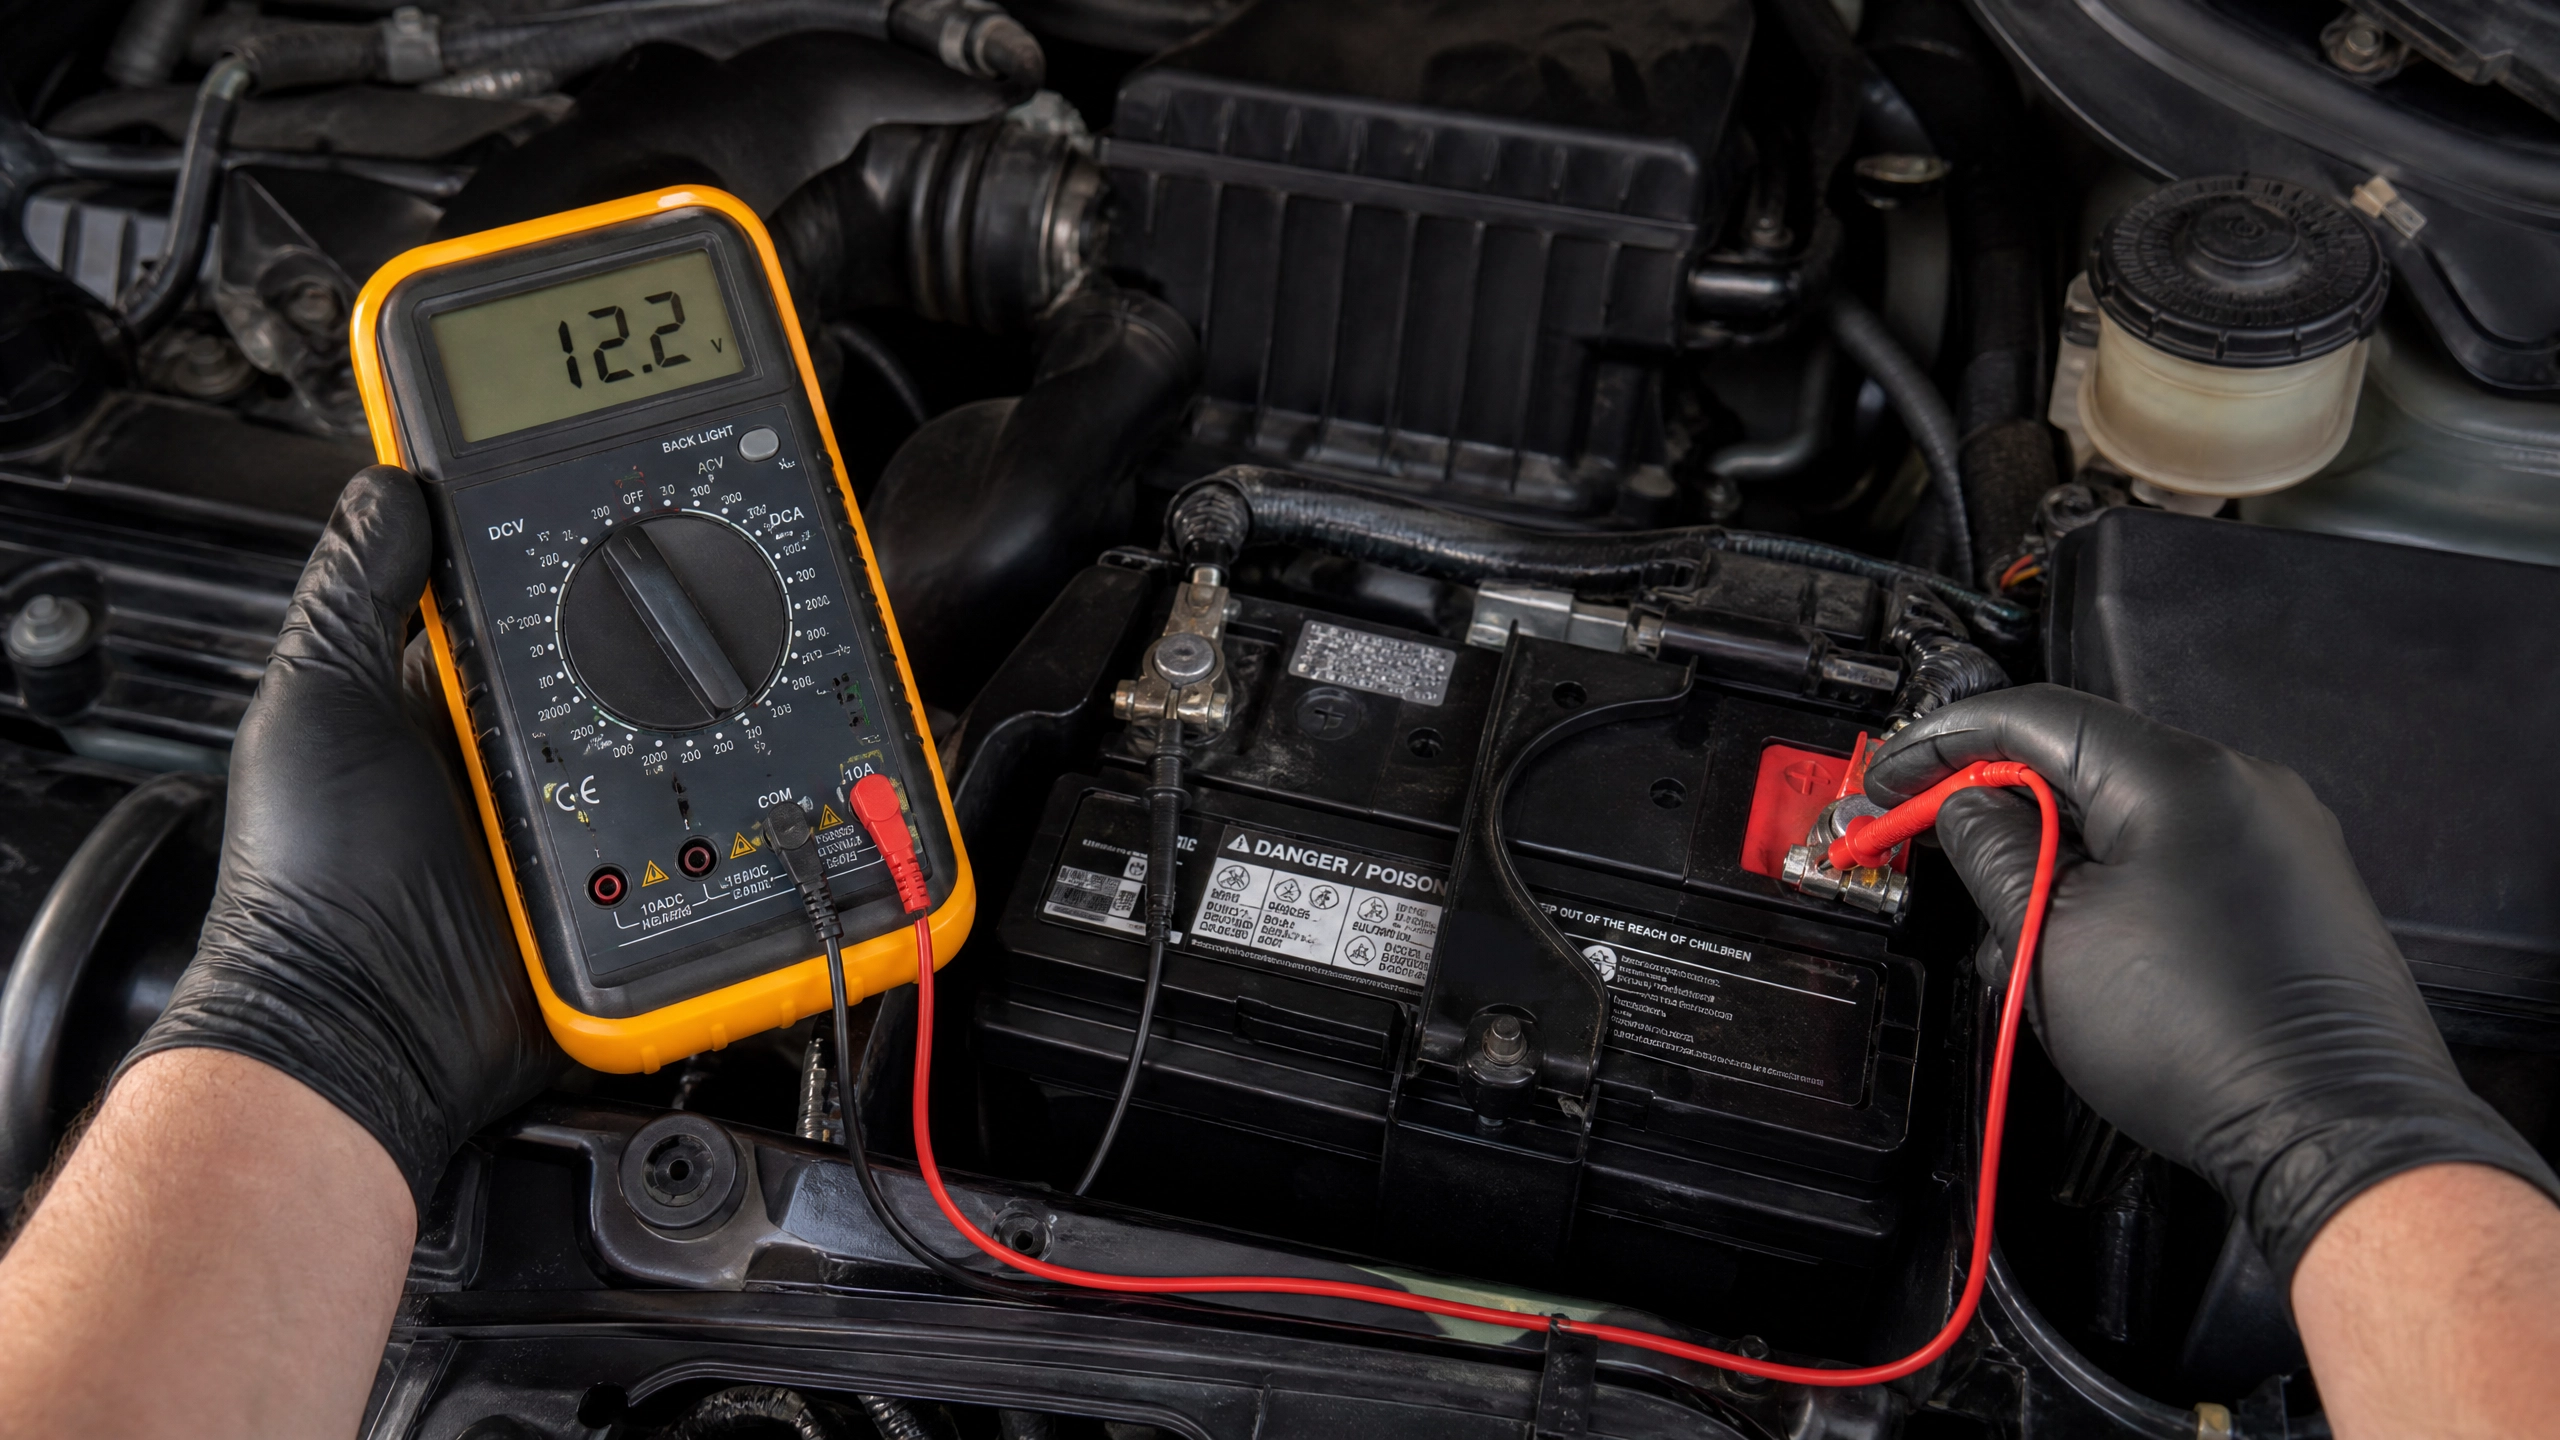
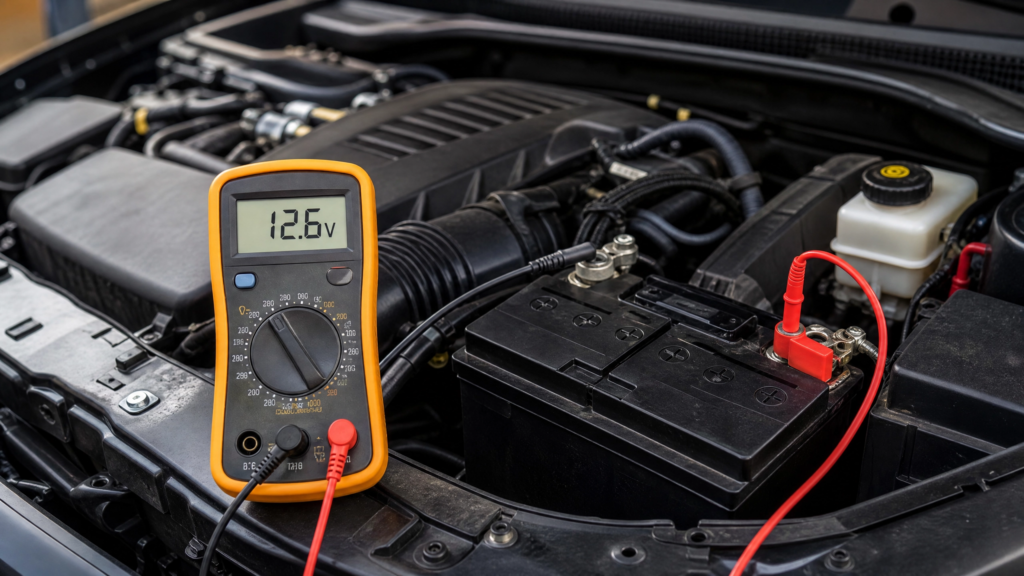
The digital multimeter test: reading the real numbers
A basic digital multimeter runs about fifteen dollars at any hardware store, and it’s one of the most useful tools in my garage. I keep one in the door pocket of my truck, no exaggeration.
Here’s exactly how I run this test:
- Set the dial to DC voltage, usually marked with a V and a straight line on top (as opposed to a wavy line, which is AC). Pick the 20V range if your meter has multiple settings.
- Touch the red probe to the positive terminal (marked with a plus sign, usually with a red cap or cover) and the black probe to the negative terminal (marked with a minus sign).
- Read the number on the screen. Make sure the engine has been off for at least 30 minutes before you test. Right after driving, the battery holds a “surface charge” that can read artificially high and lie to you about the battery’s real condition.
Here’s what those numbers actually mean:
- 12.6V to 12.8V — Perfect health. Fully charged, nothing to worry about.
- 12.2V to 12.4V — Weak. The battery is sitting around 50 percent charge. It’ll probably still start the car today, but it’s heading toward trouble.
- Below 12.0V — Practically dead. At this point, I’d plan on a charge-and-retest cycle at minimum, and probably a replacement.
One safety note here that catches people off guard: never let the red and black probes touch each other while they’re still connected to the battery. Even a brief short can throw sparks and, in rare cases, cause the battery to vent or crack. Keep your probes separated and work calmly.
Want to skip the math and just get a straight answer? I built a quick interactive tool for exactly this. Drag the slider to match your multimeter reading, or type the number in directly, and it’ll tell you in plain English what’s going on and what to do next.
Battery voltage diagnostic tool
Drag the slider to match your multimeter reading, or type the exact number. I’ll tell you straight away what it means and what to do next.
Battery health matrix
If you’d rather just glance at a chart than read paragraphs, here’s the same information laid out plainly.
| Multimeter Reading | Charge Level | Condition | Required Action |
|---|---|---|---|
| 12.6V – 12.8V | 100% | ✓ Fully Charged | None. Battery is in excellent shape. |
| 12.4V – 12.5V | 75% – 90% | Good | Drive 20+ minutes or trickle charge overnight. |
| 12.2V – 12.4V | ~50% | ⚠ Weak Charge | Charge fully and retest within a few days. |
| 12.0V – 12.2V | ~25% | ⚠ Critical | Charge immediately, get a load test done. |
| Below 12.0V | Near 0% | ✗ Dead | Replace the battery. Charging is a temporary fix at best. |
I keep a version of this chart taped inside my toolbox lid. It’s saved me from second-guessing a reading more than once, especially on a cold morning when my brain isn’t fully awake yet either.
A quick word on load testing, since I mentioned it above: a voltage reading tells you how charged the battery is, but it doesn’t tell you how much current it can actually deliver under load. Most auto parts stores will run a free load test with a handheld tester that puts the battery under a real load and watches how the voltage holds up.
If your voltage reading is borderline, a load test is the tiebreaker. I always recommend it before spending money on a new battery, and definitely before assuming the battery is fine just because it reads 12.4V at rest.
Simple preventative care: cleaning the terminals
Here’s something that trips up a lot of people, including some who’ve been wrenching for years: sometimes a perfectly good battery acts completely dead, and the battery itself isn’t the problem at all. White or pale blue crusty buildup on the terminals can block electrical current just as effectively as a dead cell can.
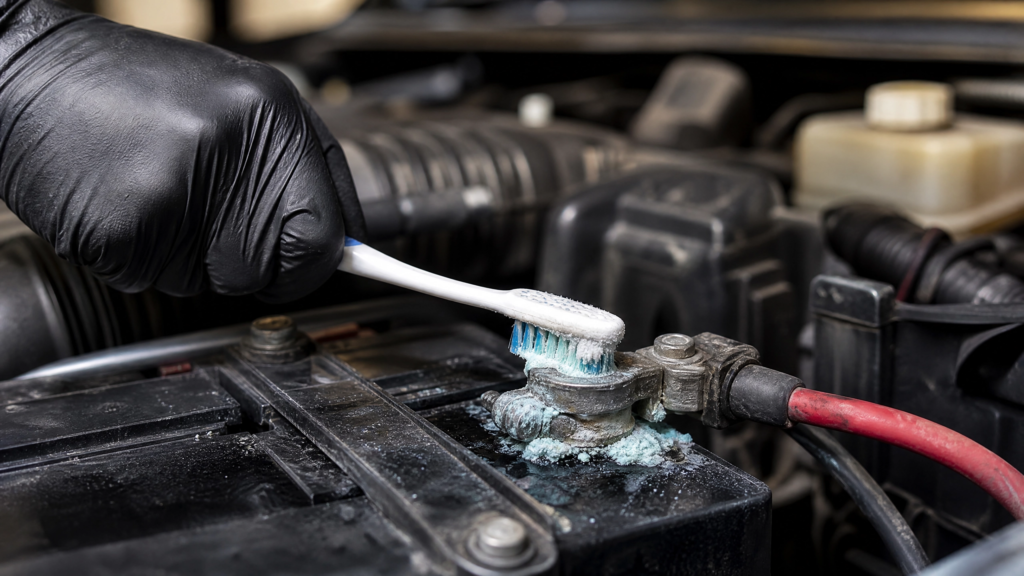
That crust is corrosion, caused by hydrogen gas escaping the battery and reacting with moisture and dust. It looks nasty, but it’s an easy fifteen-minute fix.
Scrub it clean:
- Disconnect the negative cable first, then the positive. This order matters. Disconnecting negative first reduces the risk of a spark if your wrench accidentally touches metal while you’re loosening the positive side.
- Mix one tablespoon of baking soda into a cup of warm water. This neutralizes the acid in the corrosion, which is the same reason it works so well, baking soda is a base and the corrosion is acidic.
- Dip an old wire brush or toothbrush into the solution and scrub the metal clamps and posts until they’re clean and shiny. A 10mm or 8mm wrench (size depends on your vehicle) will usually loosen the clamp bolts if the buildup has crept underneath them.
- Dry everything with a shop rag before reconnecting. Reconnect positive first, then negative, the reverse order of how you took them off.
A couple of safety notes I tell every beginner who asks me about this job. Wear gloves and eye protection. Battery acid will eat a hole clean through your jeans, and worse, if it gets on painted metal on your car, it can corrode straight down to bare metal if you don’t rinse it off quickly. I’ve seen a small drip sit on a fender overnight and leave a permanent bare spot the size of a dime.
Also, keep that baking soda solution away from the battery’s vent caps. You want to clean the outside of the terminals, not flood cleaning solution down into the cells themselves. A damp rag does the job just fine, you don’t need to pour anything directly onto the battery.
One more thing I always mention: if you’ve got a battery with sealed, hidden terminals under a plastic cover, take a second to wipe dirt and grime off that cover before you even open it. Dirt that falls into the terminal area on some modern vehicles can find its way toward sensitive electronics nearby, including ABS valve components in tightly packed engine bays. It sounds like overkill, but a clean rag wipe-down before you start costs you ten seconds.
Bringing it all together
A weak battery doesn’t have to catch you off guard. Between the headlight trick, a fifteen dollar multimeter, and a quick terminal cleaning, you’ve got everything you need to catch the problem weeks before it leaves you stuck in a parking lot.
My honest advice, the same thing I tell anyone who asks me about this: test your battery every six months, especially right before the first cold snap of the season and right after the hottest stretch of summer. Heat is actually harder on batteries than cold is, it just shows up later, usually as that slow crank on the first frosty morning. A few minutes with a multimeter twice a year beats a tow truck bill every single time.
If your numbers come back weak, don’t just throw money at a new battery right away. Charge it, retest it, and get a load test at a parts store if you’re still unsure. Batteries are expensive enough that it’s worth the extra five minutes to be sure you actually need one.
Stay safe out there, and keep that multimeter in the glove box. You’ll be glad it’s there the next time something sounds even slightly off.


Leave a Reply