
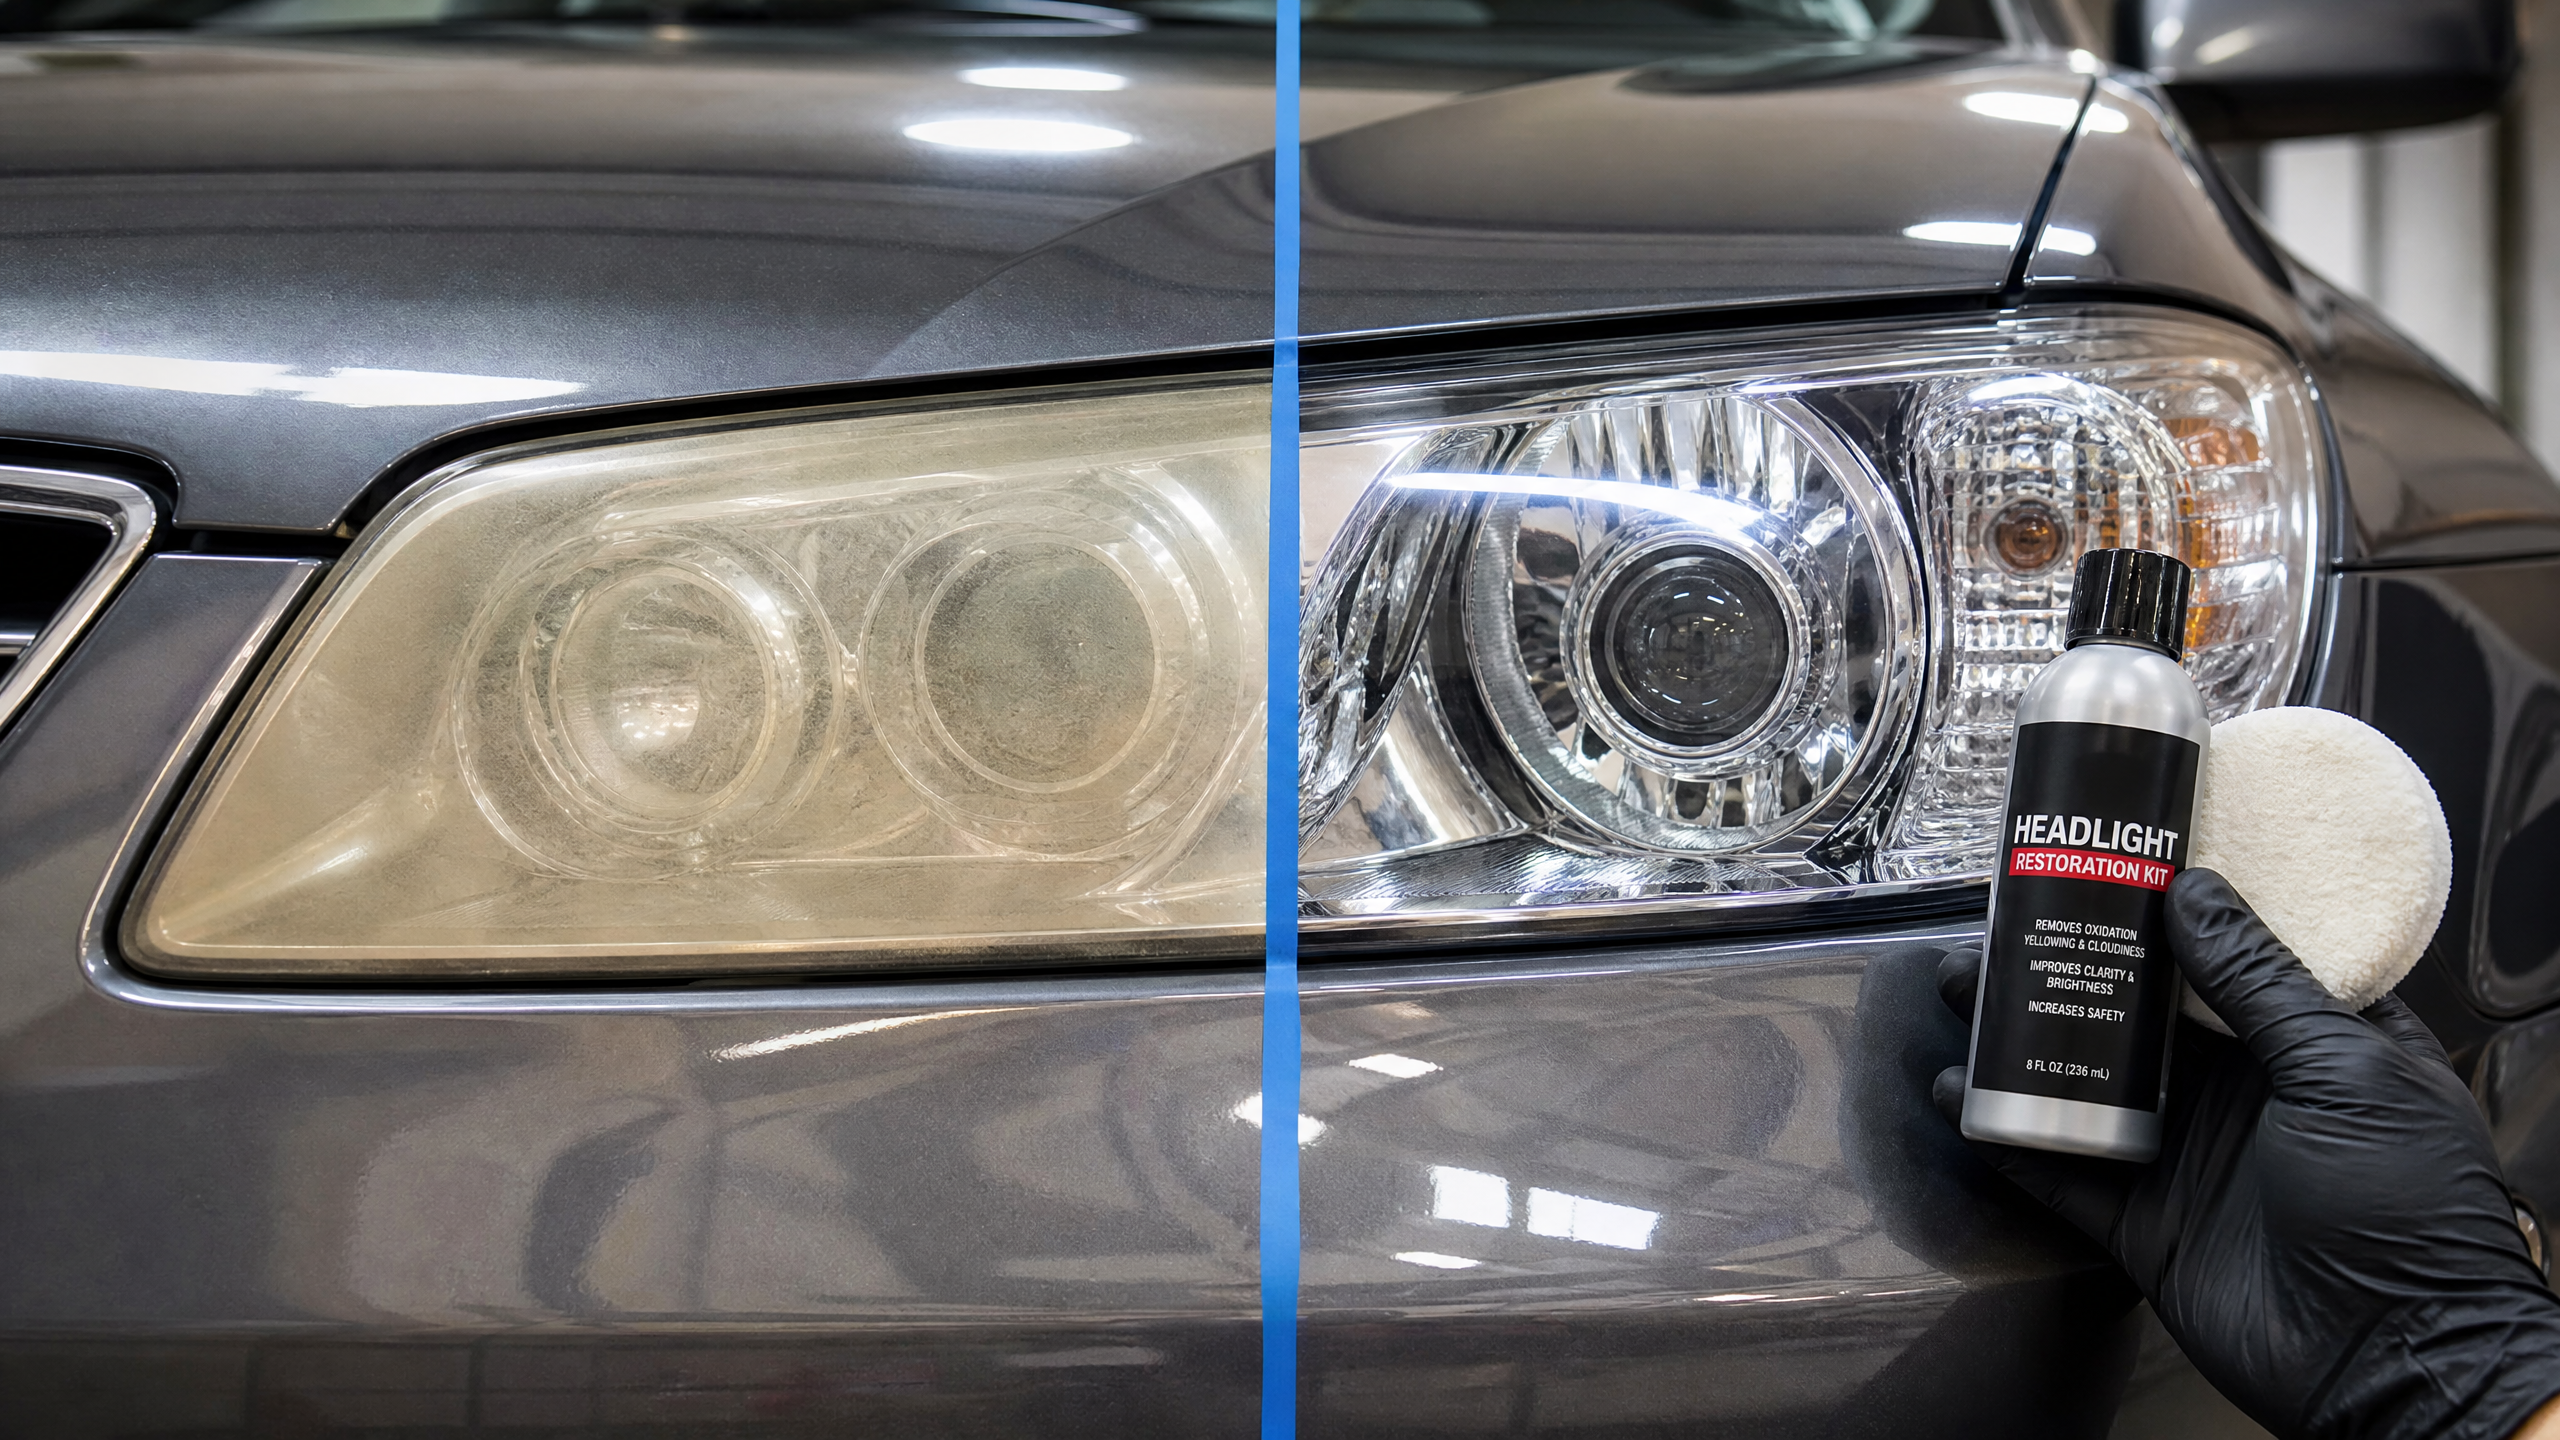
I’ve lost count of how many hazy, yellowed headlights I’ve had sitting on my bench. Customers bring their cars in thinking they need new headlight housings, and nine times out of ten, that cloudy plastic just needs the right kit and thirty minutes of elbow grease.
Here’s the thing though — not every restoration kit is worth your money. I’ve used the cheap wipe-and-go bottles that clear things up for two weeks before the haze creeps right back. I’ve also used kits that legitimately hold up through two Michigan winters. The difference almost always comes down to whether the kit actually seals the lens with real UV protection, or just polishes the surface and calls it a day.
I put together this list from kits I’ve either run myself or seen enough of on customer cars to trust the pattern. I’m ranking from #10 up to my top pick, so stick around for the one I reach for first.
Quick garage note before we start: if your headlights are cloudy enough to fail a safety inspection or trip the visual check on a smog test, don’t just wipe them down for photos. Sand them properly first. Inspectors shine a light through the lens and look for actual clarity, not a quick shine.
#10. Mothers NuLens Headlight Renewal Kit
Testing Summary: Headlight Restoration Kit Clarity Retention Test
| Testing Metric | Weight | Evaluation Method |
|---|---|---|
| Initial Light Restoration (%) | 40% | Lux meter light transmission test through severely oxidized lenses |
| UV Sealant Longevity | 30% | Outdoor UV exposure rack monitoring for 90 days |
| Ease of Sanding/Polishing | 20% | Timed multi-stage grit progression trial |
| Kit Completeness | 10% | Inventory check of sandpaper grits, backing pads, and sealants |

- Quickly Restores Headlight Clarity: Removes yellowing, stains, oxidation…
- All-in-One Headlight Renewal Solution: Polishes away light to moderate…

Mothers has been in the car care game forever, and this kit leans on their PowerBall polishing tool instead of sandpaper discs. You chuck the foam ball into a drill, add the included PowerPlastic polish, and buff.
What I like: it’s fast. On lightly hazed lenses I’ve had this done in under 10 minutes per side. The polish also doubles as a maintenance product, so you can hit your headlights again in six months without buying a whole new kit.
Where it falls short: on heavily oxidized lenses — the kind that look chalky white — this kit struggles. There’s no aggressive sanding step, so it’s polishing over damage instead of removing it. I only reach for this one on headlights that are mildly dull, not deeply yellowed.
#9. Rain-X 2-Step Headlight Restorer Kit

- No Tools or Tape Required – Restore headlights with ease using this simple…
- Quick 15-Minute Process – Clean and polish headlights in just 15 minutes…
Rain-X updated their kit with what they call Graphene Shield tech, and I’ll admit the sealant does feel more durable than their older polish-only formula. No sanding, no tape, no drill — just a polish step and a wipe-on coating.
Garage insight: I tested this on a customer’s fleet van with moderate yellowing from sitting in a parking lot all day, every day. It brought back real clarity, and four months later the lenses were still holding up when I checked during an oil change.
Where it falls short: it’s a light-to-moderate oxidation kit, not a heavy-duty one. If your lenses are pitted or scratched from years of stone chips, this won’t touch that. Also, one kit only covers one set of headlights, so buy two if you’re doing a fleet.
#8. Turtle Wax Headlight Restoration Kit (T-240KT)

- RESTORES FOGGY HEADLIGHTS: Quickly restore and eliminate oxidized and…
- BOOST VISIBILITY: Clear and polished headlights shine brighter for maximum…
Turtle Wax has been making car care products since 1946, and this no-drill kit is their answer for people who don’t own power tools. It uses graduated wet-sanding pads (2400 to 8000 grit) worked by hand, followed by a clarifying compound and a sealing wipe.
What I like: the pad grits are well spaced, so you’re not jumping from aggressive to fine and missing a step. Working by hand also means less risk of burning through the clear coat, which happens more than people think when a drill gets away from you.
Where it falls short: hand sanding takes real time and forearm strength. Budget 25-30 minutes per headlight, more if the oxidation is heavy. If you’re short on patience, a drill-based kit will get there faster.
#7. Nasiol Nano Ceramic Headlight Restorer

- CERAMIC COATING TECHNOLOGY – Powered by nano-ceramic coating, this…
- 2 EASY STEPS – FAST RESTORATION: Step 1: Use the included wet-sanding…
Nasiol is a newer name in the U.S. market, but their nano-ceramic coating chemistry is legit — I’ve used their glass and paint coatings before, and this headlight kit follows the same formula philosophy. Wet sand with the included 500/1000/2000 grit discs, then seal with the ceramic coat.
What I like: the coating goes on thin and cures hard, similar to what you’d get from a paint ceramic coating. It’s rated for multi-year protection, and in my experience with their other products, that claim tends to hold up better than most.
Where it falls short: the instructions are translated and can be a little clunky to follow the first time through. Read them twice before you start, and don’t rush the cure time — touching the coating too early will leave streaks you can’t buff out.
#6. Gliptone Headlight Restoration Kit

- Simple 2 Step System: Restore clarity in minutes with an easy…
- Restores Up to 4 Headlights: Each 7 piece kit includes enough product to…
Gliptone skips sanding entirely and leans on a chemical restoration process instead. That sounds risky, but it’s actually the gentlest option on this list for lenses that aren’t too far gone.
What I like: because there’s no sanding, there’s zero risk of uneven pressure creating swirl marks or a wavy finish — a mistake I’ve seen plenty of first-timers make with drill kits. It’s genuinely the easiest kit on this list to hand to someone who’s never restored a headlight before.
Where it falls short: on lenses with real depth to the oxidation, chemical-only restoration can’t remove material the way sanding can. If you can feel roughness on the lens with your fingernail, skip this one and go with a sanding-based kit instead.
#5. Chemical Guys Headlight Restore & Protect

- HEADLIGHT RESTORATION AND PROTECTION (GAP11516) – All-in-one formula…
- RESTORES LIKE-NEW CLARITY – This headlight restorer quickly removes…
Chemical Guys built their name on detailing products, and this one-step restore-and-protect formula is their answer to people who want results without a multi-step process. Rub it on by hand or machine, buff it off, done.
What I like: it’s genuinely a one-bottle solution, which makes it my go-to recommendation for someone who just wants their headlights looking better before a road trip and doesn’t want to commit an afternoon to it. It also plays nice as a between-restoration maintenance product.
Where it falls short: it’s not built for severe oxidation. On a lens that’s gone chalky and pitted, this will improve things but won’t get you back to glass-clear. Think of it as a strong touch-up, not a full restoration.
#4. Meguiar’s G3000 Heavy Duty Headlight Restoration Kit

- Restores clarity to severely neglected, oxidized, yellowed, and scratched…
- Includes Easy Buff wool pad that attaches to a standard corded drill for a…
This is the kit I grab when a headlight looks genuinely rough — deep yellowing, scratches, the works. It’s drill-powered, using a wool pad plus 1,000 and 3,000-grit finishing discs, along with Meguiar’s Plast-X polish.
Garage insight: the drill-driven wool pad cuts faster and more evenly than any hand-sanding kit I’ve used. I’ve restored a badly sun-baked set of headlights on an old work truck in about 20 minutes total with this kit, start to finish, including taping off the surrounding paint.
Where it falls short: you need a corded or well-charged cordless drill, and a heavy hand with that wool pad can burn through the clear coat fast if you linger too long in one spot. Keep it moving and keep the surface wet.
#3. SYLVANIA Headlight Restoration Kit

- Easy Headlight Restoration Kit: The Sylvania Headlight Restoration Kit is…
- Restores Headlight Clarity: Designed to eliminate haze and yellowing, this…
Sylvania’s been making automotive lighting for over a hundred years, and it shows in how this kit is engineered. No tools needed — a surface activator softens the plastic first, then you sand by hand, then seal with their UV block clear coat.
What I like: that surface activator step is the standout. It genuinely makes the sanding phase go faster because you’re not fighting fully hardened, sun-baked plastic. The UV coat afterward has held up well on customer vehicles I’ve checked back on 12-plus months later.
Where it falls short: it’s a no-drill kit, so like the Turtle Wax option, it takes patience and forearm effort. Also budget real time for the process — this isn’t a 10-minute job, closer to 30-40 minutes per headlight if you follow every step properly.
#2. 3M Ultra Headlight Restoration Kit (39195)

- KIT INCLUDES: 1 – Disc Pad Holder, 3.25 in (8,2 cm) 6 – 3M Gold Sanding…
- KITS CONTAIN masking tape, light sanding discs, wax protectant and more
3M’s Trizact abrasive discs are honestly some of the best sanding media in the business, and this kit proves it. It’s a progressive system — 500-grit, then 800-grit, then a 3000-grit refining disc — usable with or without a drill.
Garage insight: I keep a couple of these in the shop specifically for the worst cases — headlights that look like frosted glass. The step-down grit progression matters more than people realize. Skip a grit and you’ll see faint sanding marks under streetlights at night, even after the clear coat goes on.
Where it falls short: it’s a more involved process than the wipe-on kits, and you do need to keep the surface wet through every sanding stage or you risk gouging the plastic. Also plan on masking tape around the lens — 3M’s abrasives don’t play nice with paint.
#1. CERAKOTE Ceramic Headlight Restoration Kit

- KIT CONTENTS: Each headlight restoration kit includes (8) Step 1 Oxidation…
- LONG-LASTING CERAMIC COATING: This is a CERAMIC coating for cars that…
This is the kit sitting on my shelf right now, and it’s the one I hand to customers who ask what to buy for themselves. Three steps, all wipes, zero power tools: oxidation-remover wipes, a light sanding pad for stubborn spots, then two ceramic coating wipes to seal it all in.
Garage insight: I ran this on a neighbor’s Tacoma with lenses so baked they looked like frosted shower glass. Thirty minutes later, they looked close to factory. What actually sold me wasn’t the initial result — plenty of kits look good on day one. It was checking back eight months later and finding almost no yellowing creeping back in, even after a full summer of sun exposure.
Where it falls short: the ceramic coating chemically bonds to the lens, which is great for durability but means there’s zero room for error on application. Wipe in one direction, don’t go back over a spot once it starts to set, and keep your garage dust-free while it cures. Rework isn’t really an option here the way it is with a spray-on sealant.
What Actually Matters When You’re Picking a Kit
I get asked a lot of the same questions at the counter, so let me save you some back-and-forth.
Sanding vs. no-sanding — which do you actually need?
- If you can feel roughness or pitting on the lens with your fingernail, you need a sanding kit. No amount of polish removes actual surface damage.
- If the lens is smooth but hazy or yellowed, a no-sanding chemical kit will usually get you there with less effort.
Drill or no drill?
- A drill-based kit cuts faster and gives a more even finish across the whole lens, especially on textured or curved headlights.
- Hand application gives you more control and less risk of burning through the clear coat, but it’ll cost you time and forearm strength.
UV protection is not optional. Every kit on this list includes some form of sealant or coating step. Skip that step — even if you’re in a hurry — and you’ll be back to a hazy lens in a matter of months. UV is what actually causes the oxidation in the first place, so a kit without real UV blocking is just delaying the problem.
A few things I always tell people before they start:
- Wash and dry the headlight completely before doing anything. Any grit or road film left on the surface will scratch into the lens during sanding.
- Tape off the surrounding paint. Sanding discs and clarifying compounds will dull painted surfaces if they touch them.
- Keep the lens wet during any sanding step. Dry sanding builds heat and can cause micro-cracking you won’t notice until the coating goes cloudy weeks later.
- Work in the shade if you can. Direct sun causes some sealants to flash-cure unevenly, leaving streaks.
How Long Should Results Actually Last?
This is where I see people get burned by marketing claims. Wipe-on chemical kits without a real sealant step tend to hold for a couple of months before haze creeps back. Sanding-based kits with a proper UV clear coat or ceramic sealant can realistically hold for 1 to 3 years, depending on your climate. If your car sits outside in direct sun daily — especially at altitude or somewhere hot like Arizona or Texas — expect the shorter end of that range no matter which kit you use.
If you want your results to stretch as long as possible, a quick maintenance wipe with a UV protectant spray every few months does more for longevity than anything in the original kit.
Haze Severity Picker
Choose the condition that most closely matches your headlights. Open one option to see the recommended restoration approach and product pick.
Faint yellow tint — still mostly clear
Skip sanding. Use a headlight compound with a foam pad, follow with finishing polish, and apply a UV sealant.
Recommended pick: Mothers NuLens Headlight Renewal Kit
Best for light haze when you want a quick drill-assisted polish without a full sanding process.
Check the Mothers NuLens kit on Amazon
Milky haze or moderate cloudiness
Wet-sand progressively with 1000, 2000, and 3000 grit, then compound, polish, and protect the lens with a UV sealant.
Recommended pick: Turtle Wax Headlight Restoration Kit
A practical hand-sanding option with graduated pads, clarifying compound, and a sealing wipe for moderate cloudiness.
Check the Turtle Wax kit on Amazon
Peeling, cracked, or severely oxidized coating
Remove the failed coating with careful wet sanding, complete the full polish sequence, and apply a durable UV coating. Replace the lens or seek professional help if cracks extend into the housing.
Recommended pick: CERAKOTE Ceramic Headlight Restoration Kit
The guide’s top pick for heavily oxidized lenses because it combines oxidation removal with a durable ceramic coating and needs no power tools.
Check the CERAKOTE kit on Amazon

Leave a Reply