
I had a customer once who paid $89 for an air filter swap at a quick lube place. Eighty-nine dollars. The filter itself was maybe eighteen bucks, and the job took the tech less time than it takes to make a sandwich. I remember standing there thinking, if only people knew how easy this actually is.
So let’s fix that. This is genuinely one of the simplest jobs you can do on your own car, and for most vehicles, you won’t touch a single tool. Just your hands and about ten minutes.
Why Bother Doing This Yourself
Your engine air filter keeps dirt, dust, bugs, and debris out of the engine’s intake. Air gets pulled through that filter before it mixes with fuel and gets burned in the cylinders.
A clogged filter chokes that airflow. Your engine has to work harder to breathe, which can hurt your fuel economy and, in bad cases, cause a noticeable loss of power when you hit the gas.
I’ve pulled filters out of cars that looked like they’d been dragged through a dust storm — packed with leaves, pine needles, even a few unlucky moths. That’s not an exaggeration. If you’ve never checked yours, there’s a decent chance it’s overdue.
And the fix costs almost nothing. Filters run anywhere from $10 to $30 depending on your car, and the whole job takes less time than waiting in line at a shop.
What You’ll Need
- A new air filter that matches your make, model, and year (check the box, or look up your car at any auto parts store website)
- Your hands — that’s genuinely it for most cars
- A rag, just in case the housing’s dusty inside
Some older vehicles use a screwdriver or a couple of small clips that need a light tug with pliers, but the vast majority of cars built in the last 15-20 years use simple spring clips or snap latches you can pop with your fingers. I’ll flag where a tool might come in handy below.
Step 1: Find the Air Filter Housing
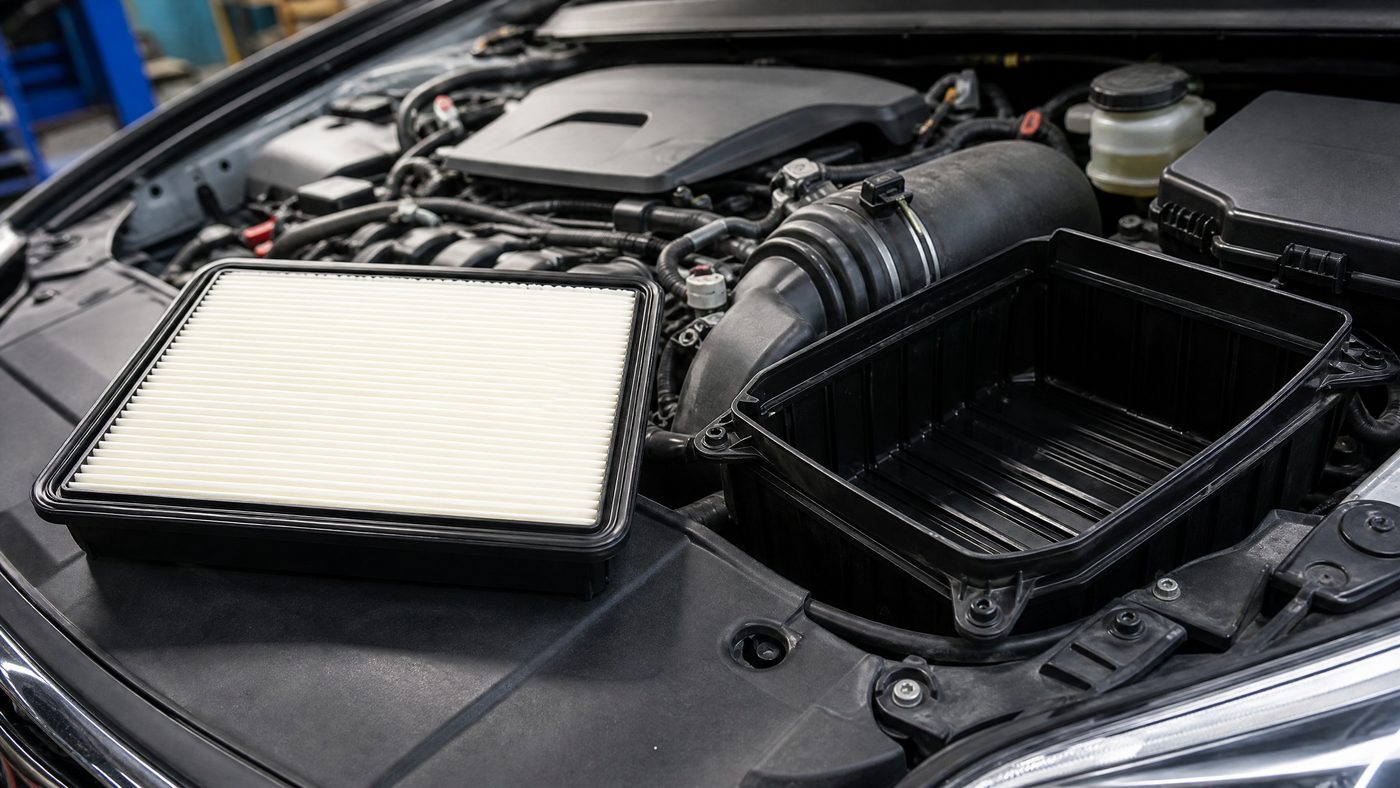
Pop the hood. You’re looking for a black plastic box, usually rectangular, sometimes with a snorkel-looking tube running off to one side toward the front grille or fender.
It’s almost always near the front of the engine bay, close to the radiator support or along one of the front corners. On most cars it’s one of the biggest black plastic pieces under the hood, so it’s not exactly hiding.
If you can’t spot it right away, look for a wide plastic duct running from the front of the car toward the engine. Follow that duct — it’ll lead you straight to the filter box.
Step 2: Open the Housing
This is the only part that varies much car to car, so I’ll cover the three most common setups.
Type 1: Spring clips (most common) Look along the edges of the box for small metal clips or plastic tabs. Pinch or pull them outward, and the top of the housing lifts right off. No tools needed — just your fingers.
Type 2: Screws Some housings use one or two Phillips-head screws holding the lid down. A basic screwdriver handles this in seconds. I keep one in the garage specifically because a handful of cars I’ve worked on use this style.
Type 3: Snap latches A few designs use plastic snap-together latches, kind of like a lunch box clasp. Press down and pull, and it releases. These are common on some Japanese and Korean models.
Whatever type you have, don’t force it. If a clip feels stuck, wiggle the housing gently side to side while you pull. Plastic housings get brittle with age and heat, and cracking one means an extra trip to the parts store for a part that isn’t nearly as cheap as the filter itself.
Step 3: Remove the Old Filter and Check It
Once the lid’s off or swung open, lift the old filter straight out. Take a look at the direction it was sitting — some filters have a slight taper or an arrow printed on the frame showing airflow direction. I always snap a quick mental note (or a photo on my phone if I’m doing a car I’m not familiar with) before pulling it, just so the new one goes back in the same way.
Here’s what to look for on the old filter:
- Light dust coating, still mostly white or off-white: you’re probably fine for a while longer, but since you’ve already got it out, might as well swap it if it’s due
- Gray, packed with visible dirt, maybe some debris caught in the pleats: time for a new one
- Hold it up to a light source. If you can’t see light coming through the pleats at all, that filter is done. This is the same trick I use to show customers why their car’s been running sluggish.
Give the inside of the housing a quick wipe with your rag while it’s open. Leaves and dust tend to collect in the bottom corners, and there’s no reason to seal fresh air behind a layer of grime.
Step 4: Drop In the New Filter
Set the new filter in facing the same direction as the old one. Most filters have a rubber gasket edge that only seats correctly one way, so if it doesn’t sit flush and flat, flip it and try again.
Press down gently around the edges to make sure it’s seated evenly in its groove. You shouldn’t have to force it — if it’s fighting you, it’s probably in backward or slightly misaligned.
Step 5: Close the Housing Back Up
Reverse whatever you did in Step 2. Snap the clips back down, tighten the screws, or press the latches shut. Give the lid a light push around all the edges to make sure it’s seated and sealed — an improperly closed housing lets unfiltered air sneak in around the edges, which defeats the whole purpose of the filter you just installed.
That’s it. Close the hood, and you’re done.
CHANGE YOUR
AIR FILTER
LOCATE AIRBOX
Pop hood. Black plastic box near engine.
OPEN IT
Release clips or unscrew. Lift cover.
REMOVE OLD
Lift dirty filter. Wipe housing.
INSERT NEW
Drop new filter same orientation. Seal flush.
CLOSE & SECURE
Replace cover, re-clip. Start engine — done.
A Few Things I’ve Learned Doing This a Hundred Times
Don’t try to clean and reuse a standard paper filter. I see people attempt this with compressed air or by tapping it against a wall. Paper filters aren’t designed to be cleaned — you’ll just push the trapped dirt deeper into the pleats or tear the material. If your car uses a reusable oiled cotton filter (some aftermarket performance setups do), that’s a different product with its own cleaning kit, and it’ll say so on the filter itself.
Check your filter every oil change, replace it roughly every 12,000 to 15,000 miles, though this varies by how dusty your driving conditions are. If you drive a lot of gravel roads or live somewhere dry and dusty, check it more often. I’ve had customers in construction who needed theirs swapped every few months because of the site dust they drove through daily.
A dirty air filter will not usually throw a check engine light. People sometimes assume their engine light means the air filter, but that’s rarely the case unless it’s so severely clogged that it’s affecting the mass airflow sensor readings. Don’t wait for a warning light. Just check it visually on a schedule.
Never run your engine with the housing lid off or the filter out entirely, even briefly. Unfiltered air pulling dust and debris straight into your intake can damage the mass airflow sensor or, worse, let something small get sucked into the throttle body.
If your engine bay has a cabin air filter too, don’t confuse the two. The cabin air filter is a separate part that cleans the air blowing through your vents and heater, usually located behind the glove box, not under the hood. Different job, different part, different location. I mention this because I get asked about it constantly when people are looking at their engine air filter.
When a Tool Actually Helps
I said no tools needed, and for most cars that’s true. But here’s when I’d grab something from the toolbox anyway:
- A Phillips screwdriver for housings with screw-down lids
- A flashlight or your phone’s flashlight if you’re working in a dim garage or it’s getting dark out — you want to actually see the pleats clearly to judge the filter’s condition
- Needle-nose pliers, only if a spring clip is stuck or corroded and won’t budge by hand
None of these are strictly required for a standard swap, but having them nearby saves you a walk back to the garage mid-job.
Quick Reference Checklist
- [ ] Confirm the correct filter for your make, model, and year
- [ ] Pop the hood and locate the black plastic housing
- [ ] Open clips, screws, or latches to access the lid
- [ ] Note the airflow direction before removing the old filter
- [ ] Check old filter condition (hold to light to check for clogging)
- [ ] Wipe out any debris inside the housing
- [ ] Insert new filter facing the same direction
- [ ] Press edges down to confirm a flush, even seat
- [ ] Close and secure the housing completely
- [ ] Never run the engine with the housing open or filter removed
Signs Your Air Filter Is Overdue
Beyond just checking it visually, here are a few real-world signs I’ve come across that usually point back to a clogged filter:
- A noticeable drop in acceleration, especially when flooring it from a stop
- Worse fuel economy than usual, even though your driving habits haven’t changed
- A faint burning or musty smell near the vents, sometimes caused by debris trapped in a badly clogged system
- Rough idle, in more severe cases where airflow is significantly restricted
- Visible dirt or debris if you shine a light through the pleats and can’t see through at all
None of these symptoms are exclusive to a dirty air filter, so if you swap it and the issue’s still there, it’s worth having a mechanic take a broader look. But it’s the cheapest thing to rule out first.
Frequently Asked Questions
Can I drive with the air filter out if I forgot to put it back in? Don’t. Even a short drive can let dust and debris straight into your intake system, which can damage the mass airflow sensor or throttle body over time. If you realize it’s missing, put the old one back in temporarily rather than driving without any filter at all.
How do I know which filter fits my car? Look up your car’s year, make, model, and engine size on any auto parts store’s website or app — most let you enter your plate or VIN and it’ll pull the exact part for you. You can also just take a picture of your old filter’s part number, usually printed on the frame, and match it that way.
Is a more expensive filter actually better? For most daily drivers, a standard paper filter from a reputable brand does the job just fine. Higher-end filters marketed for better airflow or performance mostly matter if you’re chasing small performance gains on a modified engine. For a typical commuter car, stick with what your manufacturer recommends.
What if my housing has a wiring harness or sensor connector near the lid? Some cars route the mass airflow sensor wiring right near the filter box. If you see a connector, don’t yank on it. Just work around it gently, and if it’s actually attached to the lid itself, unclip it carefully by pressing the small tab before pulling apart.
How long should this really take once I’ve done it a couple times? Genuinely, once you’ve done your specific car once, it’s a five-minute job. The first time might take ten while you figure out the clips, which is still faster than driving to a shop.
Test What You’ve Learned
Here’s a short quiz to check what stuck from the steps above — housing types, warning signs, and a few of the common mistakes.
Air Filter Swap Quiz
Test what you picked up about changing your own engine air filter.




Leave a Reply