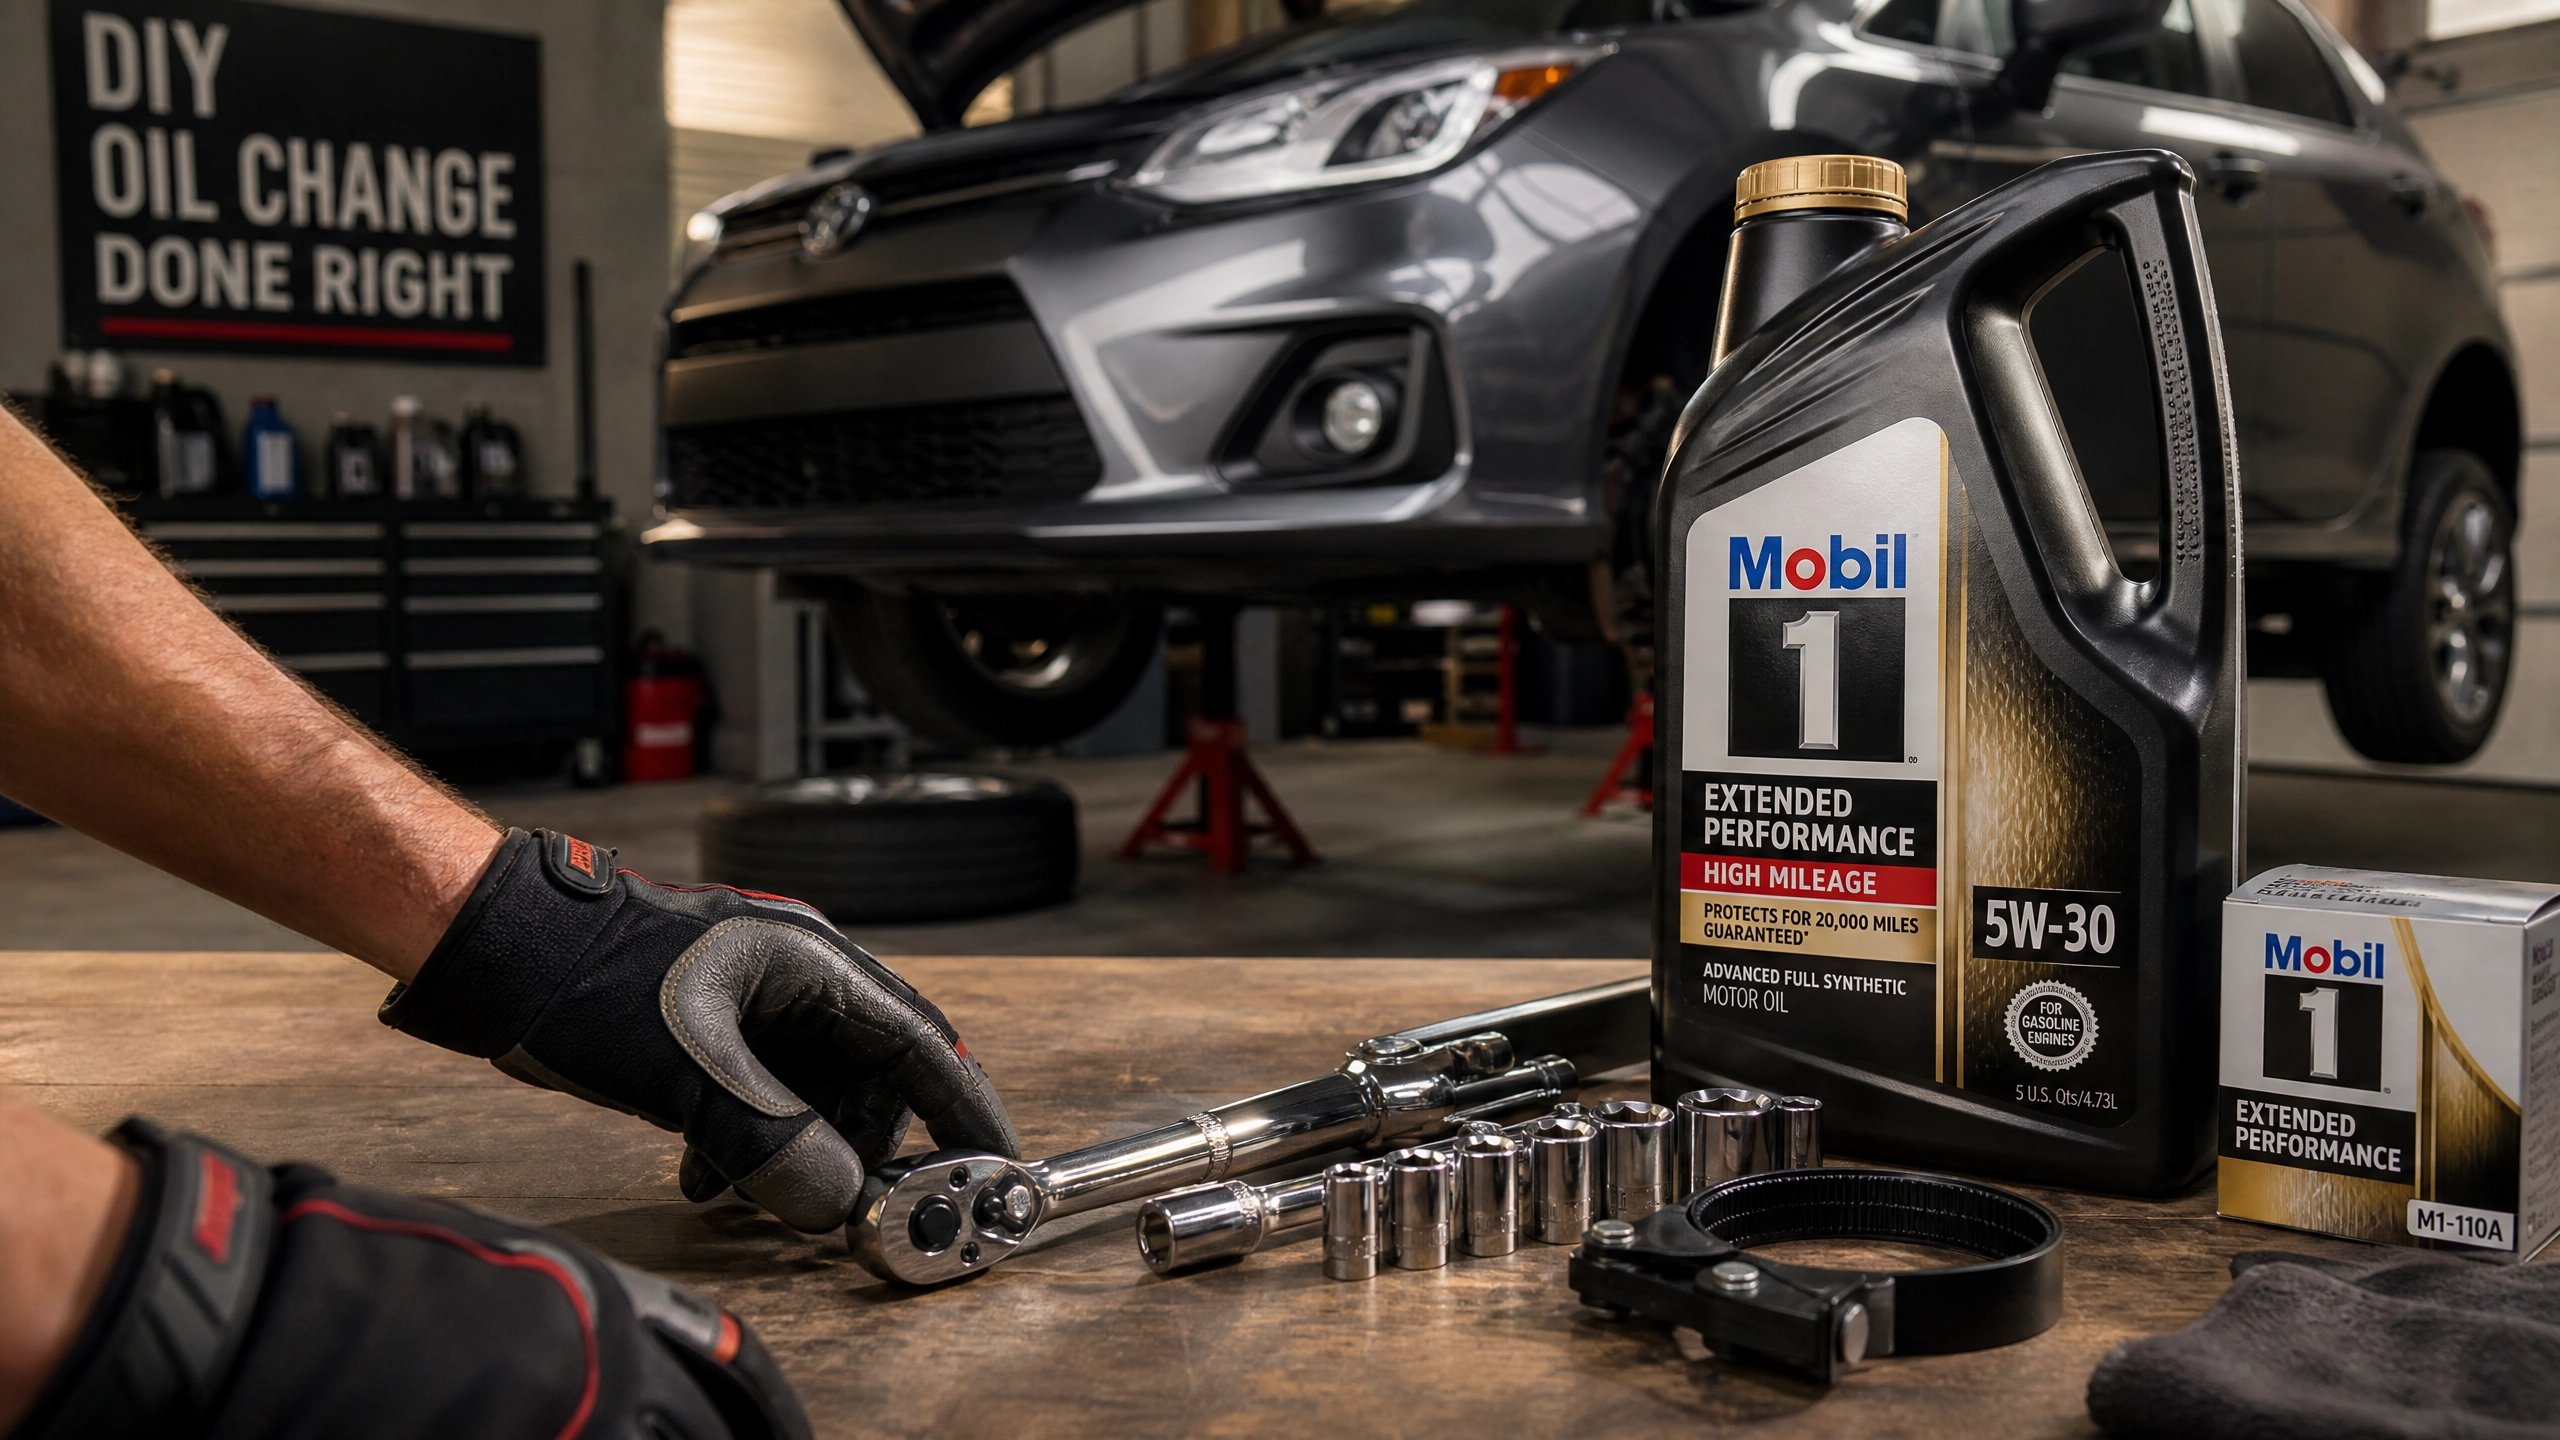
I still remember the first oil change I did on my own — a ’98 Honda Civic in my parents’ driveway, oil everywhere, drain plug nearly cross-threaded. That was twenty years ago. Since then, I’ve done hundreds of oil changes across every kind of vehicle, and I’ll tell you straight: this is one of the easiest, most rewarding maintenance jobs you can do yourself.
It takes about 30–45 minutes, saves you $50–$100 per service, and teaches you more about your car than three trips to the dealership ever will.
Let’s get into it.
Why Do Your Own Oil Change?
Most people hand this job to a shop out of habit. But once you do it yourself the first time, you’ll wonder why you ever paid someone else.
Here’s what you actually gain:
- Real cost savings. Shop labor plus their marked-up oil and filter adds up fast. Buying your own full synthetic and a quality filter runs $30–$50 tops for most vehicles.
- You control the oil. I always spec full synthetic — 5W-30 or 0W-20, depending on the engine — and I know exactly what went in. No shop substitutions.
- You spot problems early. While I’m under the car draining oil, I’m also eyeballing the CV boots, checking for any seeping gaskets, looking at the exhaust hangers. That kind of scan catches things before they get expensive.
- It builds real confidence. Once you’re comfortable under a car, everything else in DIY maintenance gets easier.
What You Need Before You Start
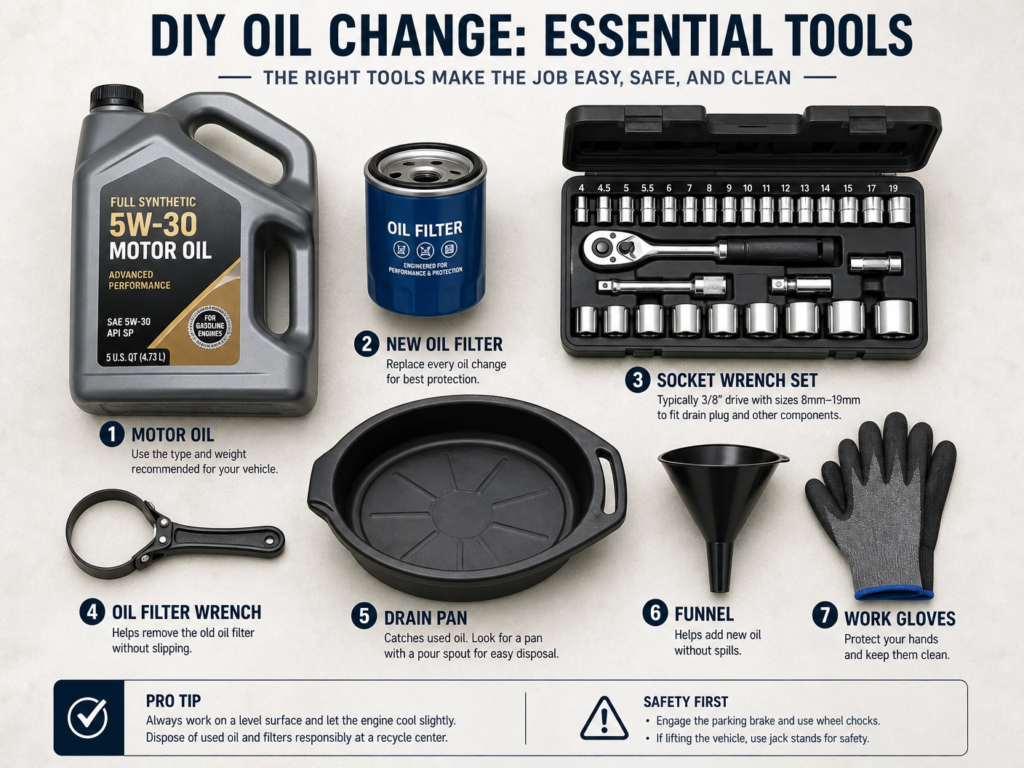
- Don’t make the mistake of starting the job and then realizing you’re missing something. I’ve done it — there’s nothing worse than having oil draining into a pan while you’re hunting around your garage for a 17mm socket.
- Gather all of this first:
- Fresh engine oil — the correct grade for your vehicle (check the owner’s manual — it’s usually on the oil filler cap too)
- New oil filter — matched to your specific make, model, and year
- Oil drain pan — big enough to hold 5–7 quarts
- Socket wrench + correct drain plug socket — commonly 14mm, 17mm, or 19mm depending on your car
- Oil filter wrench — the strap type works well for most spin-on filters; cup-style wrenches are better for tight spaces
- Car jack + two jack stands — non-negotiable for safety
- Wheel chocks — wedge them behind the rear tires
- Funnel — prevents spills when adding new oil
- Nitrile gloves — oil is harder to scrub off than you think
- Shop rags or paper towels — you’ll need more than you expect
- Cardboard or a drop cloth — protects your driveway
- Torque wrench (recommended) — to tighten the drain plug to spec; most are 25–30 ft-lbs, but yours might differ
One thing people skip and shouldn’t: check the drain plug size before buying sockets. I’ve seen guys strip oil pan threads using the wrong-sized socket because it almost fit. Almost isn’t good enough.
DIY Oil Change Assistant Toolkit
Use my interactive assistant below to track your progress and set a reminder for your next service!
🔧 DIY Oil Change Assistant
Interactive Companion for CarsRevamp Readers
Preparation
The Oil Change
Final Checks
Step-by-Step: How to Change Your Oil at Home
Step 1 — Warm Up the Engine, Then Let It Cool Slightly
Run the car for 5–10 minutes. Warm oil flows out faster and more completely than cold oil. You’ll get more of the old contaminants out.
Don’t start draining immediately though. Let it sit for 10–15 minutes after you shut it off. Hot oil and a hot exhaust manifold can cause burns fast. The goal is warm, not scalding.
Step 2 — Secure the Vehicle
Park on a level, flat surface. Engage the parking brake. Chock the rear wheels.
Jack up the front of the car and place jack stands under the frame rails or pinch welds (check your owner’s manual for the correct jacking points — using the wrong spot can crack your car’s underbody). Lower the car onto the stands and give it a firm shake before going underneath. If it moves, re-seat the stands.
I cannot say this enough: never work under a car that’s only supported by a floor jack. Jacks fail. Jack stands don’t.
Step 3 — Drain the Old Oil
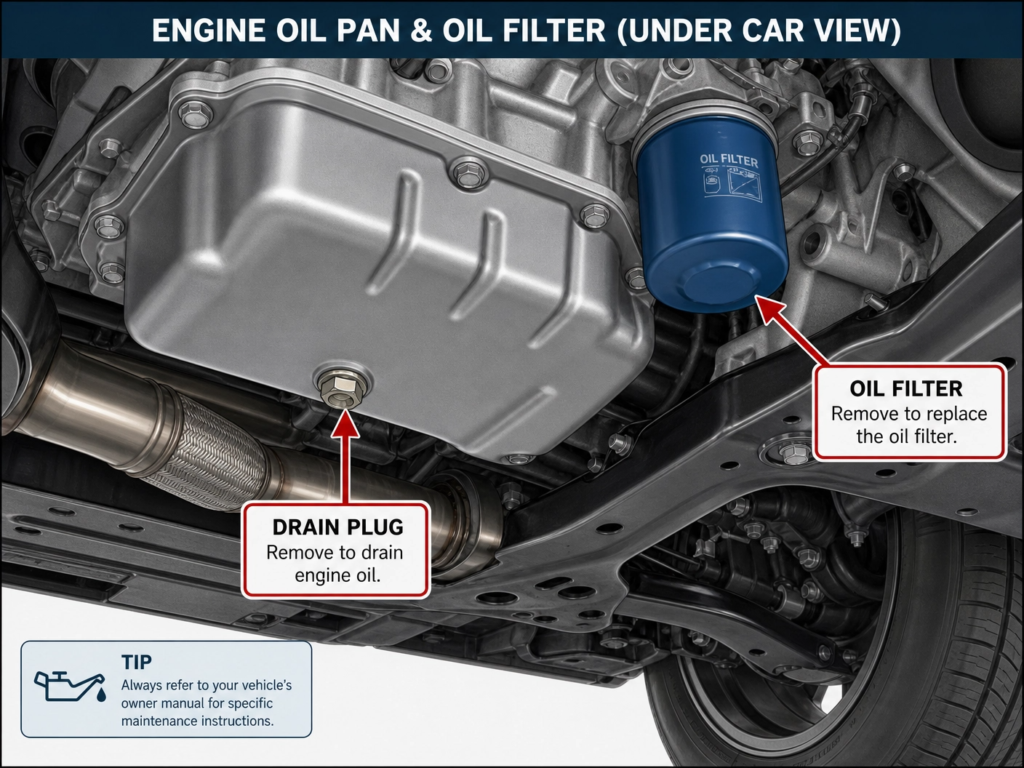
Slide under the car with your drain pan, socket wrench, and gloves.
- Locate the oil drain plug on the bottom of the oil pan. It’s a bolt, usually on the lowest point of the pan.
- Position the drain pan slightly forward of the plug — oil doesn’t fall straight down; it shoots out at an angle when first released.
- Use the correct socket (again, check your manual — 17mm is common on many Japanese vehicles, but don’t assume) and loosen the plug counter-clockwise.
- Once it’s nearly off, use your fingers to spin it out while pressing the plug into the pan. Pull it away quickly when the threads clear — the oil will flow out fast.
- Let it drain for 10–15 minutes until it slows to a drip.
While it drains, inspect the drain plug. If the sealing washer looks flat, deformed, or crushed, replace it. A $1 washer is a lot cheaper than cleaning up an oil leak.
Step 4 — Remove the Old Oil Filter
The filter still holds oil, so keep your drain pan positioned under it.
Use your oil filter wrench to break it loose — counter-clockwise. Once it’s loose, spin it off by hand and tip it into the drain pan.
Warning: If your filter is on the side of the engine block, be ready for oil to run down the block. Have a rag ready to catch it.
Now inspect the old filter’s mounting surface on the engine block. Make sure the old rubber gasket came off with the filter. This is a common mistake — the old gasket stays stuck to the engine block, you install the new filter on top of it, and you end up with a double-gasket situation that leaks badly. I’ve seen it happen to experienced guys. Always check.
Step 5 — Install the New Oil Filter
Before threading in the new filter, dip your finger in fresh oil and wipe it around the new filter’s rubber gasket. This helps it seat evenly and makes it much easier to remove next time.
Some people pre-fill the filter with oil before installing it. I do this when the filter is mounted vertically — it reduces the momentary dry start when you first fire up the engine.
Thread the new filter on by hand until the gasket contacts the block, then tighten it 3/4 of a turn more. That’s it. Do not use a wrench to tighten. Overtightening deforms the gasket and makes removal a nightmare next time — or worse, cracks the housing.
Step 6 — Reinstall the Drain Plug
Wipe the drain plug and the area around the drain hole clean with a shop rag.
Thread the plug back in by hand first to avoid cross-threading. Then tighten with your socket wrench. If you have a torque wrench, use it — most drain plugs spec between 20–30 ft-lbs, but check your manual for your exact number.
Snug and firm is the goal. Not gorilla-tight. Overtightening strips the threads on the oil pan, and that’s a far more expensive fix than you want.
Step 7 — Add the New Oil
Head to the top of the engine. Remove the oil filler cap (it usually has an oil can symbol on it).
Insert your funnel and pour in the new oil. Most 4-cylinder engines take 4–5 quarts; most V6s take 5–6 quarts; many V8s take 6–8 quarts. Start with one quart less than the full spec, then check the dipstick.
To read the dipstick correctly:
- Pull it out and wipe it clean with a rag
- Reinsert it all the way
- Pull it out again and read the level

The oil should be between the MIN and MAX marks. Add oil in small increments until you hit the full mark. Overfilling is a real problem — too much oil foams, and foamy oil doesn’t lubricate properly.
Replace the filler cap firmly.
Step 8 — Start the Engine and Check for Leaks
Lower the vehicle off the jack stands first.
Start the engine and let it run for 2–3 minutes. Watch for the oil pressure warning light — it should go out within 5–10 seconds of starting. If it stays on, shut the engine off immediately and investigate.
While the engine is running, get down and check underneath. Look at the drain plug and the oil filter for any drips. A few drops is normal at first; a stream is not.
Shut the engine off, wait 5 minutes for the oil to settle back into the pan, then pull the dipstick one more time and top up if needed.
Mistakes I See People Make (And That I’ve Made Myself)
1. Using the wrong oil grade. 5W-40 and 5W-30 are not interchangeable. One is thicker at operating temperature. Check the manual — the engine was engineered for a specific viscosity.
2. Forgetting to replace the drain plug washer. If your car uses a crush washer (aluminum or copper), it’s a one-use item. Re-using a flattened washer is the most common source of drain plug leaks.
3. Overtightening the filter or drain plug. I’ve stripped oil pan threads for a client who had been doing his own oil changes for years. He didn’t use a torque wrench, and he tightened the drain plug like he was angry at it. Cost him a new oil pan. Get a torque wrench.
4. Not checking for a double gasket on the filter. Covered above, but worth repeating. Always inspect the old filter base after removal. Make sure the gasket came with it.
5. Running the engine with no oil. If you get distracted and forget to add the new oil, starting the engine for even a few seconds can cause significant damage. After any oil change, I make it a habit to double-check the filler cap is on and the dipstick reads correctly before turning the key.
6. Disposing of old oil incorrectly. Used motor oil is toxic. It contaminates groundwater for decades. Pour your old oil into a sealed container — I reuse the empty bottles the new oil came in — and take it to an auto parts store. AutoZone, O’Reilly, and most NAPA locations take it for free.
How Often Should You Change Your Oil?
The old “every 3,000 miles” rule is outdated. It was accurate for carbureted engines running conventional oil in the 1970s. Modern engines and modern oils have come a long way.
The real answer depends on your oil type and driving conditions:
| Oil Type | Typical Interval |
|---|---|
| Conventional | 3,000–5,000 miles |
| Synthetic Blend | 5,000–7,500 miles |
| Full Synthetic | 7,500–10,000+ miles |
Severe driving conditions shorten those intervals. If you do a lot of short trips under 5 miles, stop-and-go city driving, towing, or driving in extreme temperatures, change your oil more frequently.
If your car has an oil life monitoring system, pay attention to it. These systems calculate oil degradation based on actual driving conditions — they’re more accurate than a mileage sticker.
My Top Tips for a Cleaner, Faster Oil Change
These are things I do on every single change:
- Label your drain pan. Don’t accidentally use your oil drain pan for coolant flushes. Cross-contamination between fluids is a mess.
- Take a photo of the oil color before you drain it. Over time, you’ll learn to read oil condition by color and smell.
- Wipe down the fill area before removing the filler cap. Dirt that falls into the engine from the cap area causes real wear.
- Check the other fluids while you’re at it. I peek at coolant level, power steering fluid (if applicable), and brake fluid every time I do an oil change. Brake fluid absorbs moisture over time — if it looks dark brown, that’s a sign it needs flushing.
- Record the service. Note the date, mileage, oil brand, grade, and filter brand in a maintenance log. This matters for resale value and warranty claims.
Your First Oil Change Won’t Be Perfect — That’s Fine
The first one always takes longer. You’ll have to look up where the drain plug is. The filter might be in an awkward spot. You might spill a little. That’s all normal.
By your third oil change, you’ll have a system. You’ll know exactly what socket size you need, where the filter wrench needs to grab, and roughly how long to let it drain. It becomes second nature.
There’s something genuinely satisfying about knowing exactly what oil is in your engine and that the job was done right. That’s worth more than the money you save.
Now go get your hands dirty.
References
- Car and Driver — How to Change Your Oil in 7 Easy Steps (2024). caranddriver.com
- AMSOIL Blog — The DIY Oil Change: Avoid These 5 Common Mistakes. blog.amsoil.com
- BuyGreatOil.com — The 12 Most Common DIY Oil Change Mistakes (2020). buygreatoil.com
- MVD Express — Beginner’s Guide to At-Home Oil Change. mvdexpress.com
Related posts:
 The Ultimate Year-Round Car Maintenance Checklist: Oil, Brakes, Fluids & More
  Decoding Engine Codes: A Mechanic’s Practical Guide to Common OBD-II Faults
  The Science of Car Audio Tuning: Why Your Speakers Sound Off (And How to Fix It)
  Top 10 Performance Upgrades for Your Car: Boost Horsepower and Handling
Leave a Reply