Every time you press that brake pedal, you’re trusting a column of liquid to stop thousands of pounds of rolling steel. It sounds dramatic, but it’s literally how hydraulic brakes work. The pressure from your foot travels through fluid in a sealed system, all the way out to the brake pads at each wheel. No fluid pressure, no stopping power.
I’ve seen cars come into my garage with brake pedals that sink halfway to the floor before anything happens. Nine times out of ten, the fluid is either too low or completely waterlogged. The whole inspection takes 60 seconds. It belongs on your quarterly checklist right next to tire pressure.
🛑 The Invisible Lifeline: Why Brake Fluid Quality Actually Matters
Brake fluid is hygroscopic — it absorbs moisture from the surrounding air over time. As it soaks up water, two things happen. Its boiling point drops, which means under heavy braking it can vaporize and create air bubbles in your lines. Air compresses; fluid doesn’t. That’s when your pedal goes soft and spongy.
A fully saturated system can also rust your brake lines from the inside out and destroy the expensive ABS (Anti-lock Braking System) pump. Fluid is cheap; replacing an ABS module is a $1,500 nightmare.
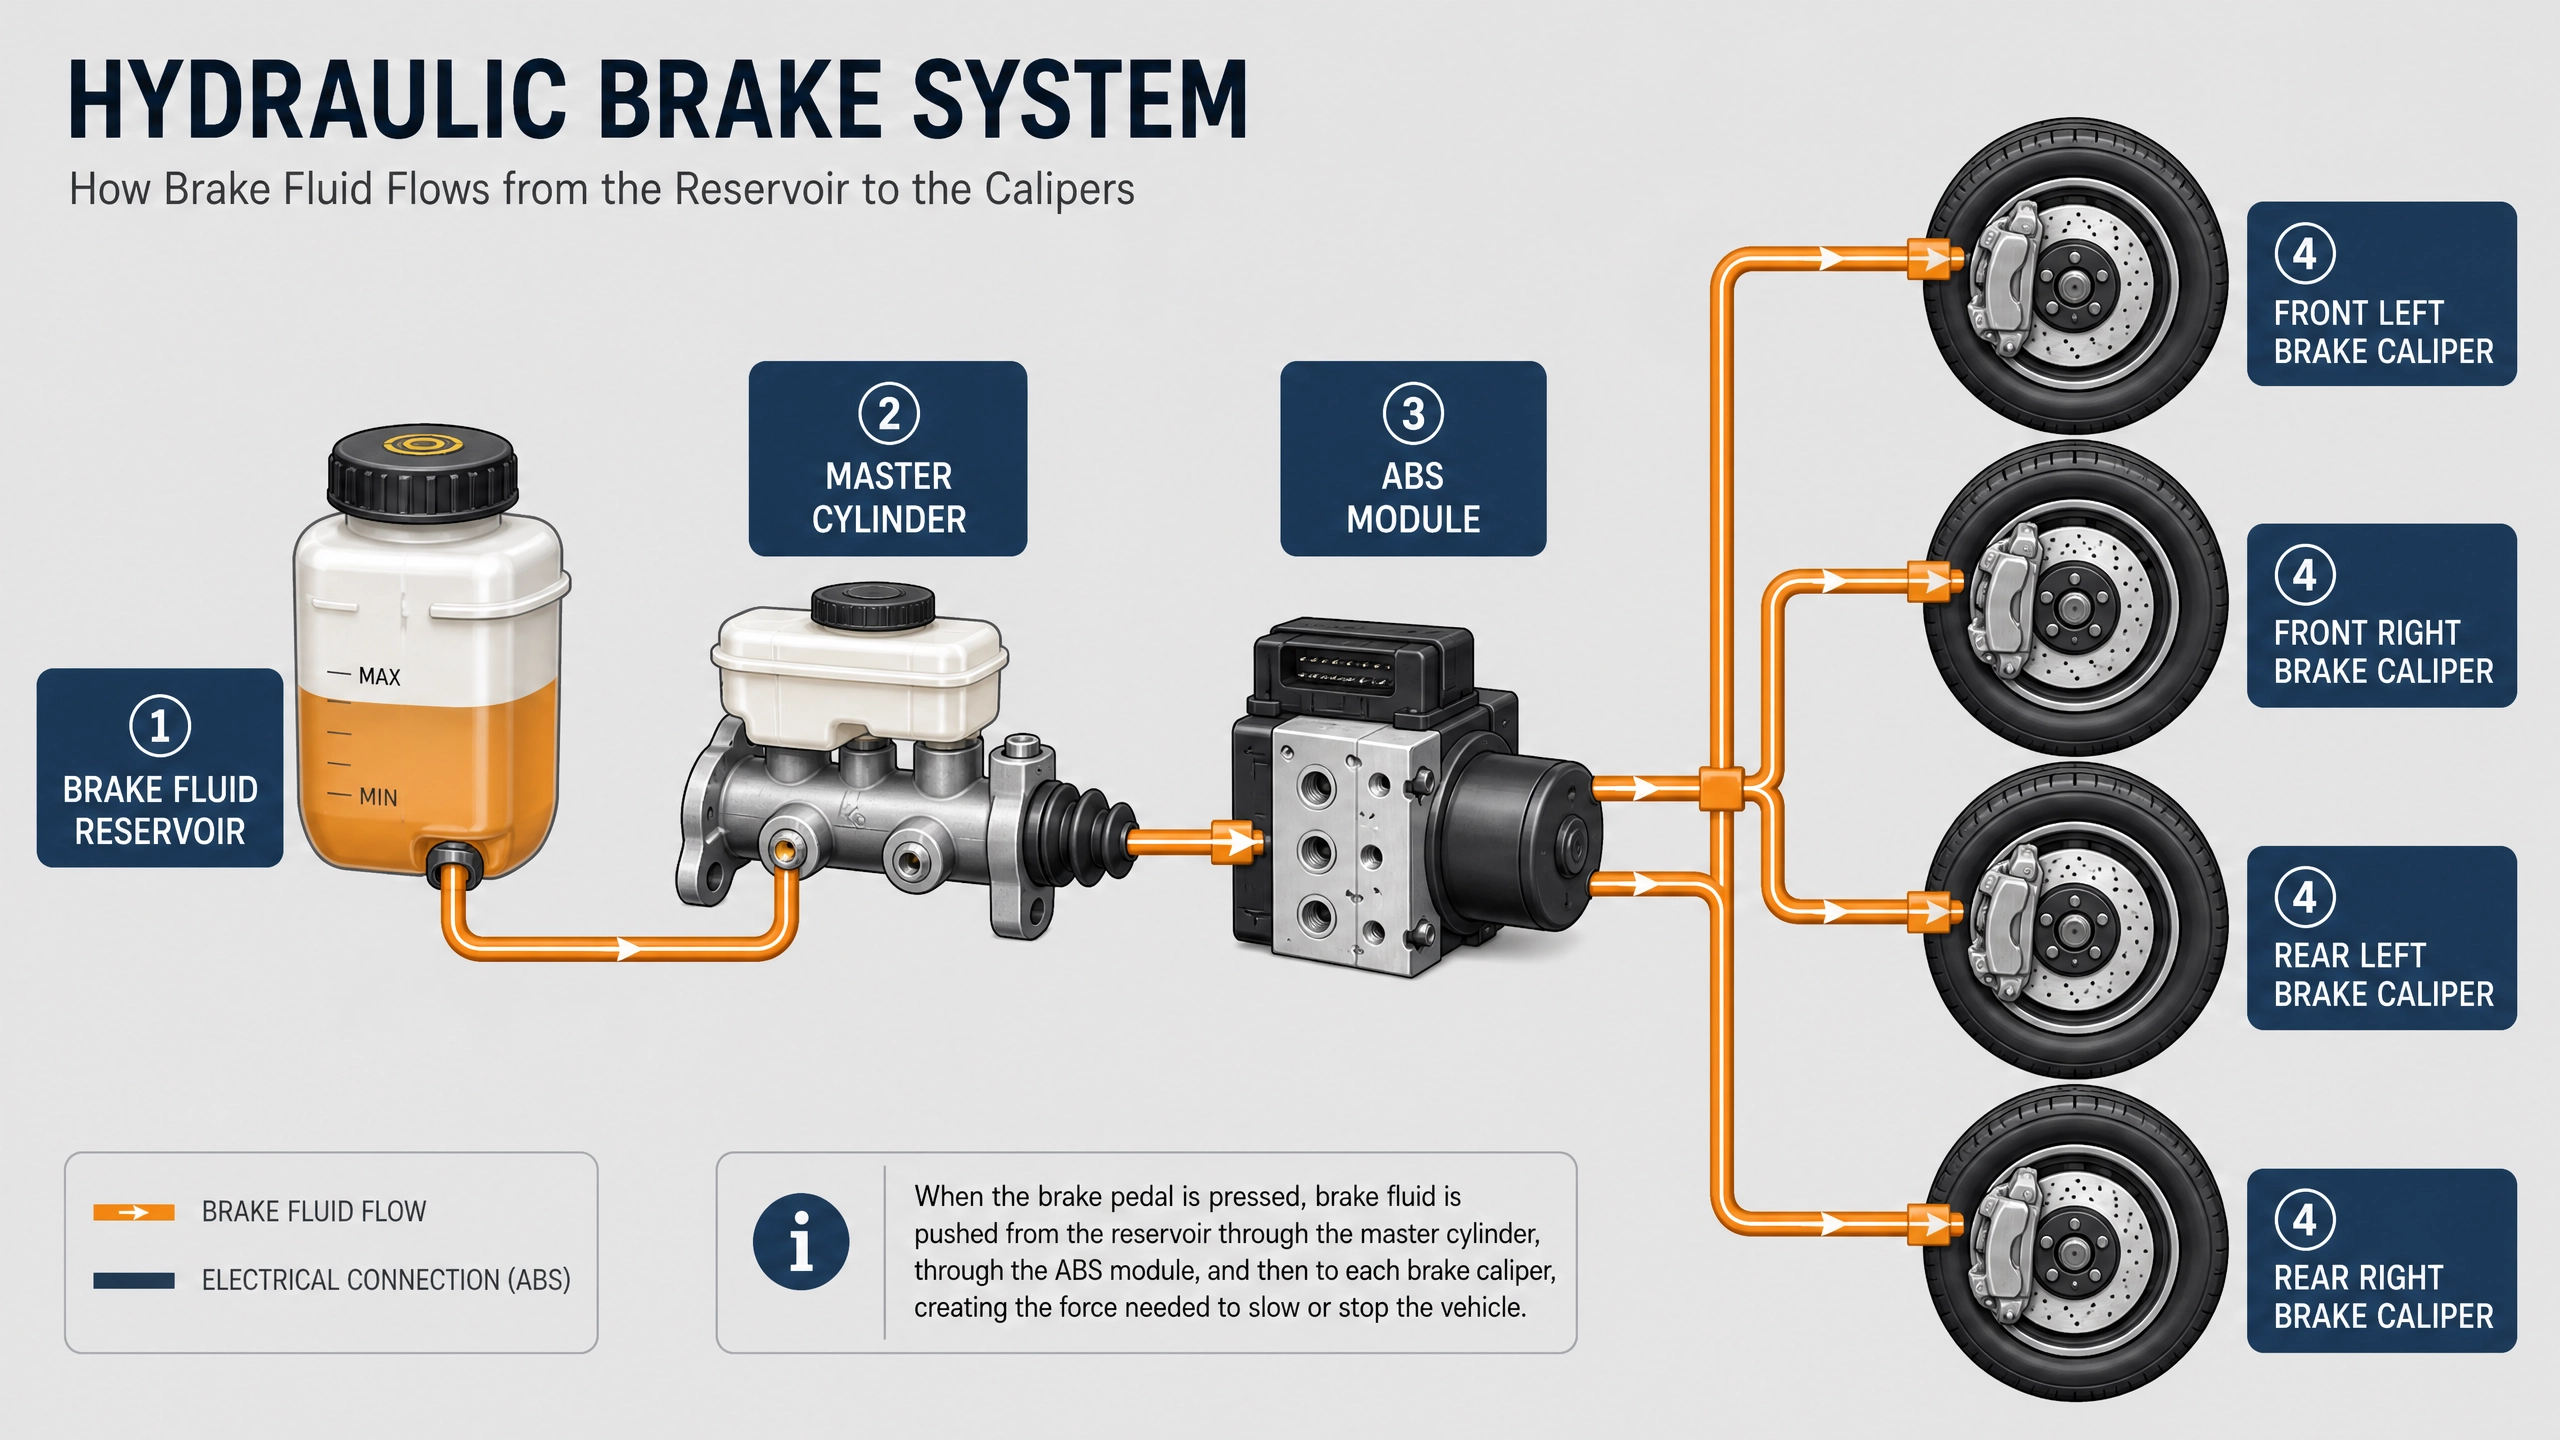
Fig. 1 — The closed hydraulic brake system. Fluid contamination upstream affects braking at all four corners.
⚠️ CRITICAL SHOP WARNING: It’s Literally a Chemical Paint Stripper
STOP — Read This Before You Open Anything
Glycol-based brake fluid (DOT 3, DOT 4, and DOT 5.1) acts exactly like an industrial chemical paint stripper on your car’s body panels. A single droplet landing on your painted fender will eat through the clear coat, primer, and right down to bare metal — in minutes. This is not an exaggeration. I’ve watched it happen.
Before you even pick up the bottle, tuck a clean shop rag under the mouth of the reservoir cap while pouring. Keep another one handy. Better yet, have a garden hose or a bucket of water within arm’s reach. The instant you see a drip on painted metal, flood it with water immediately and wipe it away. Waiting to finish what you’re doing first is how you end up with a $400 paint touch-up bill.
I keep a dedicated 1-liter spray bottle of plain water clipped to my toolbox whenever I’m doing any brake work. Costs nothing. Saves a lot of heartache.
🔍 Step 1: Locating and Reading the Master Cylinder Reservoir
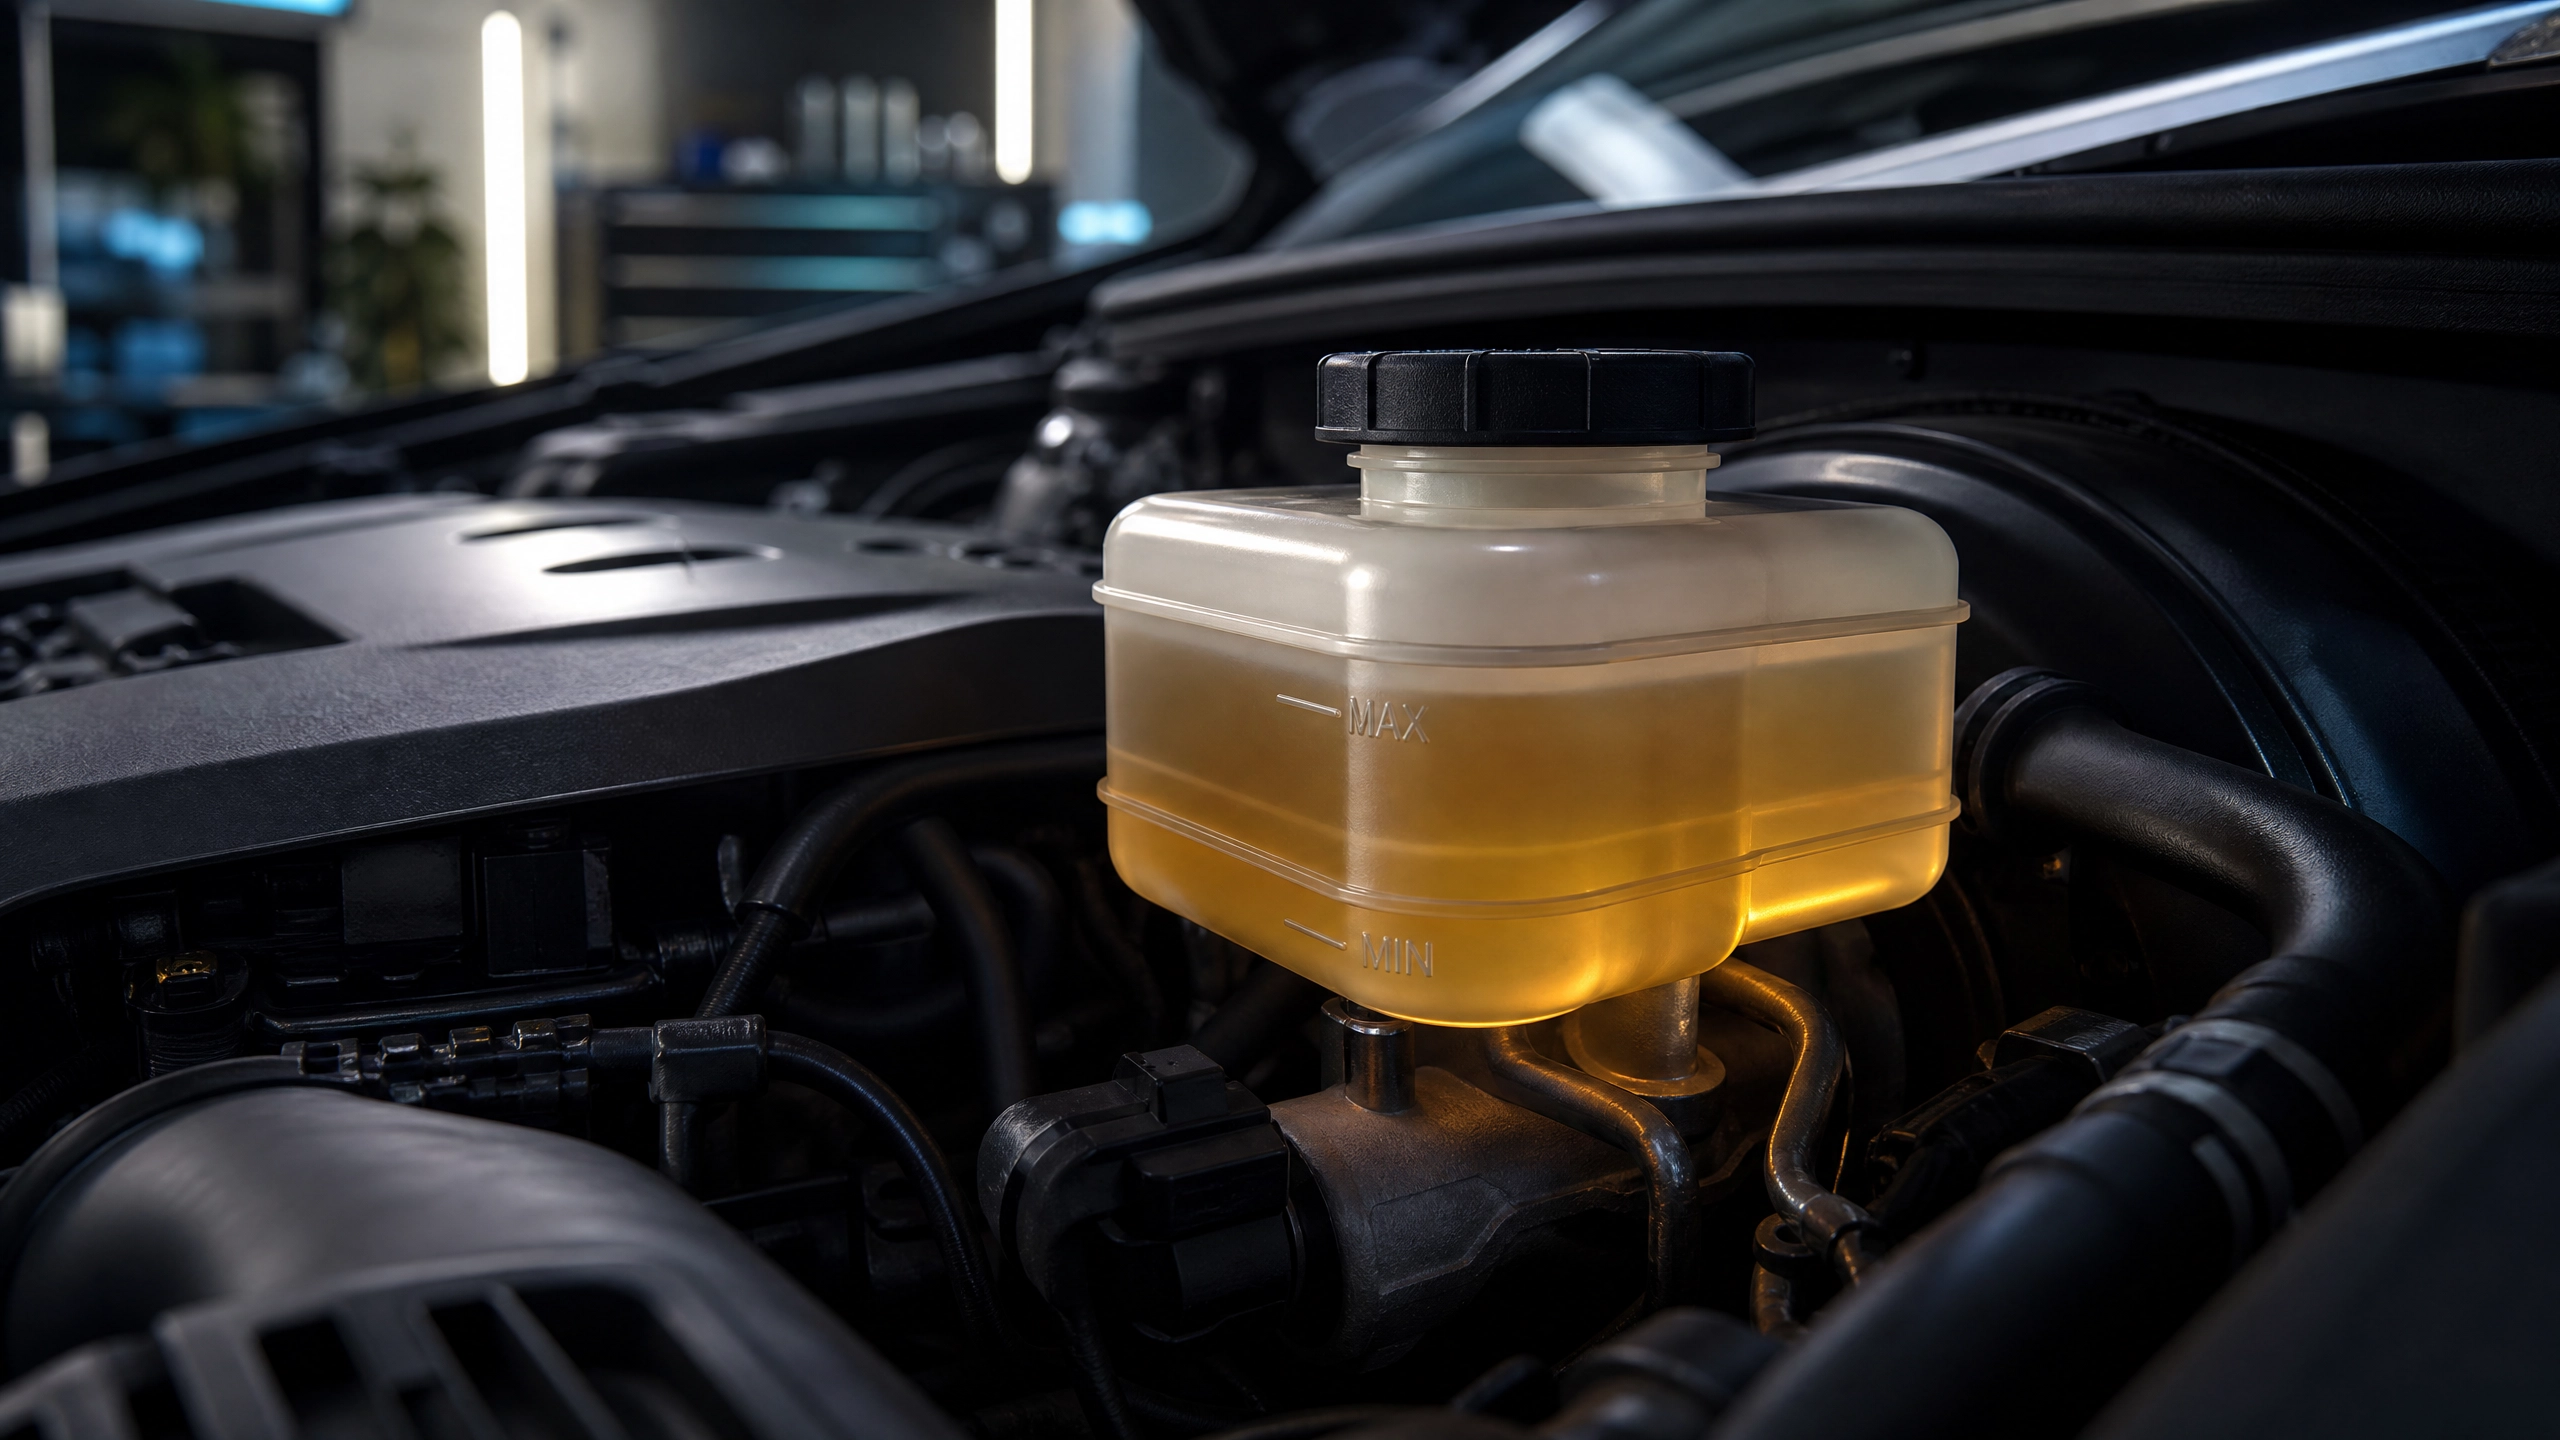
Pop your hood and look toward the driver’s side firewall — the vertical wall at the back of the engine bay closest to the windshield. You’re looking for a small translucent plastic tank sitting directly on top of the brake booster (the large circular canister the size of a dinner plate).
- Find the reservoir. It’s smaller than you expect — about the size of a coffee mug. It will have a cap that’s often stamped with the DOT rating or a brake symbol. On most Japanese and American vehicles it sits dead center on the driver’s side firewall. On some European cars it’s offset slightly toward the passenger side.
- Read through the plastic — do NOT open the cap yet. Look at the side walls of the reservoir for the molded “Min” and “Max” lines. The fluid level should sit somewhere between these two marks. You don’t need to open the cap to read the level.
- Check the color. Fresh brake fluid looks clear to very light amber — almost like pale white wine. As fluid ages and absorbs moisture and road grime, it darkens. Cloudy yellow means it’s picking up moisture. Dark brown means it’s been in there too long. Black or near-black, like the bottom of a coffee cup? That fluid is completely contaminated, and topping it off won’t fix a thing. The whole system needs a flush.
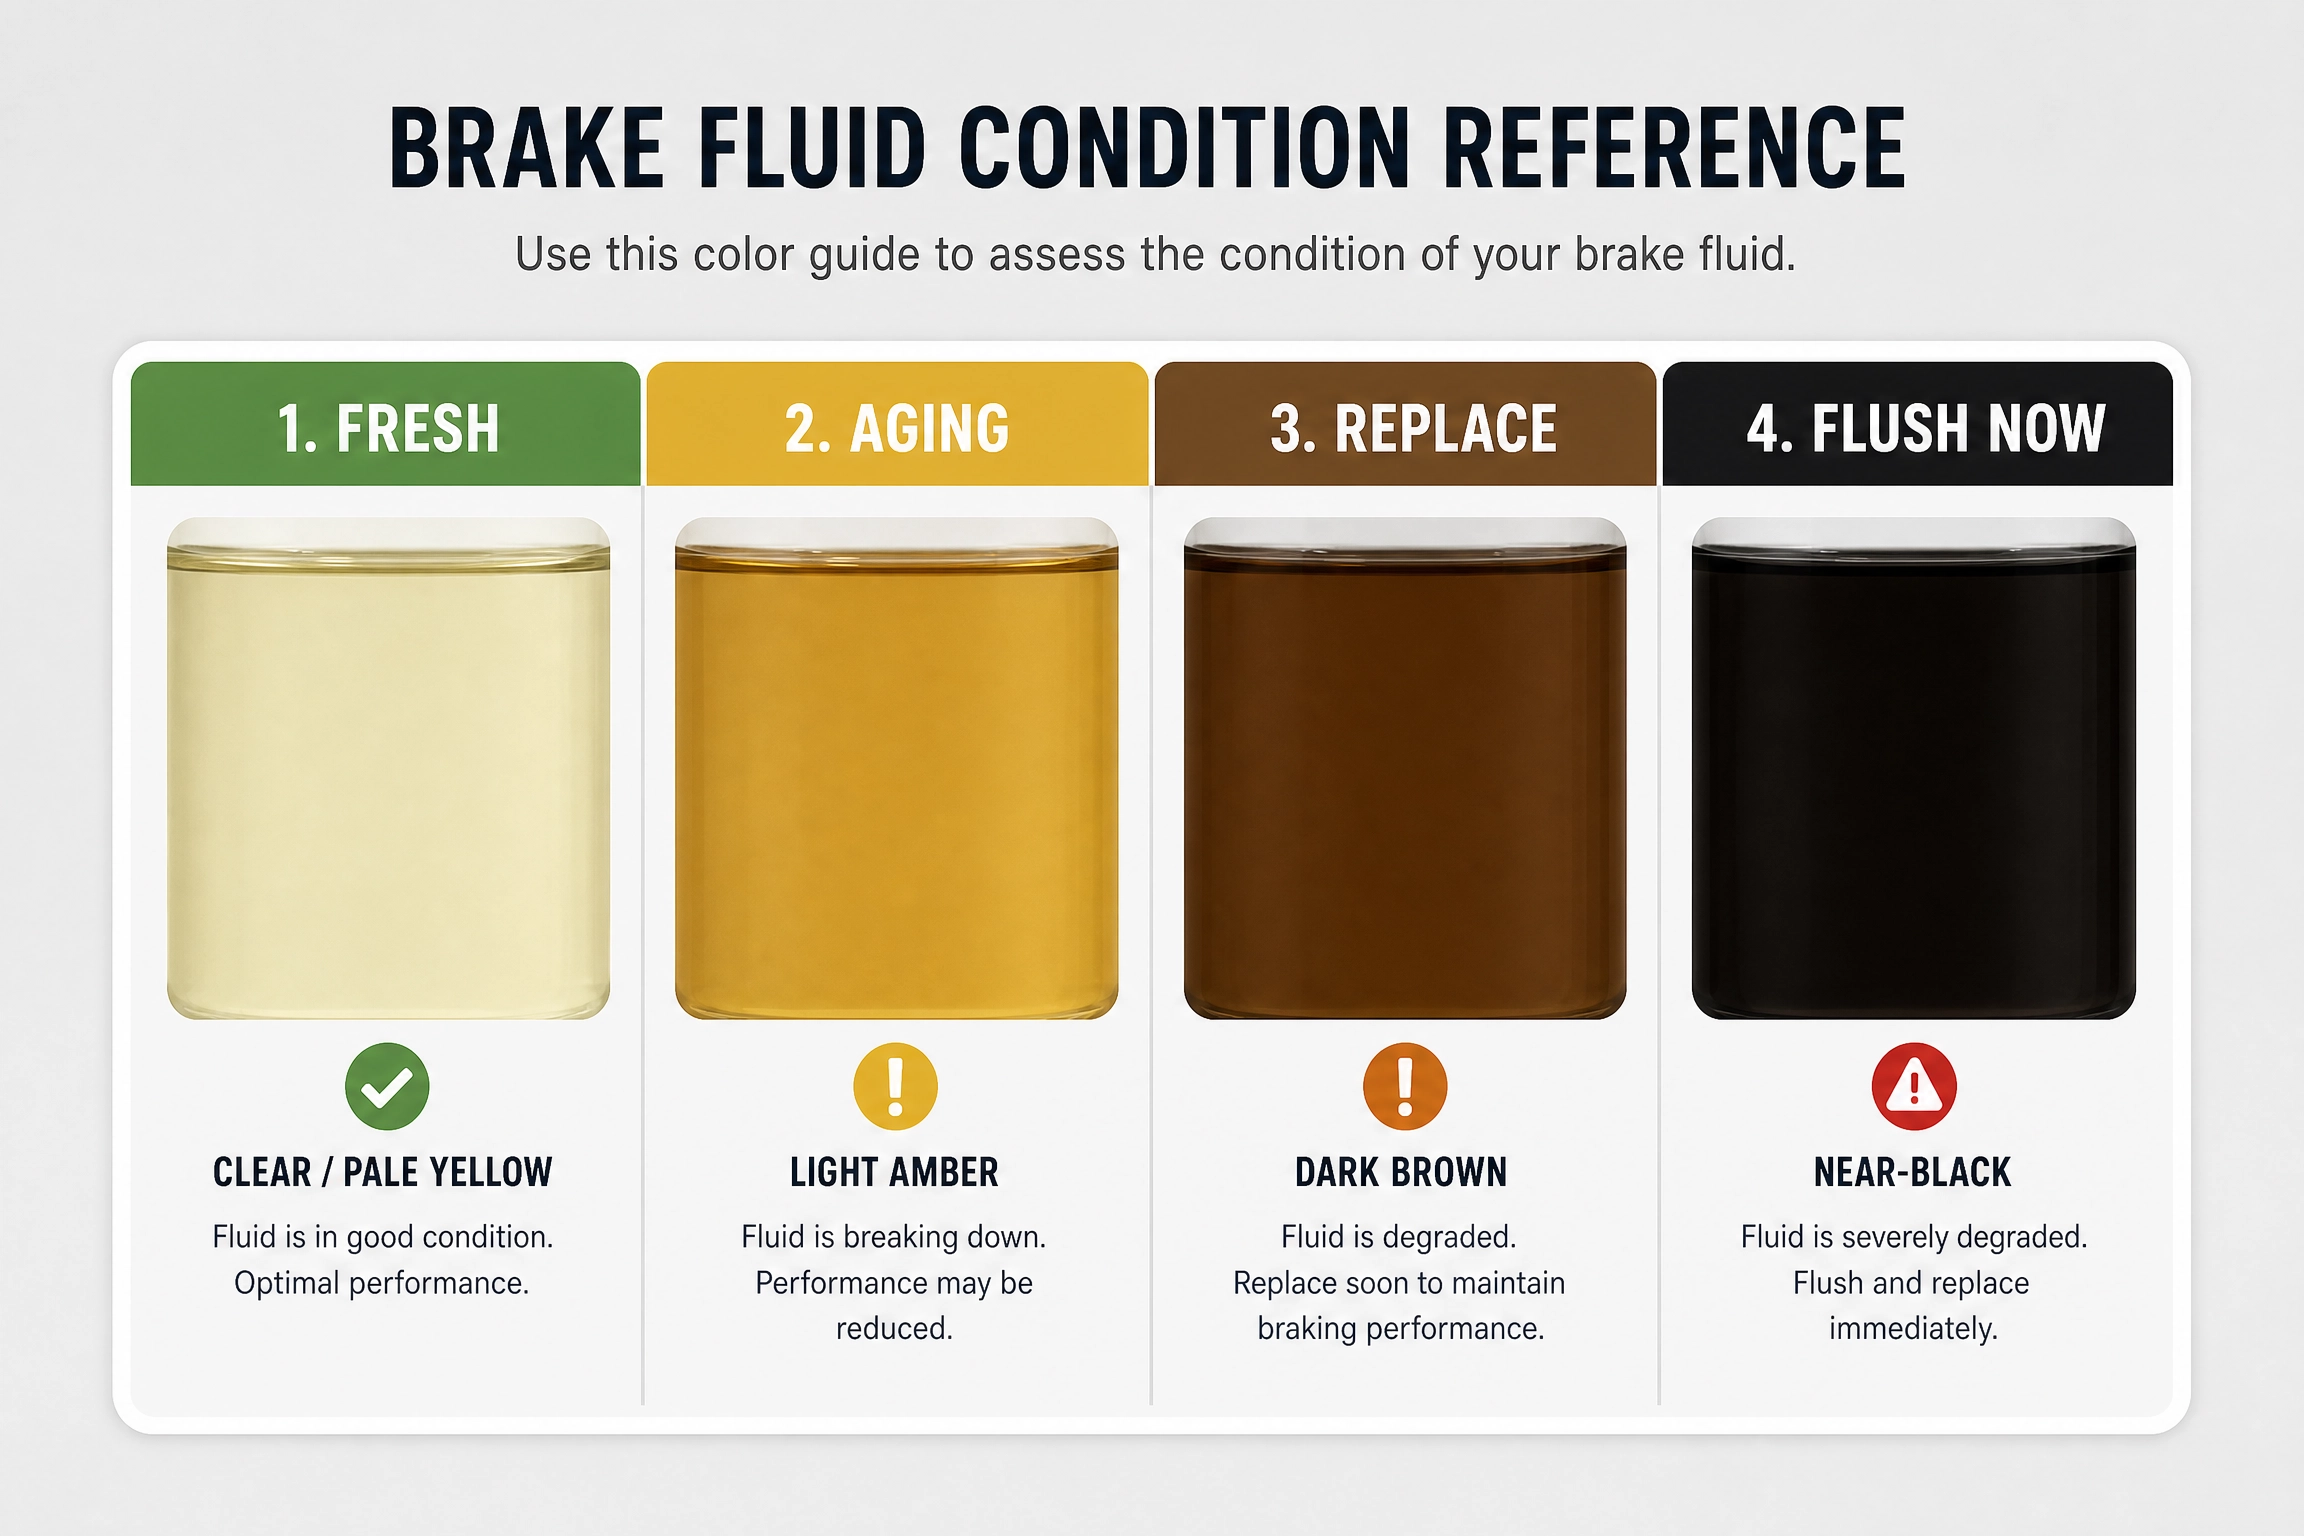
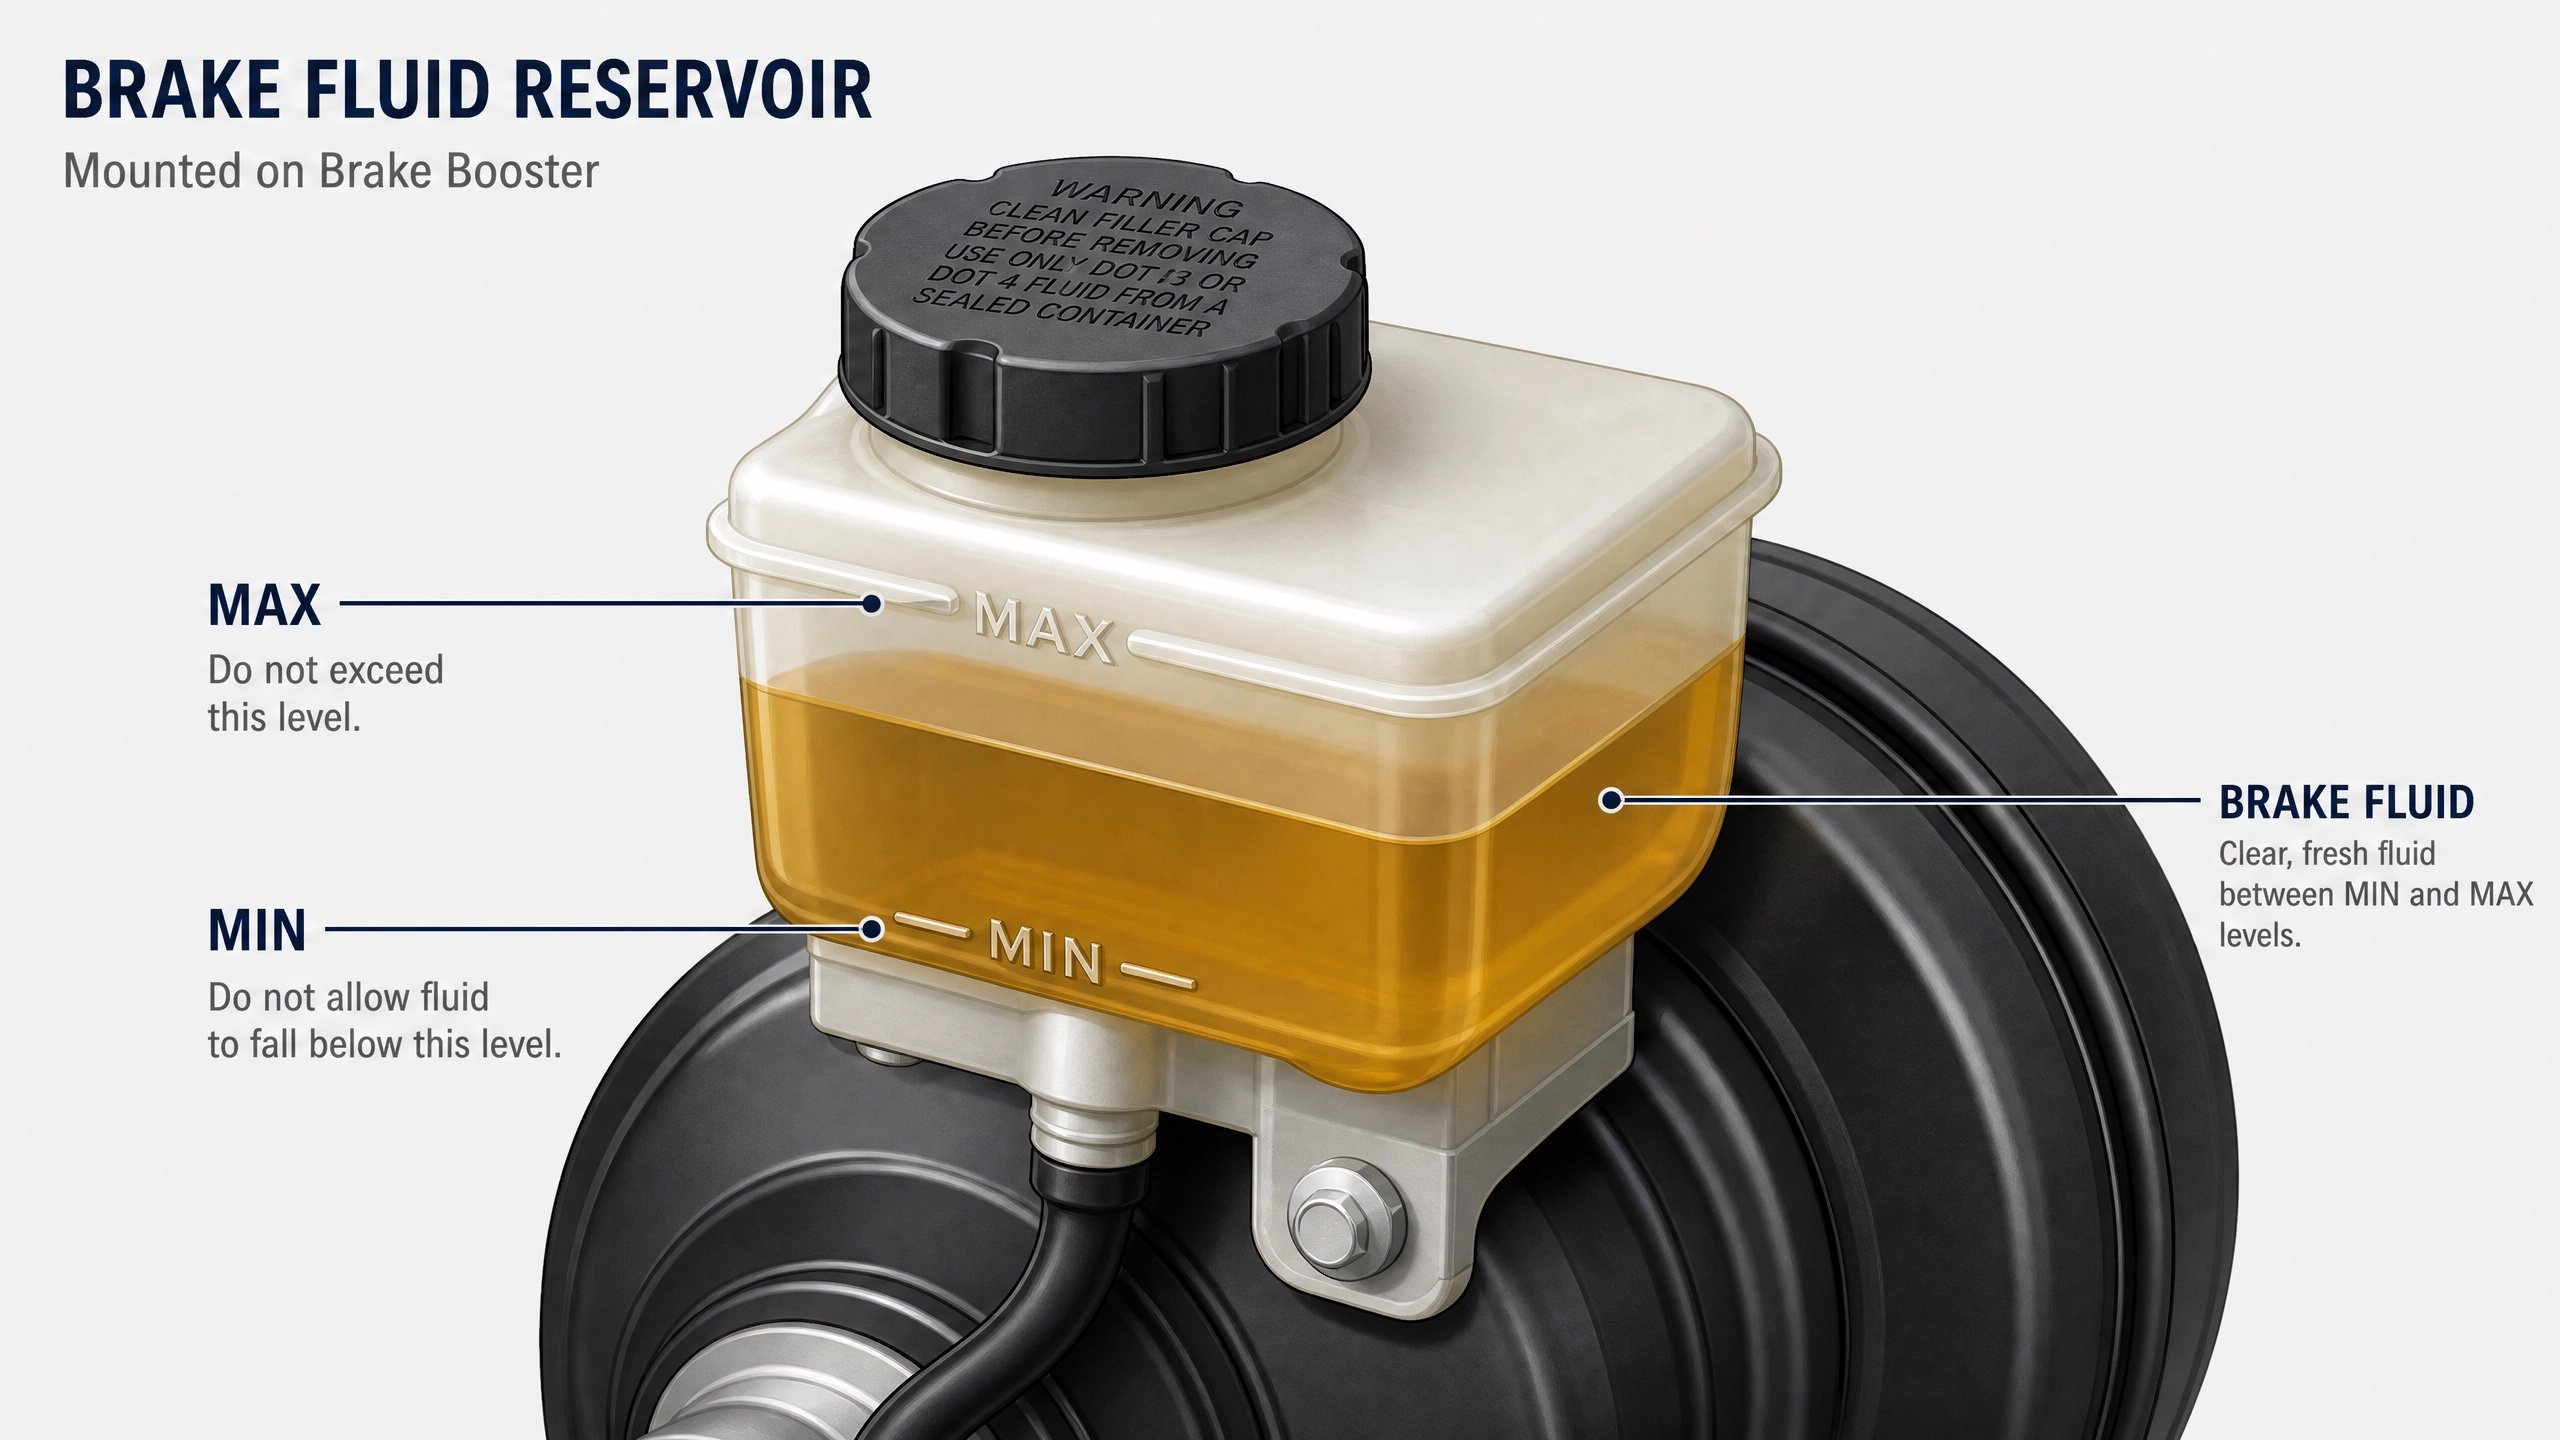
Fig. 2 — The brake fluid reservoir sitting on top of the brake booster. Note the “Min” and “Max” level markers on the translucent plastic wall.
🛑 The Golden Rule: Cleanliness Is Literally Everything
Modern anti-lock braking systems are marvels of precision engineering. They contain tiny solenoid valves that open and close dozens of times per second. Those valves have passages measured in fractions of a millimeter.
This is why dirt is the enemy. Before you ever twist that reservoir cap off, scrub the entire cap and the plastic neck around it with a clean shop rag. I use a damp microfiber cloth first, then a dry one. Get into the groove around the cap’s edge. Remove every visible speck of road grime, dust, and oil residue.
⚠ ABS DAMAGE WARNING
A single grain of sand falling into the open reservoir can migrate into your ABS hydraulic control module. Replacing a damaged ABS module typically costs $800–$2,500 at a dealership, plus labor. The 20-second wipe-down is not optional.
- Use a clean, lint-free shop rag — not a greasy one from the tool chest
- Wipe the top of the cap, the sides, and the full lip where it meets the tank
- If it’s particularly grimy, use a small parts cleaning brush to get into the threads
- Only remove the cap in a clean environment — not directly under a dusty air filter
- Replace the cap immediately after topping off; don’t let the reservoir sit open
🧴 Step 2: Topping Off Without Making a Mess
- 1. Match the DOT rating — this is non-negotiable. Look at the top of your reservoir cap. It will be stamped with a DOT rating (usually DOT 3 or DOT 4). Use only that exact rating or higher — never mix glycol-based fluids (DOT 3, 4, 5.1) with silicone-based DOT 5. The two are completely incompatible and will turn into a thick, rubbery sludge that destroys your seals and clogs your ABS module. Most everyday cars use DOT 3 or DOT 4. Performance and European vehicles often require DOT 4 or DOT 5.1.
- 2. Use a factory-sealed bottle — opened bottles are suspect. Remember that hygroscopic property? It applies to the bottle too. If a bottle of brake fluid has been sitting open on your garage shelf since last winter, it has already absorbed ambient moisture and is compromised. I use fresh, sealed bottles every time and dispose of any leftover fluid that same day rather than resealing it. A quart bottle of DOT 4 costs about $6. That’s cheap insurance.
- 3. Pour slowly and stop at Max. Tuck a shop rag around the base of the reservoir neck before you start pouring — it catches any drips before they hit the engine or bodywork. Fill slowly. The target is the “Max” line, not above it. Overfilling creates pressure problems when the fluid expands from braking heat. Once you hit Max, screw the cap back on until you feel it click or seat firmly.
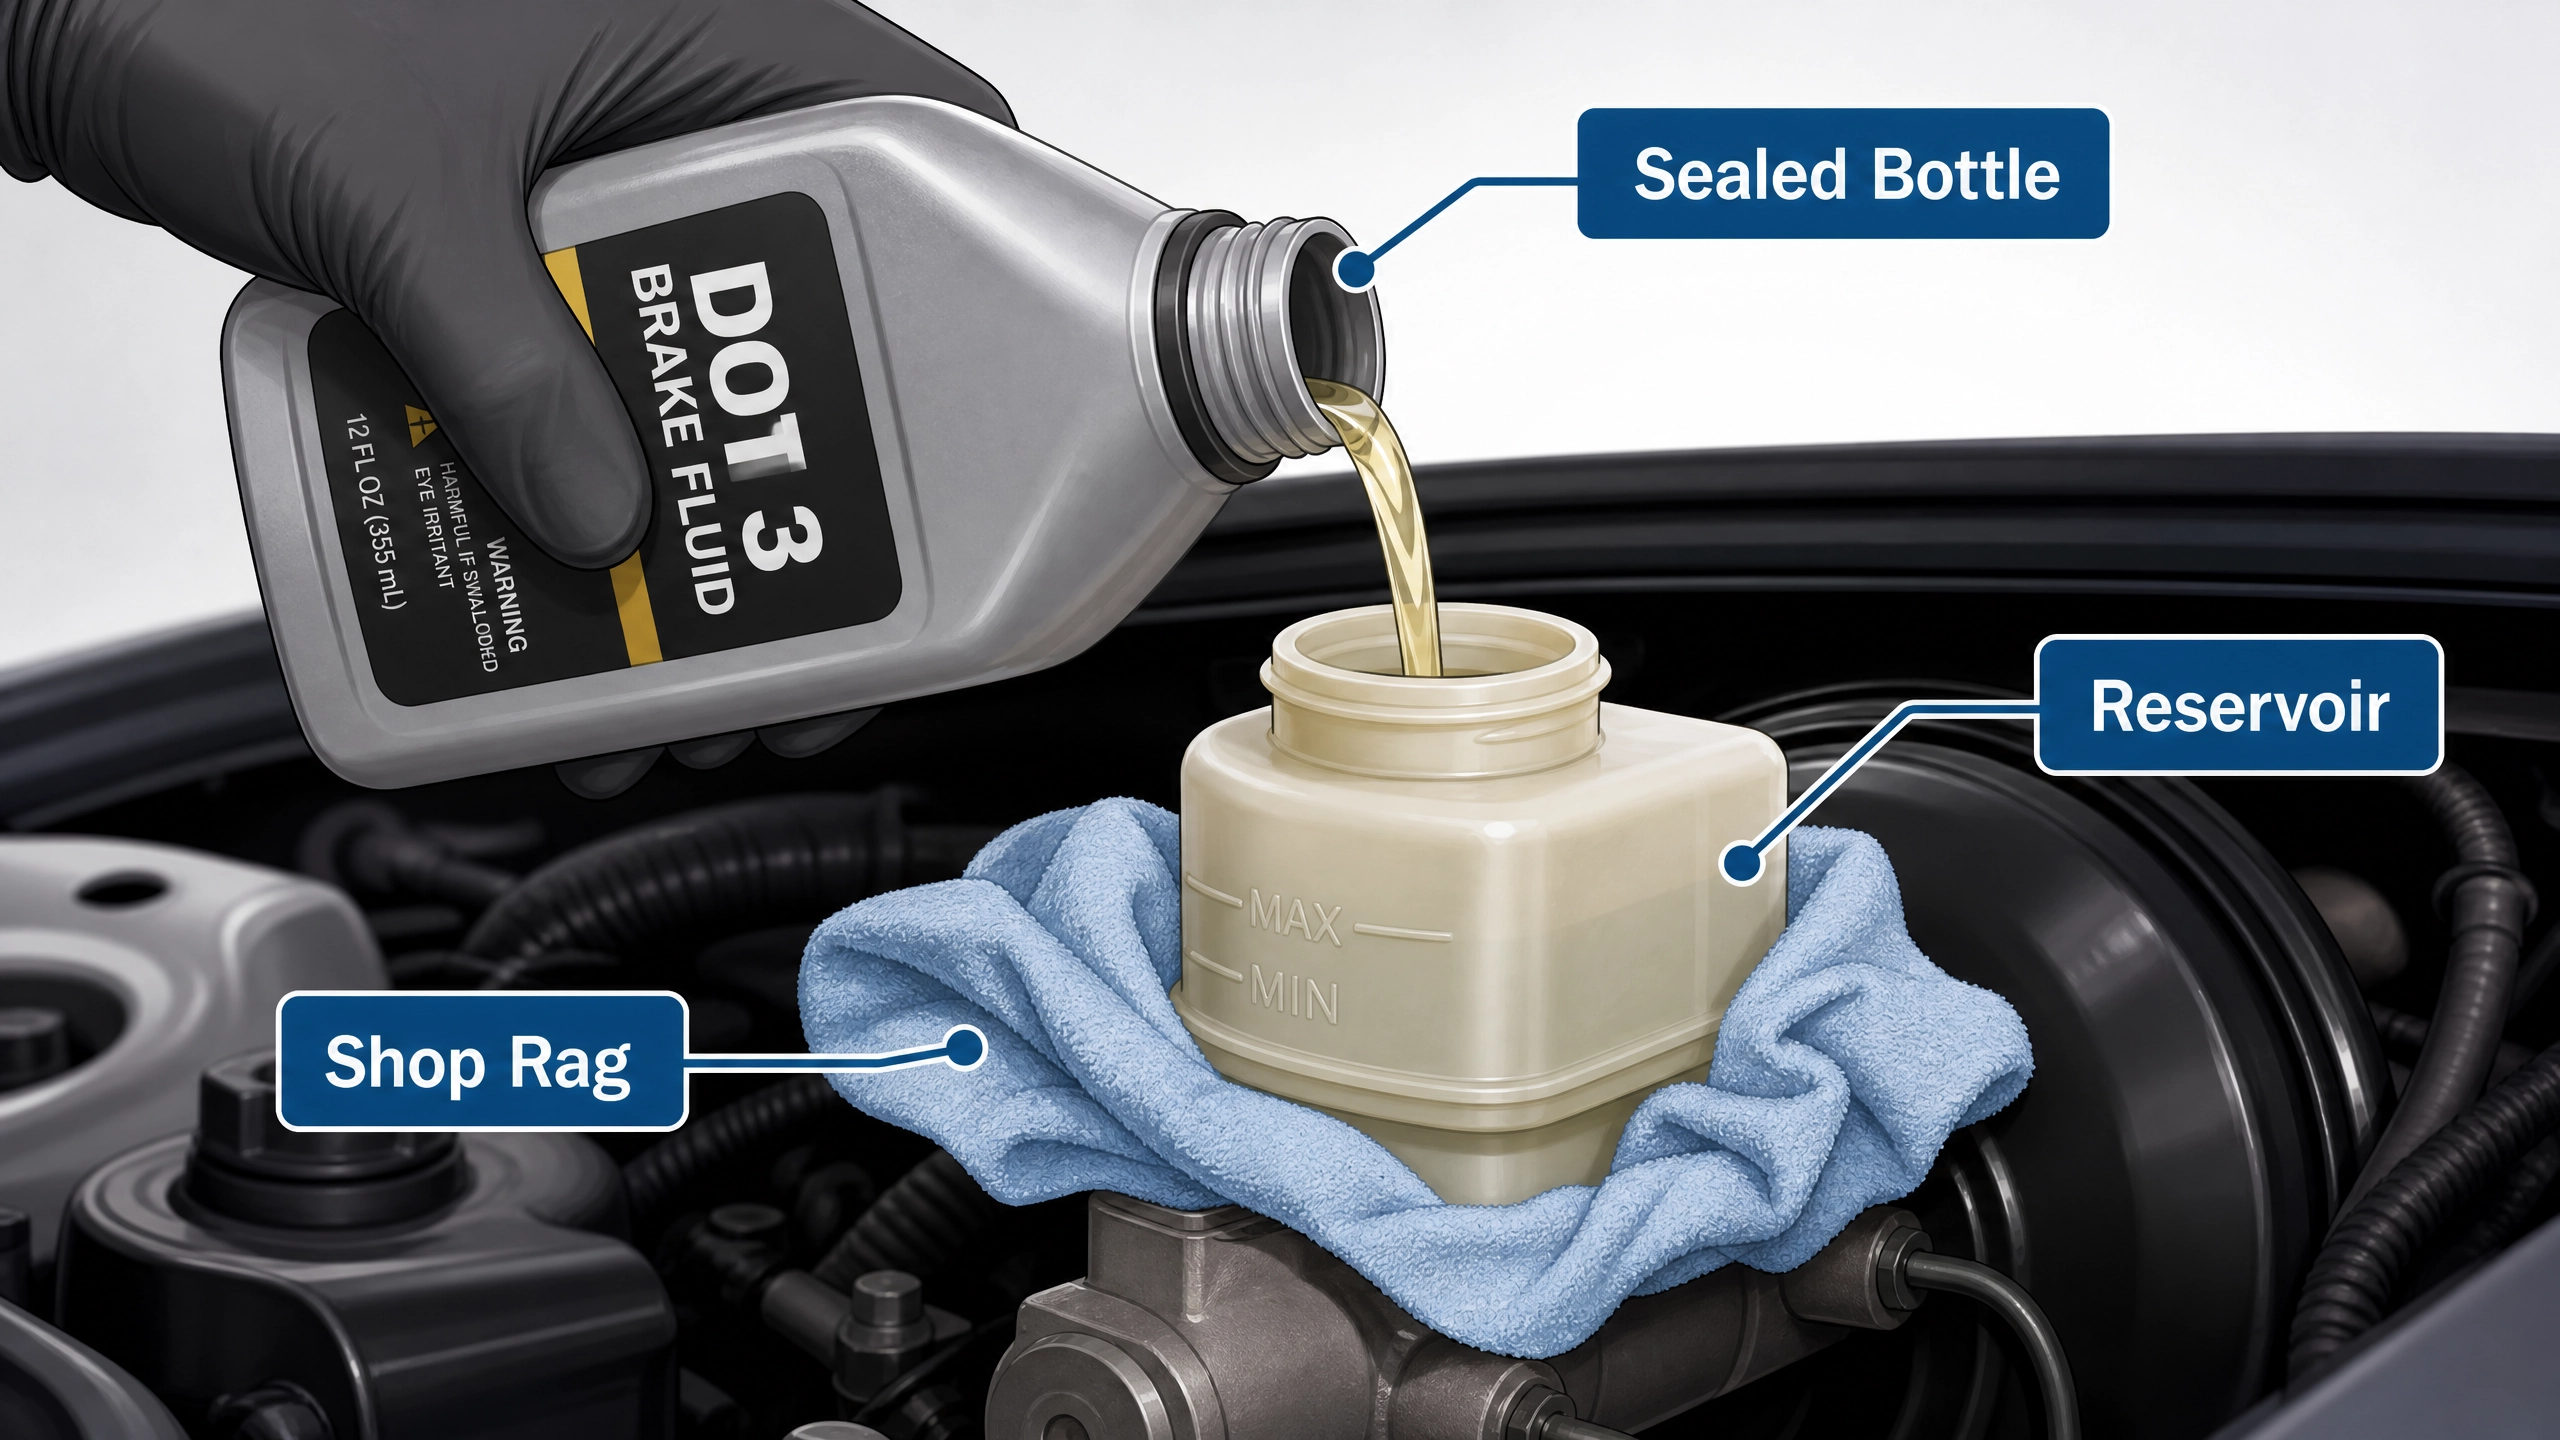
Fig. 3 — Always tuck a shop rag under the reservoir neck before pouring and stop filling exactly at the Max line.
📊 Quick Brake Fluid Reference Matrix
Print this and tape it inside your garage. It covers everything you might see when you look into that reservoir.

Fig. 4 — DOT 5 is silicone-based and completely incompatible with all glycol-based fluids. Mixing the two causes catastrophic seal failure.
When Topping Off Isn’t Enough: The Case for a Full Flush
If your fluid is dark brown or blacker than that, adding fresh fluid on top is like pouring clean oil into a dirty engine — it mixes with the contamination immediately and doesn’t help. The only fix is a complete bleed: pushing fresh fluid through every bleed nipple at all four calipers until clear, clean fluid runs through.
You’ll need a 8mm or 10mm flare wrench (not an open-end wrench — you’ll round the nipple), a clear drain hose, a catch bottle, and a helper to pump the pedal. Or invest in a one-person bleeder kit with a vacuum pump. Either way, it’s a two-hour job for a first-timer but a 45-minute job once you’ve done it once.
Simple Brake Fluid Health Checker Tool
🔧 Brake Fluid Health Checker Tool
Answer four quick questions and get a specific recommendation for your situation.
Source: How to Check Brake Fluid — CarsRevamp · By Alex Mercer, ASE Master Technician
✅ Alex’s Shop Rule:
I flush brake fluid every two years on every vehicle I service, regardless of color. Fluid is cheap. ABS modules, calipers, and paint repairs are not. Two years is the sweet spot for most daily drivers — drop it to one year for anything used on track.
Check your brake fluid this weekend. It takes 60 seconds and it might be the most important 60 seconds of maintenance you do all year.
Related posts:
 Winter Car Preparation Guide: Essential Cold-Weather Maintenance Tips
 Ultimate Guide to Car Audio System Upgrades: From Basics to Audiophile Bliss
 Brake Fluid Breakdown: Understanding DOT Ratings and When to Bleed Your Braking System
 Why Is Your Car Leaking Clear Fluid? (How to Identify 5 Common Leaks)
Leave a Reply