
The Engine Misery: Why Spark Plugs Matter
You’re sitting at a red light and the whole dashboard starts to shake. The idle feels rough, almost like the engine is coughing.
Then the light turns green. You hit the gas to merge onto the highway, and instead of pulling forward smoothly, the car stutters. It feels like someone is tapping the brakes for you.
I’ve had this exact moment happen to me in three different cars over the years. Every single time, the cause was sitting right there under the coil packs the whole time.
Spark plugs live a brutal life. Each one fires up to a few thousand times a minute, blasting through temperatures north of 2,000 degrees Fahrenheit, then cooling right back down a split second later. They do this for tens of thousands of miles without complaint, until one day they don’t.
Here’s the good part. Checking your spark plugs yourself is one of the easiest wins in home car care. It takes maybe 45 minutes, a handful of basic tools, and zero special training. I’ve walked total beginners through this in my own driveway, and they walked away knowing more about their engine than most people learn in a decade of just driving the thing.
Skip the $150 diagnostic fee. Let’s get your hands dirty instead.
The Shop Tools You Need Before You Start
Nothing kills momentum faster than getting halfway into a job and realizing you’re missing a tool. I learned that lesson the hard way on a Saturday morning, flat on my back under a Civic, with a parts store that didn’t open for another hour.
Grab these before you pop the hood:
- A standard 3/8-inch drive ratchet. This is your everyday workhorse. Nothing fancy needed here.
- A dedicated spark plug socket, either 5/8-inch or 9/16-inch depending on your plug size. These sockets have a rubber insert built into the inside wall. That rubber grips the ceramic insulator and keeps the fragile plug from rattling loose and cracking while you pull it out.
- A long extension bar, at least 6 inches. Modern engines tuck spark plugs deep down inside narrow tubes in the cylinder head. A short extension just won’t reach.
- A wire-style feeler gauge. Skip the cheap round coin-style gapper they sell at the gas station counter. I’ll explain exactly why that thing is dangerous to your plugs in a minute.
You’ll also want a shop rag or two, some compressed air or a small shop vac, and a torque wrench for the reinstall. If you don’t own a torque wrench yet, this is the job that justifies buying one.
Step-by-Step: How to Safely Remove a Spark Plug
Once you’ve got your tools laid out on a clean rag, here’s how I walk through every plug, one cylinder at a time.
1. Wait for a cold engine.
Never touch a hot aluminum cylinder head. Aluminum expands when it’s hot, and the threads holding your spark plugs in are softer than the plug itself. Crank on a hot plug and you risk stripping those threads right out of the head. That turns a 45-minute job into a head-off repair bill. Let the car sit overnight, or at minimum let it cool for a couple of hours.
2. Clear the tubes first.
This step gets skipped more than any other, and it’s the one that bites people hardest. Before you touch the spark plug, blast compressed air or run a shop vac nozzle down into that spark plug tube to clear out dirt, leaves, and pebbles.
Here’s why this matters so much. The second you crack that plug loose, any grit sitting on top of it falls straight down into your open cylinder. That debris will scratch your cylinder walls and chew up your piston rings. I’ve seen a single tube full of driveway dust turn into a compression problem six months later.
3. Disconnect the coil.
Unplug the wiring harness connector first — it usually has a small tab you squeeze to release it. Then remove the single 10mm bolt holding the ignition coil to the head. Pull the coil straight up and off. Don’t twist it or yank sideways; the boot inside can tear.
4. Unscrew the plug gently.
Drop your spark plug socket down the tube and feel it seat onto the plug’s hex. Keep your extension bar perfectly straight, in line with the tube, while you break it loose counterclockwise. Angle that extension even slightly and you risk snapping the ceramic insulator clean off inside the tube — and then you’re fishing for broken ceramic with a magnet, which is no fun at all.
Once it’s loose, finish backing it out by hand-spinning the socket the rest of the way. Pull it straight up and out.
How to “Read” a Spark Plug Tip Like a Pro
Here’s where the real diagnostic work happens. The firing tip of a spark plug is basically a little black box recorder for what’s been happening inside that cylinder. Old-timers at every shop I’ve worked in could glance at a used plug and tell you what was wrong with the engine before they even hooked up a scan tool.
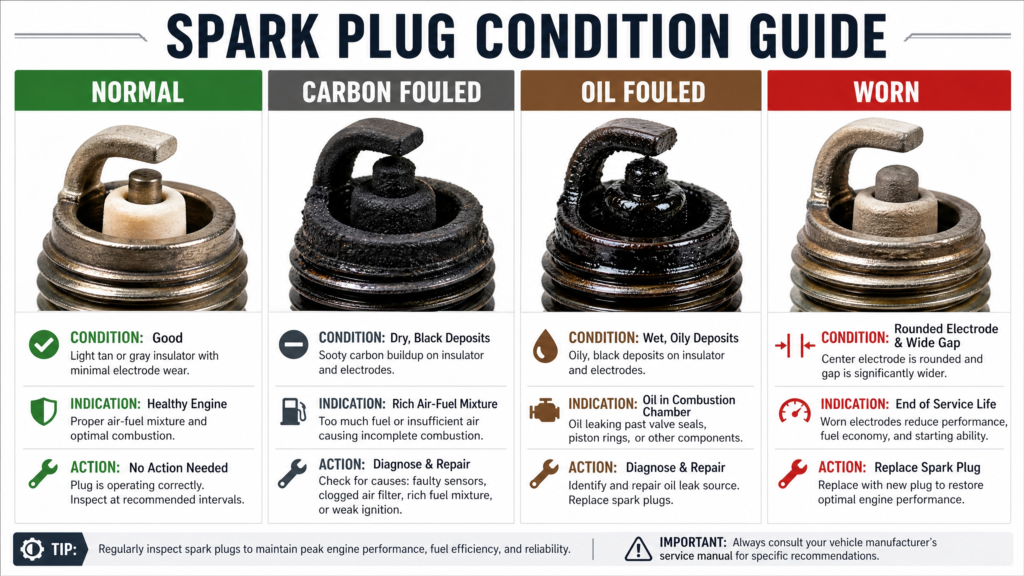
Scenario 1: Healthy. The tip shows a light gray or tan powdery deposit, and the electrode edges still look sharp and clean. This is what you want to see. It means your air-fuel mixture and ignition timing are doing their job correctly.
Scenario 2: Carbon fouled. The tip is coated in a dry, dull black soot, almost like a candle that’s been burning indoors too long. This usually points to the engine running “too rich,” meaning too much fuel and not enough air. It can also mean the spark itself is too weak to fully ignite the mixture, so unburned fuel just bakes onto the tip instead.
Scenario 3: Oil fouled. The tip looks wet, greasy, and is covered in a thick black film that looks more like oil than soot, because it is oil. This tells you engine oil is sneaking past worn piston rings or hardened valve stem seals and burning inside the combustion chamber. A new plug will run clean for a little while, but it’ll foul right back up until the oil leak gets fixed.
Scenario 4: Blistered or melted. The white ceramic insulator looks stark white or blistered, or the metal electrode itself looks like it partially melted. This is the scary one. It means the engine is running dangerously lean, or someone installed a plug with the wrong heat range for this engine. Either way, this needs attention before you drive the car hard again.
The Gap Rule: Keeping the Arc Precise
The spark plug gap is the tiny air space between the center electrode and the ground strap, where the actual spark jumps across. Get that distance wrong, and the spark either struggles to form or jumps weak and inconsistent.
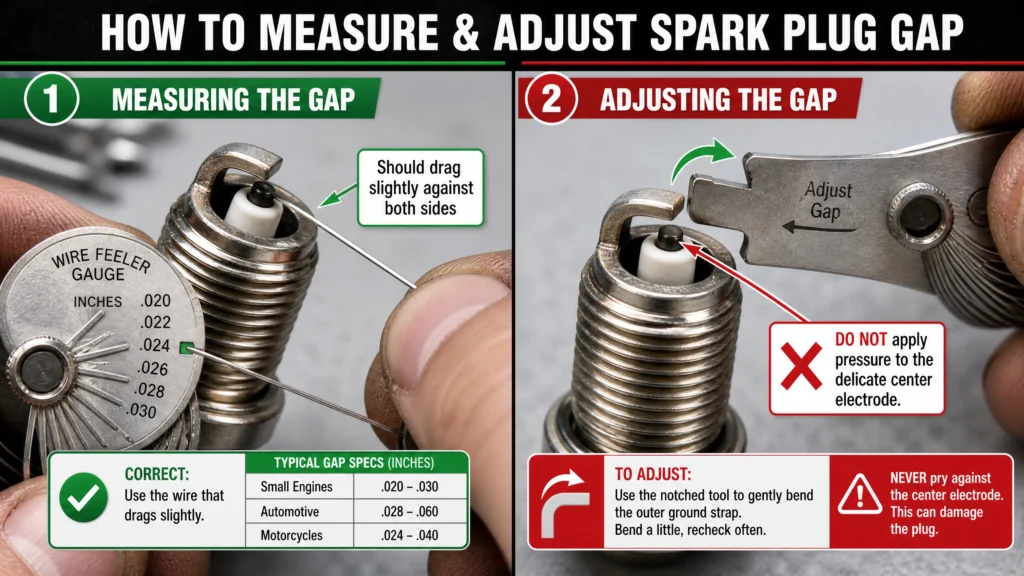
Ditch the coin gapper. Those cheap wedge-shaped tools you find hanging by the register at the gas station are built for old-school copper plugs from decades ago. Slide one of those wedges between the electrodes on a modern iridium or platinum plug, and you can snap that hair-thin, brittle firing tip right off. I’ve watched a brand new $14 plug get ruined in two seconds flat this way.
Use the wire gauge method instead. Slide the appropriate wire loop through the gap. It should drag slightly against both sides as it passes through, not fall through loose and not require force to push past. If the gap needs adjusting, use the small notched tool built into most wire gauges to gently bend the outer ground strap. Never apply pressure to the delicate center electrode itself — that’s the part that’s easiest to break.
Most plugs ship pre-gapped from the factory these days, but I still check every single one before it goes in. Takes thirty seconds and has saved me from chasing a misfire more than once.
Spark Plug Quick Diagnostic Tool
1. What does your spark plug tip look like?
2. Check your gap measurement
Reinstallation: Saving Your Cylinder Threads
Getting the old plug out is only half the job. How you put the new one back in matters just as much, maybe more.
- Thread it by hand first. Always start the new plug into the cylinder head using just your fingers on the socket and extension, no ratchet yet. Let the threads find their own path and spin freely for a few turns before you ever pick up a wrench. If you go straight in with a ratchet and cross-thread that plug, you’ll tear up the soft aluminum threads in the head itself. That’s a repair that involves a thread repair kit at best, or a new cylinder head at worst.
- Torque it to spec. Once it’s hand-tight and seated, switch to your torque wrench and click it down to the factory spec, typically somewhere in the 12 to 18 foot-pound range for most aluminum heads. Don’t eyeball this one. Over-tightening cracks the ceramic insulator just as easily as cross-threading does.
Spark Plug Torque Quick-Reference
Always check your factory manual first — these are typical ranges, not gospel
| Plug Type / Head Material | Torque Spec | Hand-Tighten Turn (after seat) |
|---|---|---|
| Aluminum head, gasket-seat plug | 12–18 ft-lb | 1/4 to 1/2 turn |
| Aluminum head, taper-seat plug | 7–15 ft-lb | 1/16 turn (snug only) |
| Cast-iron head, gasket-seat plug | 15–20 ft-lb | 1/2 turn |
| Small engine / lawn equipment | 9–11 ft-lb | 1/4 turn |
⚠ Over-torquing cracks the ceramic insulator and crushes the gasket seal.
Under-torquing lets the plug work loose and burns the threads from blow-by heat.
When in doubt, snug it by hand, then add only a partial wrench turn — not a full crank.
- Reconnect everything in reverse. Coil back down first, press it firmly until it clicks or seats fully, then reinstall that 10mm bolt and snug it down. Plug the wiring harness back in last, and listen for that little click that tells you it’s locked.
One more thing I always do before closing the hood: wipe down the area around each tube opening with a shop rag. Any leftover dirt or oil residue sitting near the coil boot can work its way down over time, and a clean seal area means a dry connection that lasts.
Do all four plugs the same way, one cylinder at a time, and resist the urge to pull every plug out at once before you start reinstalling. Keeping it to one cylinder at a time means there’s no chance of mixing up which coil or boot goes where, and your cylinders never sit wide open longer than they need to.
That’s the whole job. No lift, no scan tool, no trip to the shop. Just a cold engine, the right sockets, and a little patience with the threads.


Leave a Reply